

Open plan offices demand lighting that works as hard as your team does. Poor wafer downlight spacing wastes energy, creates shadows, and leaves employees squinting at their desks.
At PacLights, we’ve seen firsthand how the right spacing transforms an office from dim and uncomfortable to bright and productive. This guide walks you through the exact steps to get it right.
Why Wafer Downlights Win in Open Plan Offices
Superior Performance in Open Spaces
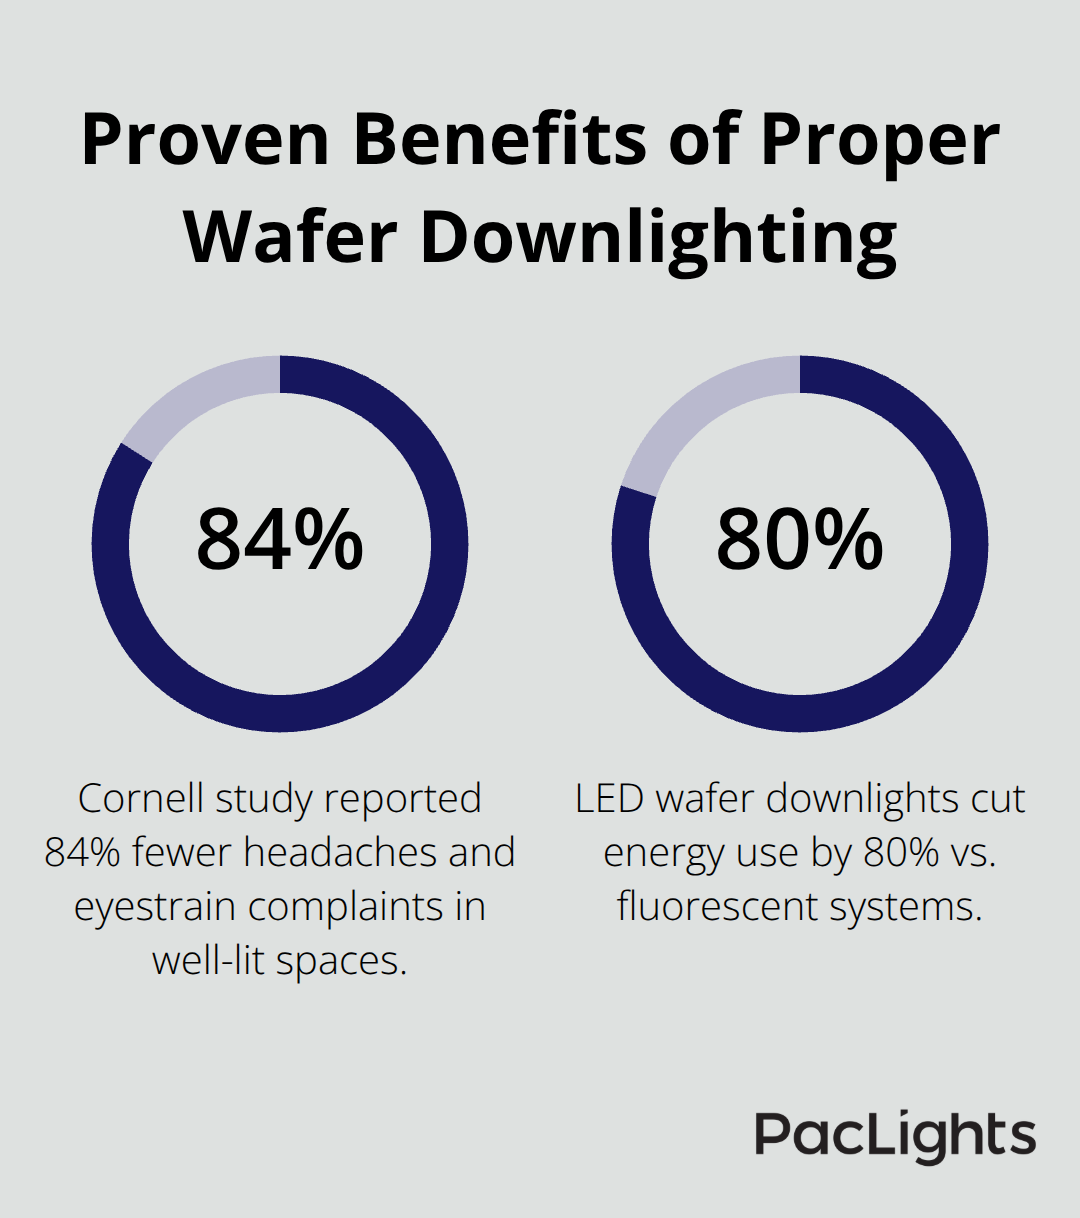
Wafer downlights outperform traditional fixtures in open plan offices because they deliver focused, uniform illumination without the bulk. A 6-inch wafer downlight producing around 1,000 lumens fits cleanly into drop ceilings and creates a sleek, uncluttered look that clients and employees notice immediately. Unlike 2×4 troffers that dominate the ceiling plane, wafer downlights sit flush and nearly invisible, making your office feel larger and more modern. They work because their narrow form factor allows precise spacing-typically 5 to 7 feet apart on a 10-foot ceiling-to eliminate the dark gaps and hot spots that plague poorly spaced traditional systems. The IES recommends this height-to-spacing ratio of around 0.6, meaning a 10-foot ceiling calls for roughly 6-foot spacing, and wafer downlights achieve this standard with minimal visual impact. This clean aesthetic matters more than most facility managers realize; a Cornell study found that 84 percent of workers in well-lit spaces reported fewer headaches and less eyestrain than those in poorly lit environments, and the visual simplicity of wafer downlights contributes directly to that comfort.
Energy Savings That Show Up on Your Bills
LED wafer downlights deliver 100 to 130 lumens per watt, meaning a 10-watt fixture generates 1,000 lumens of usable light. A typical 40-by-30-foot open office needs around 24 fixtures on a 6-foot grid to meet the IES standard of 300 to 500 lux for general office work, consuming roughly 240 watts total for ambient lighting. That same space lit with older fluorescent systems would demand 1,200 to 1,500 watts, cutting your energy bill by 80 percent or more once you account for ballast losses and heat. Over a five-year period with electricity at 12 cents per kilowatt-hour and 16 operating hours daily, switching to LED wafer downlights saves approximately 18,000 kilowatt-hours and roughly 2,160 dollars in energy costs alone. LED fixtures also last 25,000 to 50,000 hours compared to 2,000 hours for fluorescent tubes, meaning you replace them far less often and avoid the labor costs of frequent maintenance. Proper spacing amplifies these savings because fixtures spaced correctly illuminate the entire work surface without overlap waste-fixtures placed too close together waste light and energy, while spacing that is too wide requires additional fixtures to fill gaps.
Professional Appearance That Influences Perception
Wafer downlights create a finished, professional appearance that influences how people perceive your workspace. Open plan offices with recessed wafer downlights feel intentional and well-maintained, whereas offices with exposed fluorescent grids or haphazard fixture placement signal neglect. This matters because property valuations and tenant attraction depend partly on first impressions; a well-lit, modern ceiling treatment can raise perceived property value and help retain quality employees who spend eight hours a day in that environment. The narrow 1.5-inch depth of wafer downlights means they integrate seamlessly into drop ceilings without creating visual clutter or competing with HVAC ducts and sprinkler systems for space. Beam angles on quality wafer downlights typically range from 30 to 60 degrees, allowing you to choose narrower spreads for tightly spaced grids or wider spreads for larger areas, and this flexibility lets you tailor the look to your exact room dimensions and ceiling height without compromising uniformity.
Now that you understand why wafer downlights excel in open plan offices, the next step involves calculating the exact spacing your specific space requires-a process that depends on mounting height, beam angle, and the light output your tasks demand.
How to Calculate Your Exact Spacing Formula
The spacing formula works with three straightforward inputs: ceiling height, beam angle, and lumen output. Start with your ceiling height in feet, multiply it by 0.6, and you have your target spacing in feet. A 10-foot ceiling yields roughly 6 feet of spacing; a 9-foot ceiling calls for about 5.4 feet. This ratio exists because light cones from neighboring fixtures must overlap slightly to eliminate dark patches between them.
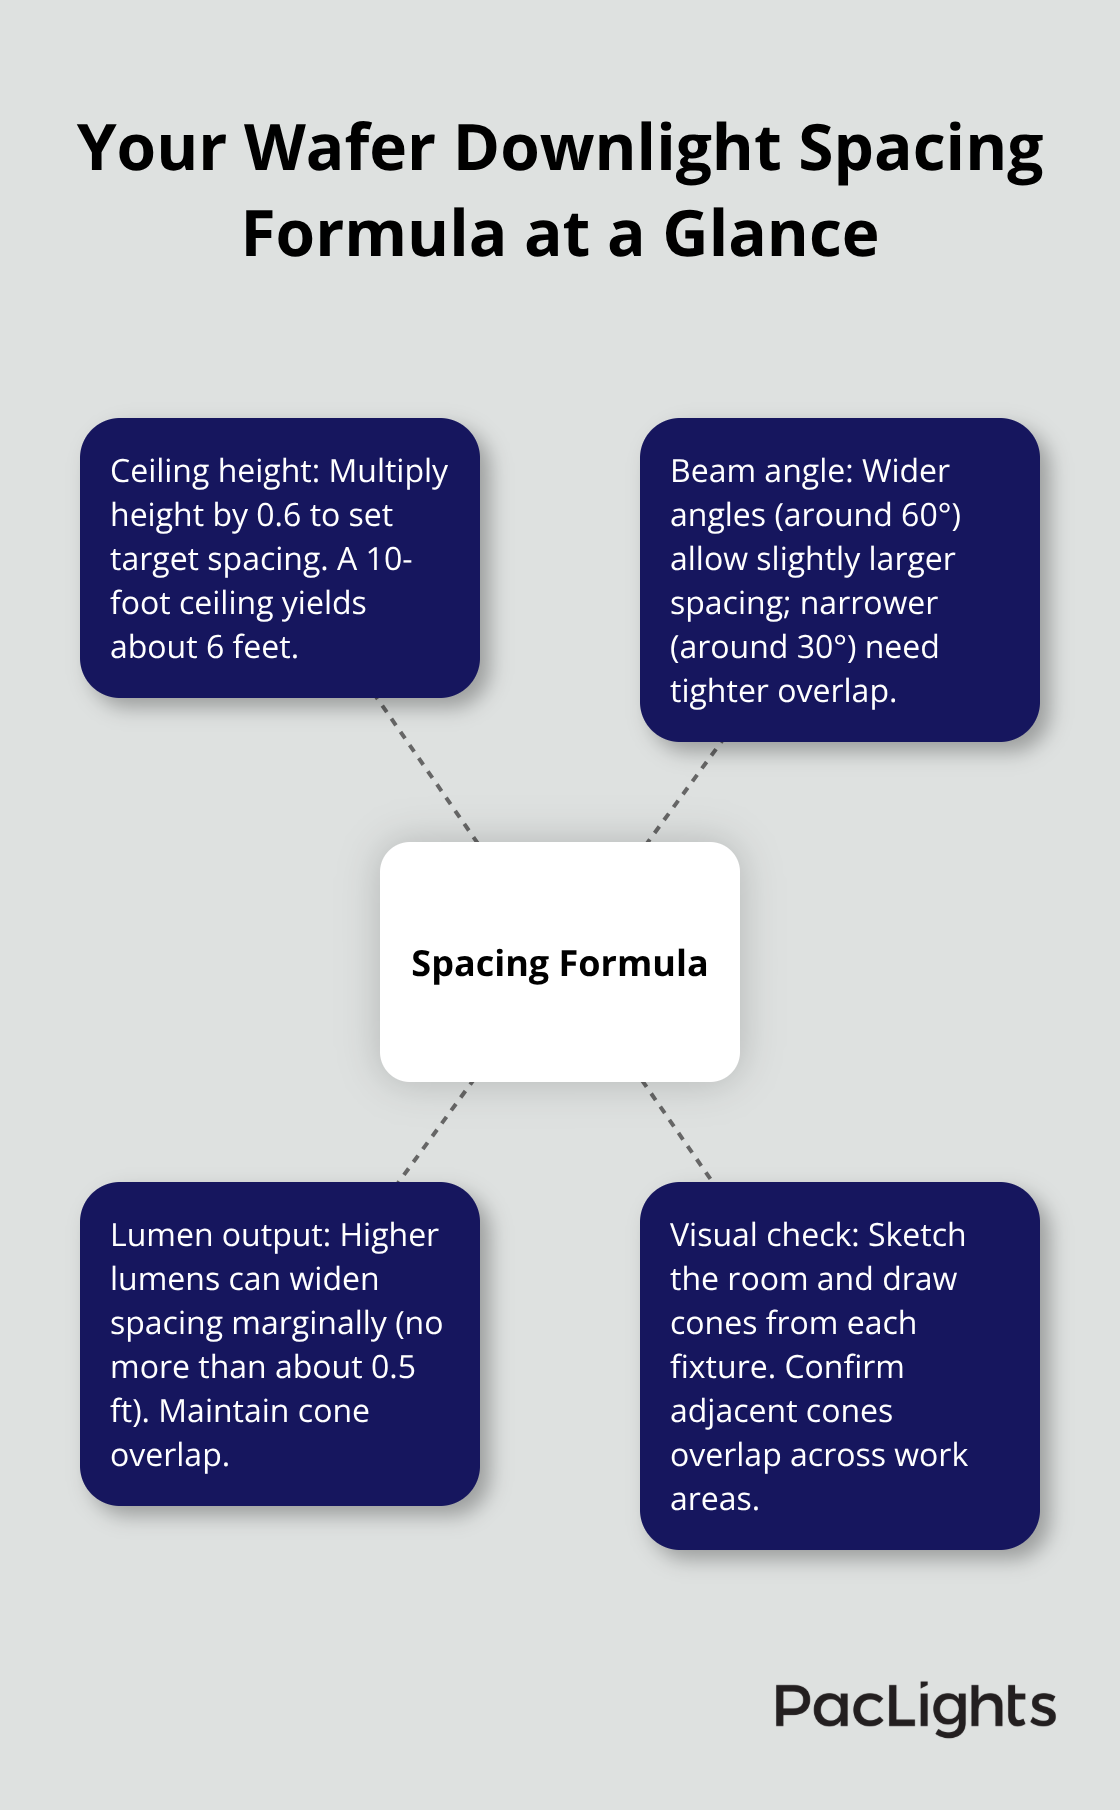
The IES recommends a spacing-to-height ratio between 0.5 and 1.0, but 0.6 delivers the most predictable results in open plan offices where uniformity matters. Your next variable is beam angle, which determines how wide the light spreads as it travels downward. A 60-degree beam angle produces a wider cone and covers more floor area per fixture, allowing slightly larger spacing; a 30-degree beam angle narrows the cone and demands tighter spacing to maintain overlap. Most wafer downlights sit between 40 and 50 degrees, which aligns well with standard 5 to 7-foot spacing on typical office ceilings. Lumen output affects spacing less directly but still matters: a fixture producing 1,000 lumens versus 1,500 lumens allows marginal spacing increases because the brighter fixture fills gaps more effectively, but this should never exceed half a foot of additional distance. To verify your spacing before installation, sketch your room to scale on graph paper, mark your proposed fixture locations, draw the expected light cones using the beam angle, and confirm they overlap across the entire work surface. This visual check catches spacing errors that cost thousands in retrofits later.
Task Demands Drive Your Lumen Targets
General office work demands 300 to 500 lux according to IES standards, roughly equivalent to 30 to 50 footcandles at the desk surface. A 40-by-30-foot open office totaling 1,200 square feet needs approximately 24,000 to 40,000 lumens of total output to meet this range. Divide this by your fixture lumen output (typically 1,000 lumens for a standard 6-inch wafer downlight) and you need roughly 24 to 40 fixtures. The math simplifies further: try 20 lumens per square foot for general office spaces, which translates to roughly one 1,000-lumen fixture per 50 square feet. Detail-intensive work like CAD drafting or financial analysis demands 75 to 100 footcandles, requiring either brighter fixtures or closer spacing to achieve the higher illuminance. Conference rooms function well at 20 to 30 footcandles for presentations, allowing wider spacing or fewer fixtures. The critical mistake most facility managers make is assuming all open plan areas need identical brightness; instead, map your actual task zones and assign spacing accordingly. Measure your current light levels with a basic light meter (available for under 50 dollars) to identify underlit areas, then adjust fixture placement or lumen output to hit your target. Room reflectance influences perceived brightness significantly: light-colored walls and ceilings with reflectances above 70 percent bounce additional light downward, potentially reducing required fixture density by 10 to 15 percent, while dark finishes below 40 percent reflectance absorb light and demand tighter spacing or higher lumen output.
Structural Reality Constrains Your Ideal Plan
Ceiling height variation across your space forces spacing adjustments that most layouts overlook. If your ceiling drops from 10 feet to 8 feet in a section, the 8-foot zone requires tighter spacing (roughly 4.8 feet instead of 6 feet) to maintain consistent illuminance at desk level. Electrical circuits also constrain spacing: a standard 15-amp circuit safely powers only 10 to 12 LED downlights at full brightness, which dictates how many fixtures you can place per circuit run and influences your grid layout. Coordinate fixture locations with HVAC supply vents, return air grilles, and sprinkler heads before finalizing your spacing plan. Fixtures must sit at least 18 inches from walls to prevent scalloping (visible bright bands along the wall), and at least 3 feet from sprinkler heads per fire code requirements. Concrete ceilings present the largest constraint: retrofitting fixtures into existing concrete costs roughly three times more than planning them into new construction, so verify your spacing on actual building plans before any drilling begins. Drop ceilings offer flexibility but limit fixture depth to roughly 4 inches for standard T-bar systems; confirm your wafer downlight fits within your specific ceiling cavity depth to avoid costly frame modifications.
Verify Your Plan Before Installation Begins
Sketch your room layout on graph paper and mark each proposed fixture location at the spacing intervals you calculated. Draw light cones from each fixture using the beam angle specification, and confirm that adjacent cones overlap across the entire work surface without gaps. This visual verification catches errors before installation crews arrive and prevents the expensive retrofits that plague poorly planned projects. Test your spacing assumptions in a small section of your office first if possible, then measure the actual illuminance with a light meter to confirm it matches your calculations. Adjust fixture placement or lumen output based on real measurements rather than assumptions about reflectance or room conditions. Professional lighting designers use photometric software to model these variables, but a scaled sketch and basic light meter testing catches most spacing mistakes at a fraction of the cost.
With your spacing formula locked in and your structural constraints mapped, the next step involves positioning these fixtures to eliminate shadows and hot spots across your work surfaces.
Practical Fixture Placement for Open Plan Offices
Position Fixtures to Eliminate Shadows and Glare
Installation crews often place wafer downlights using ceiling grids as their only guide, spacing fixtures evenly across the drop-ceiling T-bar without measuring how light actually falls on desks. This approach guarantees shadows along walls, hot spots under fixtures, and uneven brightness that drives employee complaints. Proper placement requires three distinct considerations that most installers skip. First, position fixtures 18 inches away from all walls to prevent scalloping, which creates visible bright bands running along the perimeter where light cones hit the wall surface instead of spreading across the work area.
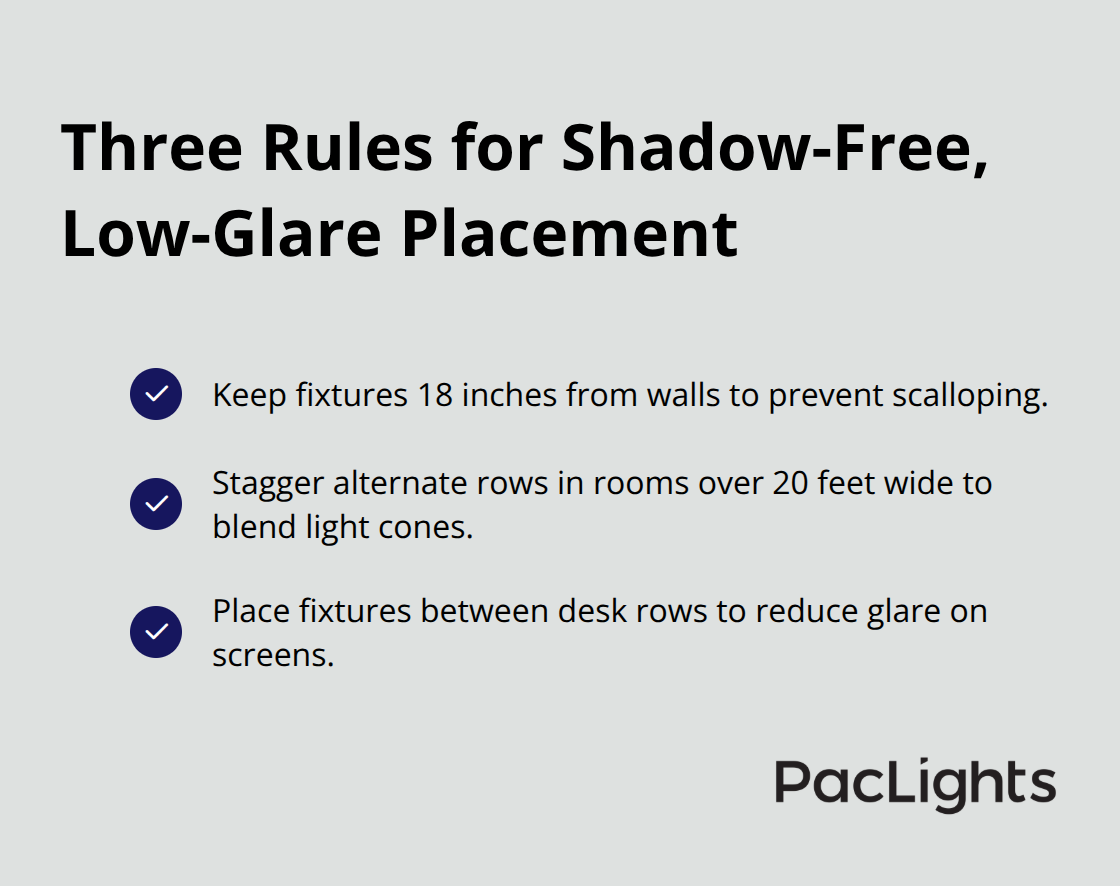
Second, stagger alternate rows if your office spans more than 20 feet in one direction; a perfect grid creates shadow lines where fixture cones align vertically, while staggered rows blend light cones more uniformly across the space. Third, avoid placing fixtures directly above workstations where employees sit; position them instead in the gaps between desk rows so light approaches from multiple angles and reduces glare on computer screens.
Measure your actual desk layout before finalizing fixture locations, then adjust your grid to align with where people actually work rather than forcing a uniform pattern that ignores task zones. Test your placement with an electrician who installs two or three fixtures in a representative section, then measure illuminance at multiple desk heights with a light meter at 30 inches above the floor where employees’ eyes sit. If measurements fall below 30 footcandles in task areas or exceed 60 footcandles anywhere, shift fixture positions by 6 to 12 inches and re-measure before the crew completes the full installation.
Coordinate with Building Systems Before Installation
Building systems constrain where fixtures can actually go, and ignoring these constraints forces expensive rework that delays your project. HVAC supply vents must sit at least 3 feet away from any fixture to prevent heated or cooled air from blowing directly upward and creating uneven thermal conditions around the light. Sprinkler heads require 18-inch clearance minimum per fire code, which eliminates roughly 10 percent of potential fixture locations in most open plan layouts. Electrical circuits determine spacing density since a standard 15-amp circuit safely handles only 10 to 12 LED downlights running at full brightness; if your calculated grid calls for 24 fixtures in a 40-by-30-foot space, you need at least three separate circuits with proper load distribution.
Coordinate with your electrical contractor before installation to map circuit runs and confirm wire gauges; runs exceeding 80 feet need 12-gauge wire to limit voltage drop to 15 percent or less, which prevents fixtures at the end of long runs from dimming noticeably. Concrete ceilings eliminate the flexibility that drop ceilings offer; fixture locations are permanent once drilled, so verify every position against building plans and have the contractor mark locations with chalk before any drilling begins. Drop ceilings offer more forgiving installation since fixtures can shift slightly if initial placement creates shadows, but concrete requires laser-level precision to avoid costly cutting and patching.
Map Obstacles Before Crews Arrive
Walk the space with your electrician and point out every HVAC duct, sprinkler head, and structural column that will affect fixture placement, then have them sketch these obstacles on your grid plan so the installation crew works from a document that accounts for real building conditions rather than assumptions. This coordination step prevents the costly rework that plagues projects where installers discover conflicts only after fixtures are mounted and wired.
Final Thoughts
Perfect wafer downlight spacing in open plan offices rests on three core principles: calculate your spacing using the 0.6 height-to-spacing ratio, account for your actual task demands and room conditions, and verify your plan against real building constraints before installation begins. A 10-foot ceiling demands roughly 6-foot spacing; a 9-foot ceiling calls for about 5.4 feet. Beam angle, lumen output, and room reflectance refine this baseline, but the formula remains consistent across most office environments, and skipping this calculation costs money through dark zones that force employees to add desk lamps or excessive fixtures that drive up installation and operating costs by 30 to 40 percent.
Proper installation transforms your office environment in measurable ways. Uniform illumination across work surfaces reduces eyestrain and headaches-a Cornell study documented 84 percent fewer complaints in well-lit spaces. LED wafer downlights cut energy consumption by 80 percent compared to fluorescent systems, translating to roughly 2,160 dollars in five-year savings for a typical 40-by-30-foot office, and correct spacing eliminates the retrofits that plague poorly planned projects since retrofitting fixtures into concrete ceilings costs three times more than planning them correctly upfront.
Your next step is straightforward: sketch your office layout, mark proposed fixture locations at calculated spacing intervals, draw light cones to verify overlap, and measure actual illuminance with a light meter in a test section. Coordinate with your electrical contractor to map circuits, HVAC vents, and sprinkler locations before crews arrive. We at PacLights offer free lighting layout designs and ROI assessments to help you plan with confidence and verify alignment with local electrical codes.
Disclaimer: PacLights is not responsible for any actions taken based on the suggestions and information provided in this article, and readers should consult local building and electrical codes for proper guidance.