

Wafer downlights are one of the most popular lighting choices for modern homes and commercial spaces. At PacLights, we’ve helped countless customers install these fixtures correctly to maximize both performance and longevity.
This guide walks you through every stage of the wafer downlight setup process, from initial planning to ongoing maintenance. You’ll learn the practical steps needed to get professional results without unnecessary complications.
Preparing Your Space for Wafer Downlight Installation
Measure and Map Your Ceiling
Measure your ceiling cavity depth in at least three different spots before you purchase fixtures. Wafer downlights require only about 2 inches of clearance, but you must verify this exists above your drywall. Use a stud finder to locate joists and structural members in your planned fixture locations, then mark positions with masking tape on the ceiling itself. A 10-foot by 15-foot room typically works well with four fixtures placed roughly at the corners, providing balanced illumination without harsh wall shadows.
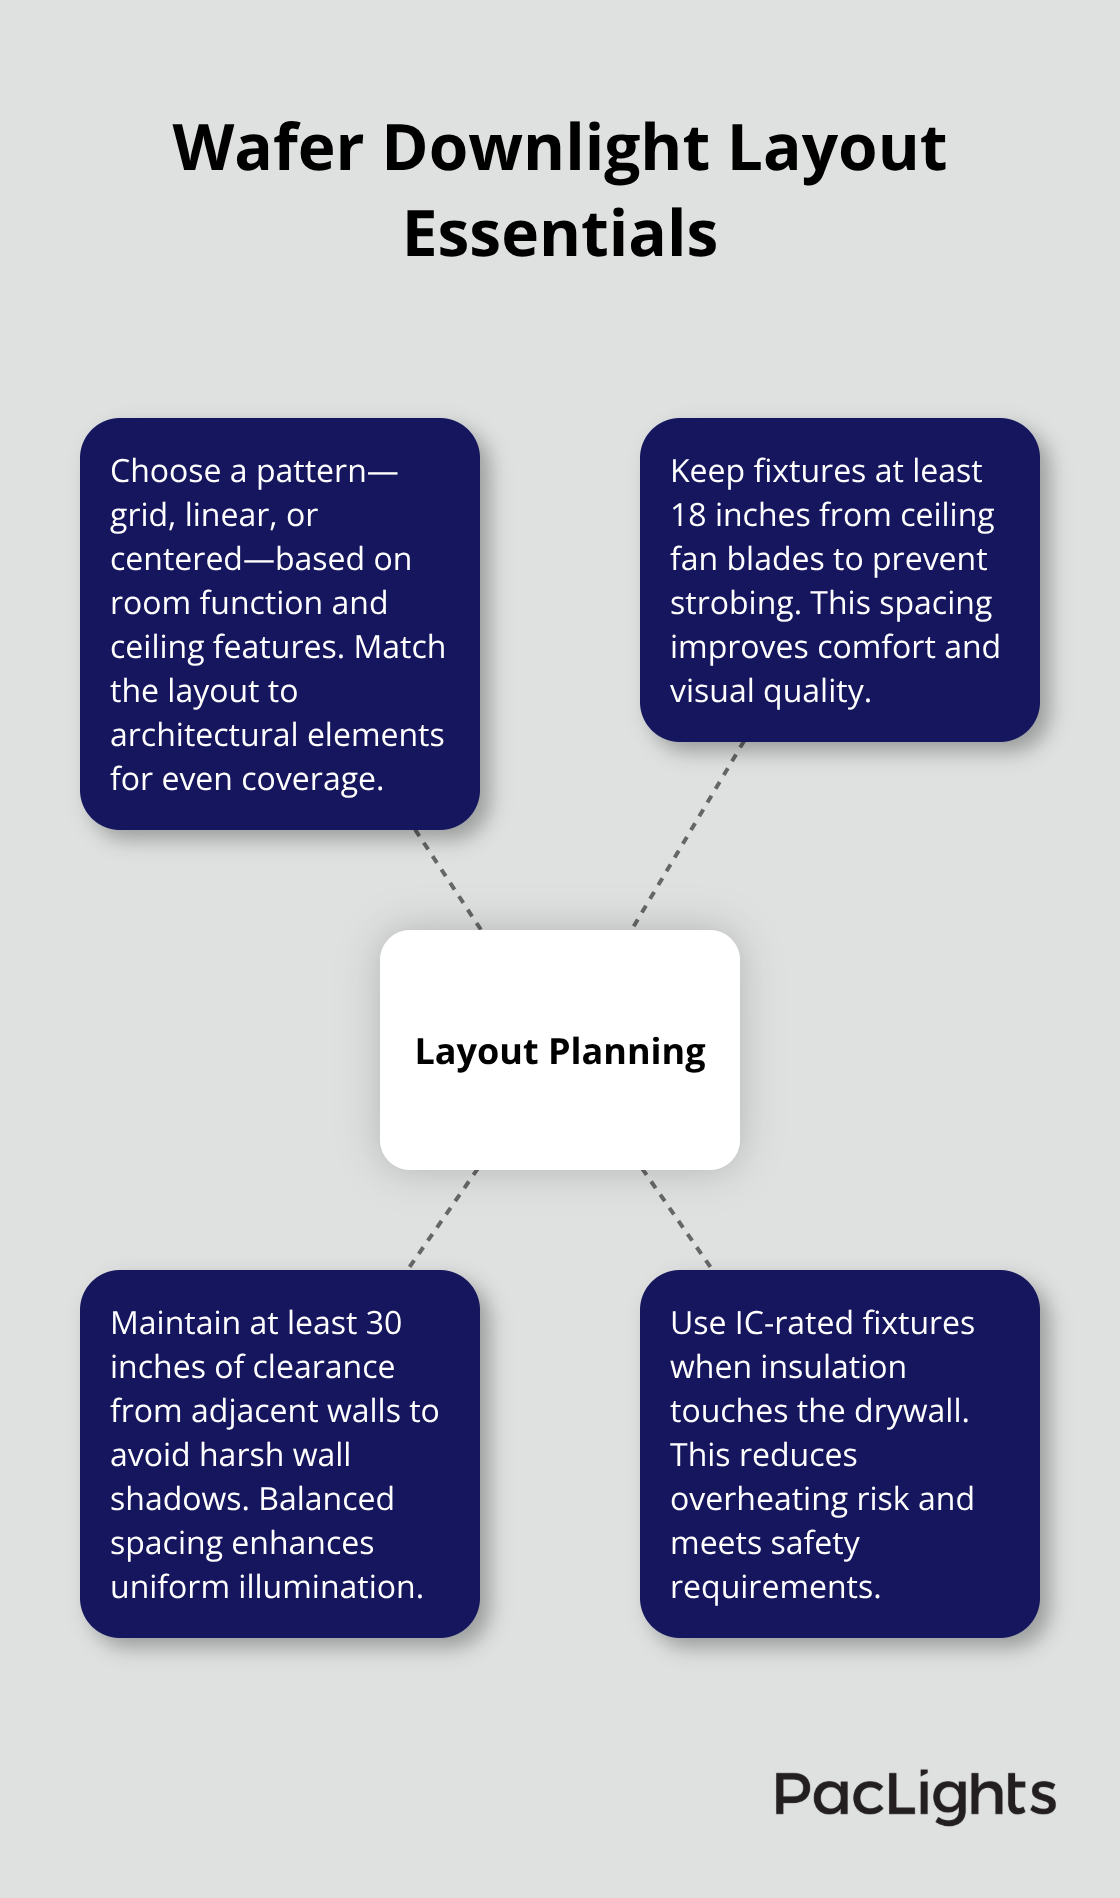
Plan Your Layout Carefully
Sketch your room layout on paper and choose between a grid pattern, linear arrangement, or centered configuration based on your ceiling features and room function. Keep fixtures at least 18 inches away from ceiling fan blades to prevent strobing, and maintain at least 30 inches of clearance from adjacent walls. If insulation sits directly above your drywall, you must use IC-rated fixtures to prevent fire risk from overheating.
Assemble Your Tools and Materials
Gather your tools before you start any work: a 4.25-inch hole saw or drywall keyhole saw, voltage tester, stud finder, screwdrivers, wire strippers, electrical tape, a ladder, and a dust-catcher bowl if you use a high-speed drill attachment. For materials, collect wafer downlight housings, matching trim rings, 12-16 gauge Romex cable, wire nuts, and appropriate bulbs or integrated LED wafers. Test your hole-cutting method on scrap drywall before you cut into your actual ceiling, and wear eye protection when you use high-RPM drill attachments (they can unscrew violently if they bind).
Check Codes and Calculate Your Load
Check your local electrical codes immediately because many jurisdictions require permits and post-installation inspections for lighting changes. If you start a new circuit, hire a licensed electrician rather than attempt this yourself. Calculate your circuit load carefully: twelve 12-watt fixtures equal 1,440 watts or 12 amps on a 120-volt circuit, which fits safely on a single 15-amp circuit.
Prepare for Safe Installation
Turn off power at the breaker before you touch any wiring, and use your voltage tester to confirm power is off. If you replace existing fixtures, remove the old ceiling box first to make your installation cleaner (this step prevents confusion during wiring). With your space measured, tools assembled, and safety protocols in place, you’re ready to move forward with cutting and preparing your ceiling openings.
Installing Your Wafer Downlights
Cut Ceiling Openings with Precision
A 4.25-inch hole saw attached to a drill produces cleaner, more precise openings than a drywall keyhole saw and saves considerable time. Test your hole cutter on scrap drywall first to understand the speed and pressure needed, then mark your actual ceiling locations with an awl to create pilot holes. High-RPM drill attachments can unscrew violently if they bind, so wear eye protection and use a plastic dust-catcher bowl to contain debris and protect your face. Once you cut each opening, run Romex cable from your power source to the first fixture with 12 to 16 inches of slack at each hole, then staple the cable to joists every 4.5 feet to keep it secure and neat.
Prepare Wiring and Connections
Strip about four inches of sheathing from each cable end before you insert the fixture into the ceiling. Color-matched and mechanically tight connections prevent flickering or fixture failure, so connect wires to color-coded terminals (black to black, white to white, and ground to ground). Twist the wires clockwise three to four times before you secure them with wire nuts and wrap with electrical tape-this prevents the connections from loosening over time. Each LED wafer fixture includes an internal junction and quick-connect system that simplifies wiring compared to traditional recessed housings, so push the connectors together firmly until they seat completely.
Test Before Final Installation
Restore power briefly to verify that the lights work and test any color temperature settings (many models offer 3000K for warm office lighting or 5000K for task-focused spaces). Power off again, then insert the fixture into the hole and deploy the spring clips until the trim ring sits flush with the drywall. If the ring appears angled, re-seat the fixture to ensure a clean, professional finish. Installation typically takes 30 to 60 minutes per fixture once you develop a rhythm, and the quick-connect design means you can work faster on subsequent fixtures without rewiring complexity.
With your fixtures installed and tested, you’re ready to fine-tune their performance and establish a maintenance routine that keeps them operating at peak efficiency.
Tuning and Maintaining Your Wafer Downlights
Select and Test Your Color Temperature
Your wafer downlights perform best when you actively manage their settings and keep them clean. Test color temperature immediately after installation-3000K delivers warm, office-friendly lighting while 5000K provides crisp task-focused illumination. If your fixtures offer switchable white with five color temperatures, experiment across the range during morning, afternoon, and evening hours to find what works best for your space and activities. Perception shifts based on time of day and surrounding surfaces, so test your preferred color temperature for several days before finalizing your choice.
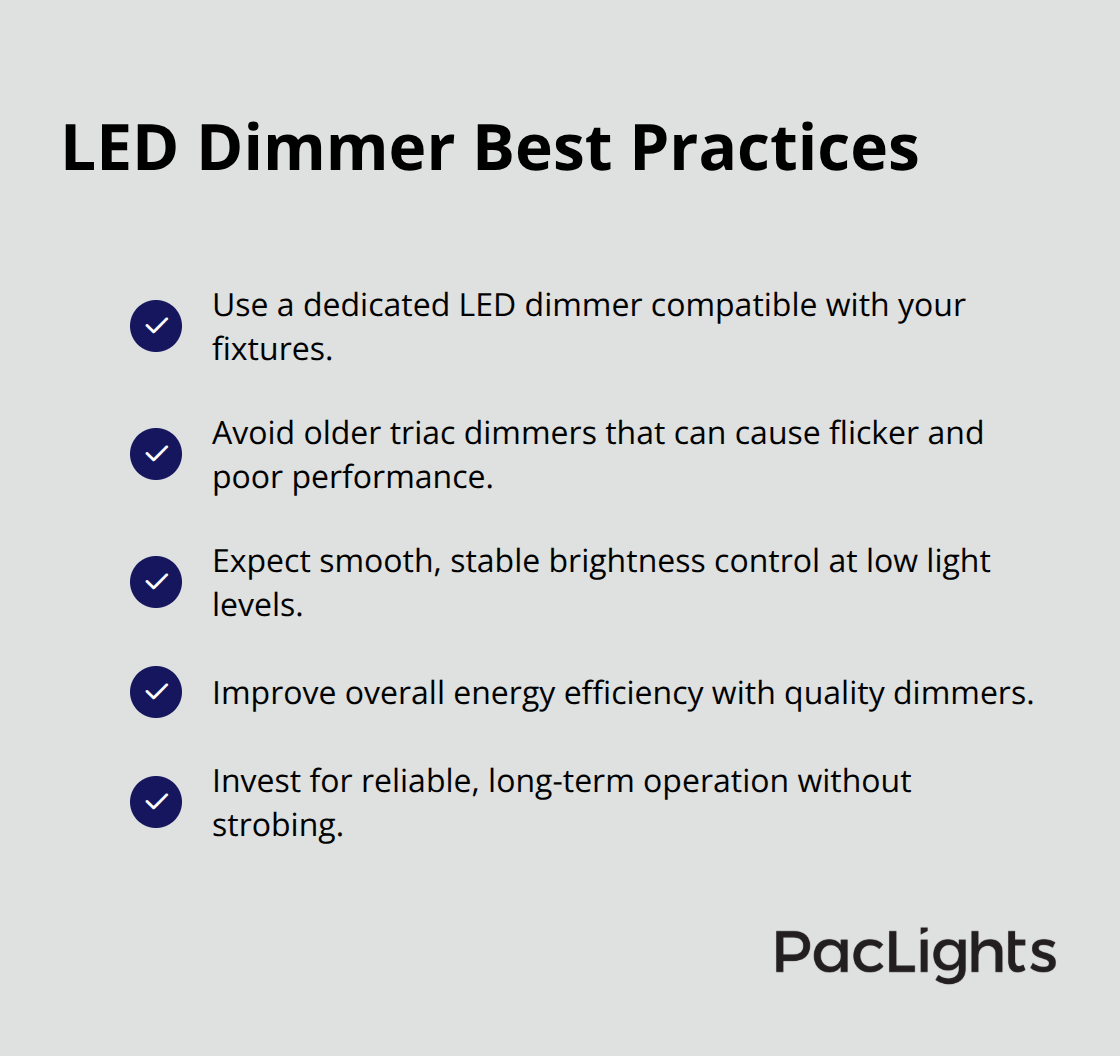
Install a Quality LED Dimmer
If your fixtures support dimming, install a dedicated LED dimmer like the Lutron Diva rather than relying on older triac dimmers, which cause flicker and poor performance with LED technology. Cheap dimmers often produce bouncing or visible strobing at lower brightness levels, degrading the entire lighting experience. High-quality dimmers ensure smooth brightness control and better energy efficiency, making them worth the investment for reliable operation.
Clean Your Fixtures Regularly
Dust accumulates on wafer downlight surfaces faster than you might expect, reducing brightness and creating uneven illumination. Clean your fixtures every three to four months using a soft, dry cloth-avoid water or harsh chemicals that damage the optics and housing. Inspect for visible wear, loose trim rings, or discolored housing during these cleaning sessions because minor issues caught early prevent complete fixture failure.
Monitor LED Lifespan and Warranty Coverage
LED wafers typically last 25,000 hours or longer, but integrated LED units cannot be serviced like traditional bulbs, so verify your fixture’s expected lifespan before purchase. If a fixture fails prematurely, contact the manufacturer’s support team with your purchase date and installation details because many quality LED wafers come with extended warranties. Keep your original documentation and receipts organized in a file or digital folder-this matters when you need warranty service or technical guidance.
Final Thoughts
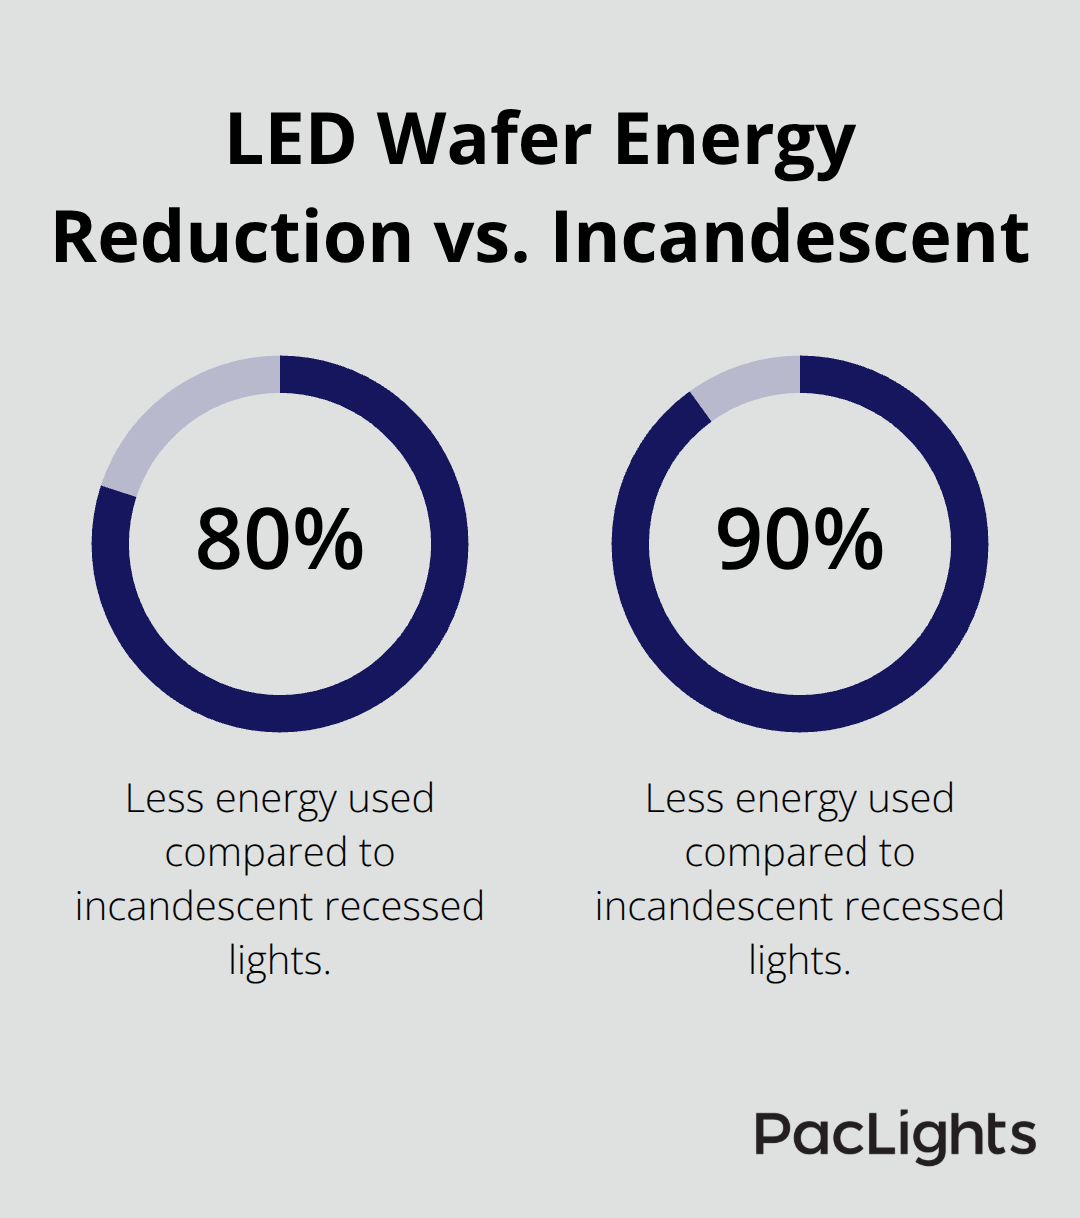
Installing wafer downlights correctly transforms your space with clean, modern lighting that performs reliably for years. The process requires careful planning, precise execution, and attention to electrical safety, but the payoff justifies the effort. Running ten fixtures for five hours daily saves approximately 2,000 kWh annually, reducing your electricity costs by roughly $240 at average U.S. rates. LED wafers consume only 6 to 12 watts compared to 50 to 60 watts for incandescent recessed lights, cutting energy consumption by 80 to 90 percent.
The reduced heat output from your wafer downlight setup also lowers your air conditioning load, compounding those savings throughout the year. With LED lifespans reaching 25,000 hours or longer, you’ll replace bulbs far less frequently than with traditional fixtures, minimizing maintenance hassles and long-term expenses. Commit to a simple maintenance schedule that keeps your fixtures performing at peak efficiency-clean your wafer downlights every three to four months with a soft, dry cloth, and inspect trim rings and housing for wear during these sessions.
If you need expert guidance on fixture selection, layout optimization, or energy savings projections, contact PacLights for a free lighting layout design and ROI assessment tailored to your specific space and goals. Your wafer downlight investment deserves professional support to maximize performance and return on investment.
Disclaimer: PacLights is not responsible for any actions taken based on the suggestions and information provided in this article, and readers should consult local building and electrical codes for proper guidance.