

Getting surface mount downlight spacing right makes the difference between a room that feels bright and welcoming and one with dark spots and wasted energy. Most installers either space fixtures too far apart, creating uneven shadows, or too close together, driving up costs unnecessarily.
At PacLights, we’ve seen countless projects where poor spacing decisions led to expensive retrofits. This guide walks you through the exact calculations and standards that deliver even illumination every time.
Surface Mount Downlight Spacing: Achieving Even Illumination
Why Spacing Matters More Than You Think
Spacing directly controls whether light reaches the floor uniformly or pools in bright patches with dark gaps between them. When fixtures sit too far apart-say 8 to 10 feet in a retail space-bright spots form directly under each light while shadowed zones appear in between, which damages visibility and makes customers uncomfortable. The IES guideline recommends spacing fixtures 4 to 6 feet apart for even illumination. In a 20-by-30-foot retail space, this means planning roughly 24 fixtures on a 5-foot grid instead of the 12 to 16 fixtures many installers default to. The cone of light from each fixture must overlap with its neighbors to eliminate dark spots; without that overlap, your space feels patchy and wastes the entire investment. Poor spacing also kills color consistency across the room, especially in retail where customers judge product appearance under the lights they see in-store. If one section is darker than another, perceived product color shifts, and purchasing decisions suffer.
The Real Cost of Getting Spacing Wrong
Incorrect spacing forces expensive retrofits down the line. Adding fixtures after installation costs far more than planning correctly upfront because it means ceiling work, new wiring, and labor charges that dwarf the modest expense of extra fixtures in the initial design. Conversely, cramming too many fixtures into a space wastes money immediately-more fixtures mean higher material costs, more circuits to run, and more energy consumption. A 15-amp circuit can safely support only 10 to 12 fixtures at full brightness, so oversized layouts require additional circuits and breaker capacity. Spacing from a measured grid based on ceiling height and fixture performance prevents costly guesswork. The spacing-to-mounting-height ratio method delivers precision; multiply your fixture’s spacing criteria value (typically 0.5 to 1.5) by the mounting height to determine exact distances. For an 8-foot ceiling with a spacing criteria of 0.8, you’d space fixtures roughly 6.4 feet apart. This approach beats arbitrary placement and prevents expensive corrections later.
Energy Efficiency Through Smart Layout
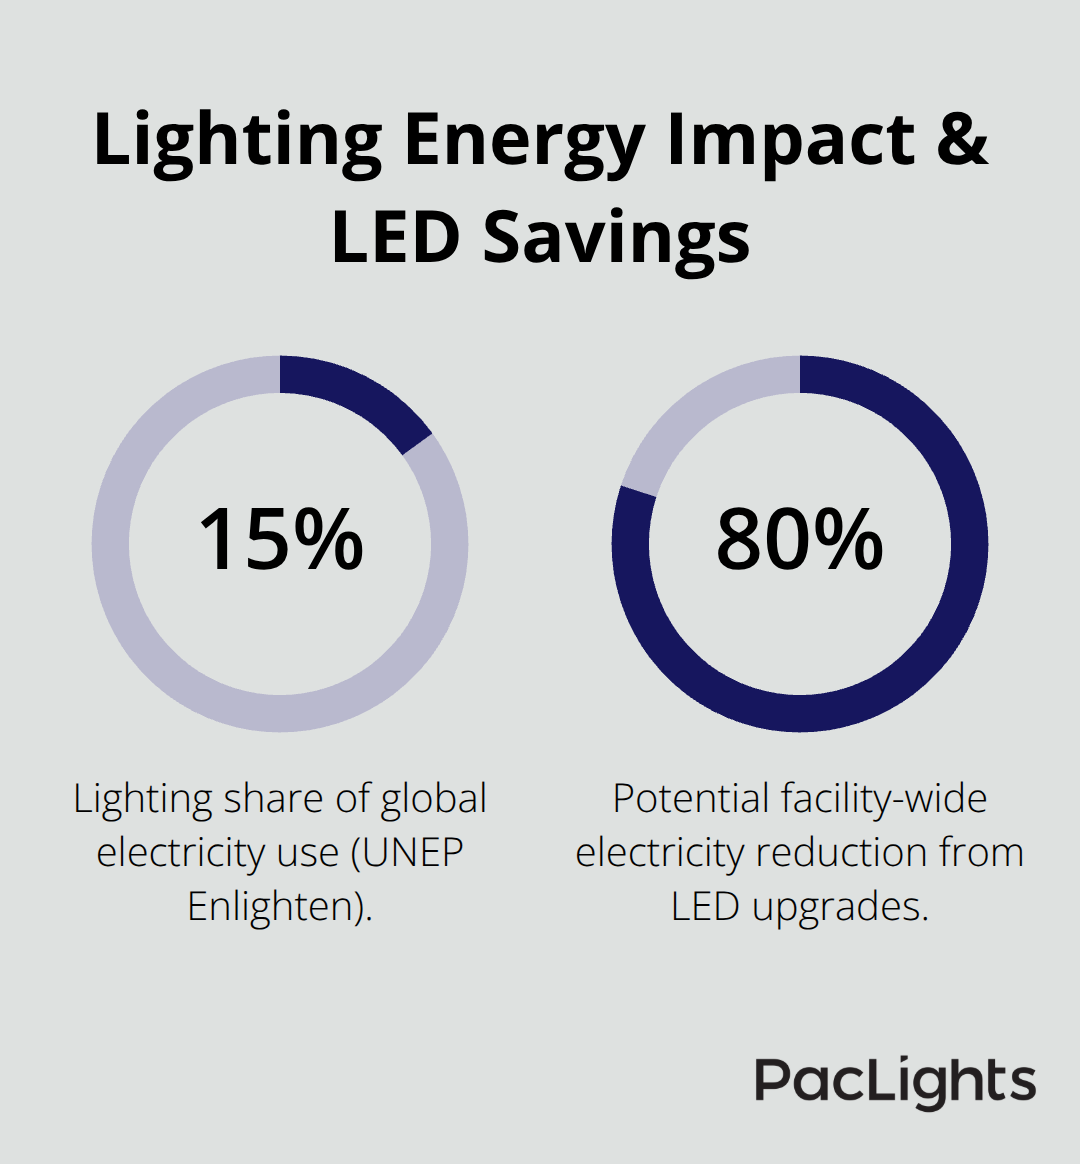
Proper spacing reduces energy waste because light lands where you need it instead of spilling into corners or dark zones where it vanishes. The UNEP Enlighten Initiative reports that lighting accounts for roughly 15 percent of global electricity use, and upgrading to LED can trim facility-wide consumption by up to 80 percent. However, poor spacing negates those savings; if half your light output disappears into dark spots, you fail to gain the full efficiency benefit.
LED recessed downlights use 70 to 90 percent less energy than incandescent bulbs, drawing just 6 to 15 watts while delivering 700 or more lumens. In a 10,000-square-foot facility with 40 fixtures replacing 60-watt incandescent bulbs, correct spacing ensures you hit your energy targets. Incorrect spacing forces you to either add more fixtures (raising energy draw) or accept poor illumination. Starting with the right spacing calculation locks in efficiency from day one and prevents the false economy of under-lighting followed by add-on fixtures that spike energy costs. Understanding how to calculate optimal spacing becomes your next step toward a layout that balances light quality, cost control, and energy performance.
What Spacing Actually Means on Your Ceiling
How Light Cones Create Even Illumination
The IES guideline of 4 to 6 feet between fixtures works because light cones must overlap to create seamless illumination across the floor. When you space fixtures at 5 feet on-center in a standard room with an 8 or 9-foot ceiling, the overlapping cones eliminate the dark zones that appear when spacing stretches to 8 or 10 feet. Without that overlap, your space feels patchy and wastes the entire investment in fixtures and energy.
The Spacing-to-Mounting-Height Formula
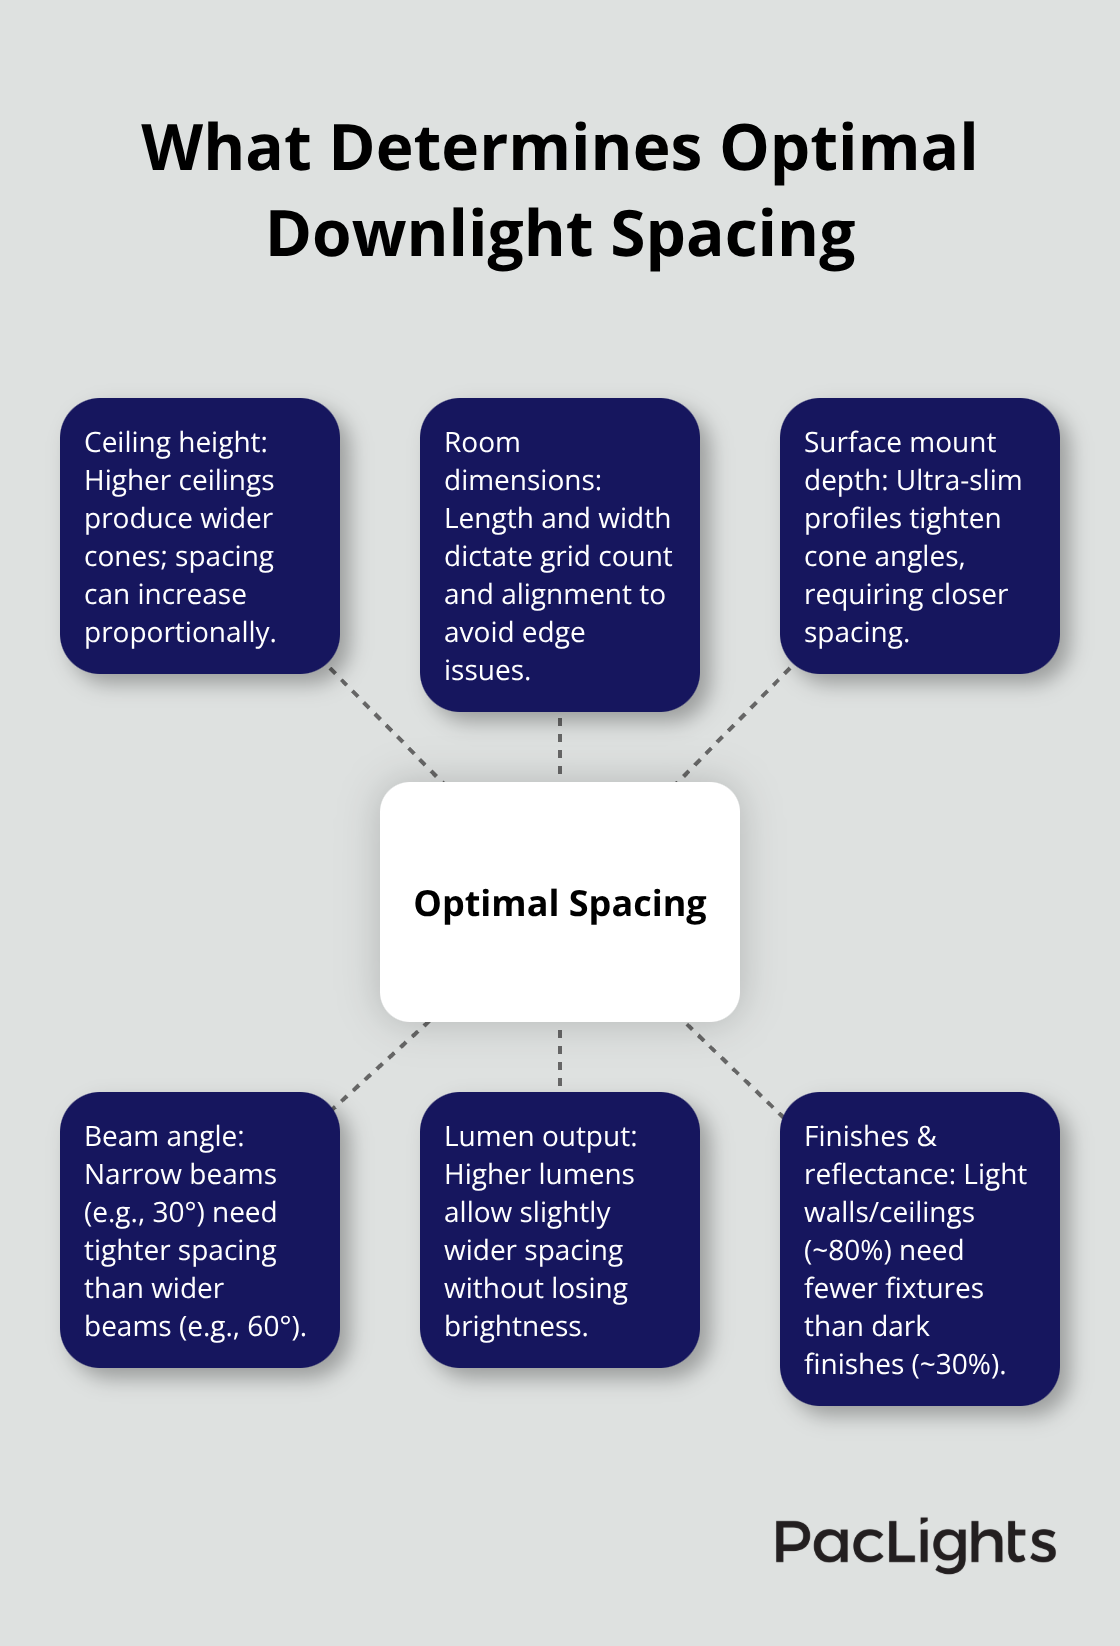
The spacing-to-mounting-height ratio method offers precision beyond general rules. Your fixture’s spacing criteria value, printed in the spec sheet and typically ranging from 0.5 to 1.5, multiplies by mounting height to give exact spacing distance. For a fixture with a 0.8 spacing criteria mounted at 8 feet, multiply 0.8 by 8 to get 6.4 feet-that’s your target spacing. This formula accounts for how beam width changes with ceiling height; a 10-foot ceiling produces a wider cone than an 8-foot ceiling, so spacing can increase proportionally.
The rule of thumb suggests roughly half the ceiling height. An 8-foot ceiling suggests 4-foot spacing, while a 10-foot ceiling suggests 5-foot spacing. In a warehouse with a 14-foot ceiling, tight spacing becomes necessary to maintain overlap. This approach beats arbitrary placement and prevents expensive corrections later.
Ceiling Height and Room Dimensions
Ceiling height directly determines cone width and overlap quality. At 8 feet, cones spread wider than at 12 feet, so you can space fixtures farther apart without losing uniformity. Room dimensions matter because they define how many fixtures fit and whether your grid aligns with the space. A 20-by-30-foot retail area on a 5-foot grid requires approximately 24 fixtures arranged in neat rows.
A narrow hallway might need only two rows, while an open warehouse demands careful grid planning from the center outward to avoid awkward spacing at edges.
Always keep fixtures at least 2 to 3 feet away from walls to prevent shadows and wasted light spilling into corners where it serves no purpose.
Surface Mount Depth and Beam Characteristics
Surface mount depth changes spacing requirements significantly. The ultra-slim profile-as shallow as 1.5 inches-means less distance between the fixture lens and ceiling, which tightens the cone angle and demands tighter spacing than recessed fixtures at the same height. This is why surface mount downlights suit tight plenums and shallow ceiling cavities; they deliver coverage without extra headroom, but your spacing calculation must account for this shallower mounting. If you replace older recessed fixtures with surface mounts, recalculate based on the new fixture’s specifications rather than copying the old spacing grid.
Beam angle and lumen output also shift spacing needs. A fixture with a narrow 30-degree beam spreads light more tightly than one with a 60-degree beam, so narrow-beam fixtures need closer spacing. High-lumen outputs (900+ lumens) can space slightly farther than low-lumen models while maintaining brightness. However, chasing lumen count without spacing discipline creates glare and wasted light in corners.
Verify Your Layout Before Installation
Start with the spacing criteria formula, then verify your layout visually. Sketch the room to scale and draw light cones from each planned fixture position. Overlapping cones show you where light lands; gaps reveal where you need an extra fixture. This visual check catches spacing mistakes before installation and prevents the expensive retrofits that poor upfront planning creates. Once you confirm your spacing grid works on paper, the next step involves selecting fixtures that match your beam angle and lumen requirements to lock in the performance your layout promises.
How to Calculate Spacing with Precision
The Spacing-to-Mounting-Height Formula
Start with your fixture’s spacing criteria value, the number printed on every spec sheet that typically ranges from 0.5 to 1.5. Multiply this value by your mounting height in feet to get exact spacing distance. A fixture with a 0.8 spacing criteria mounted 8 feet high requires 6.4-foot spacing; one with a 1.0 criteria at 10 feet requires 10-foot spacing. This formula works because beam width expands proportionally with ceiling height, so the math accounts for how light spreads in your specific room.
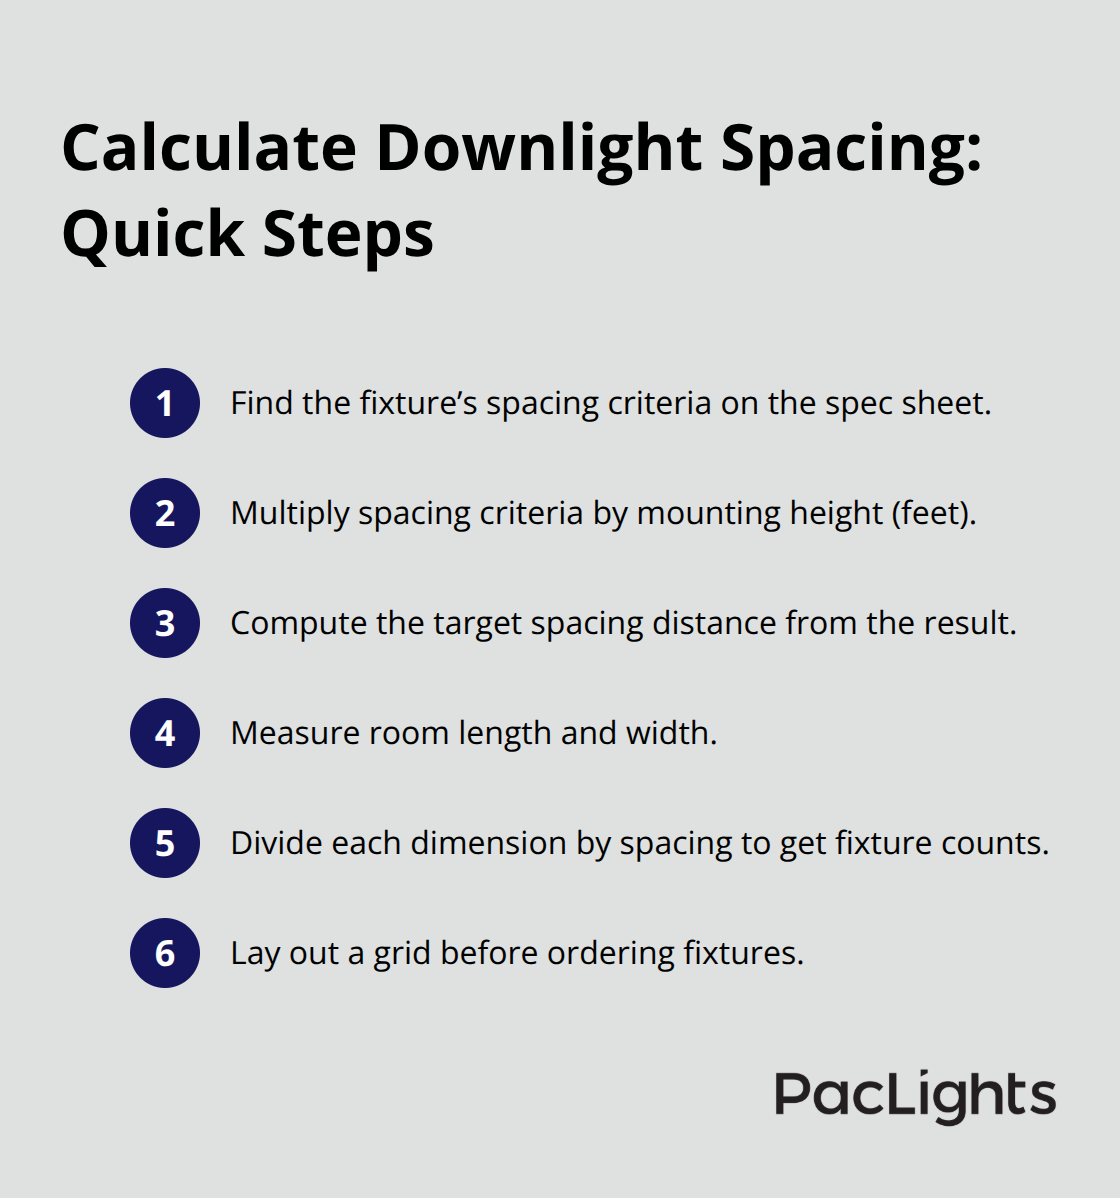
The spacing-to-mounting-height method beats the rule-of-thumb approach because it reflects actual fixture performance rather than generic estimates. Once you calculate target spacing, measure your room length and width, then divide by your spacing distance to determine fixture count. A 20-foot room with 5-foot spacing needs four fixtures across; a 30-foot room needs six down the length. This gives you a precise grid before you order a single fixture, preventing the costly additions that poor initial planning creates.
Lumen Output and Spacing Balance
Lumen output matters less than most installers think; a 700-lumen fixture spaced correctly delivers better results than a 1,200-lumen fixture spaced poorly. Higher lumens allow slightly wider spacing without sacrificing brightness, but chasing lumen count without spacing discipline wastes energy and creates glare on reflective surfaces like retail displays or office walls. ENERGY STAR certified LED downlights drawing 6 to 15 watts deliver 700 or more lumens with high color rendering index above 90, which means accurate color perception in retail environments where reflectance choices affect purchasing decisions.
How Room Finishes Change Your Calculations
Room finishes and reflectance values shift how much light reaches your floor or work surface. Light-colored walls and ceilings with 80 percent reflectance bounce more light downward than dark finishes at 30 percent reflectance, meaning darker rooms may need tighter spacing or higher lumens to maintain the same floor brightness. Concrete warehouse floors reflect roughly 20 to 30 percent of light, while polished retail flooring reflects 40 to 50 percent, so a warehouse demands denser fixture placement than a retail store with identical ceiling height.
Glossy splashbacks and shiny countertops in kitchens reflect concentrated hotspots, so surface finish forces you toward fixtures with deeper baffles and tighter spacing to control glare. Surface mount depth compounds these calculations because the ultra-slim 1.5-inch profile creates narrower cone angles than recessed fixtures, requiring closer spacing to maintain overlap.
Switching Fixture Types Requires Recalculation
When you switch from recessed to surface mount or vice versa, recalculate spacing based on the new fixture’s actual spacing criteria rather than copying your old grid. Sketch your final layout on graph paper with light cone overlaps drawn in, then verify that cones touch without leaving gaps. This visual check takes fifteen minutes and catches spacing errors before installation costs multiply.
Final Thoughts
The spacing-to-mounting-height formula transforms surface mount downlight spacing from guesswork into precision, preventing the costly retrofits that poor planning creates. When you multiply your fixture’s spacing criteria by mounting height, you lock in even illumination from the start, whether you light a retail floor, warehouse, or office. LED downlights already cut energy consumption by 70 to 90 percent compared to incandescent bulbs, but incorrect spacing wastes that advantage by directing light into corners where it serves no purpose.
Proper spacing delivers three immediate wins: customers see products accurately in retail environments, employees work without eye strain, and your energy costs drop because every lumen lands where you need it. Correct spacing also prevents the false economy of under-lighting followed by expensive add-on fixtures that spike energy demands and circuit loads. Your electrician works from a verified grid rather than making spacing decisions on the fly, which reduces installation time and labor costs.
Measure your room dimensions and ceiling height, then calculate target spacing using your fixture’s specifications. Sketch the layout on graph paper to verify light cone overlap before installation begins, and contact PacLights for free lighting layout designs and ROI assessments to plan with confidence.
Disclaimer: PacLights is not responsible for any actions taken based on the suggestions and information provided in this article, and readers should consult local building and electrical codes for proper guidance.