

Wafer downlights have become the standard choice for modern homes and commercial spaces. Their slim profile fits into tight ceiling cavities, making them ideal for renovations and new construction alike.
At PacLights, we’ve helped countless customers navigate the options available. This wafer downlight comparison guide breaks down the key differences so you can select the right fixture for your specific needs.
What Wafer Downlights Actually Are
The Basics: Ultra-Thin Design Solves Real Installation Problems
Wafer downlights are ultra-thin recessed LED fixtures that mount directly to drywall without a traditional housing can. The profile sits under one inch thick, which addresses a genuine constraint in most homes and commercial spaces: limited ceiling depth caused by joists, plumbing, or ductwork. Standard recessed light housings demand 6 to 8 inches of clearance above the ceiling, making retrofits difficult or impossible in tight spaces. Wafer downlights eliminate that barrier. They use integrated LED modules, so no bulb replacement ever happens. The fixture itself lasts 25,000 to 50,000 hours depending on the model-roughly 10 to 20 years of typical residential use.
Built to Last: LED Technology and Thermal Management
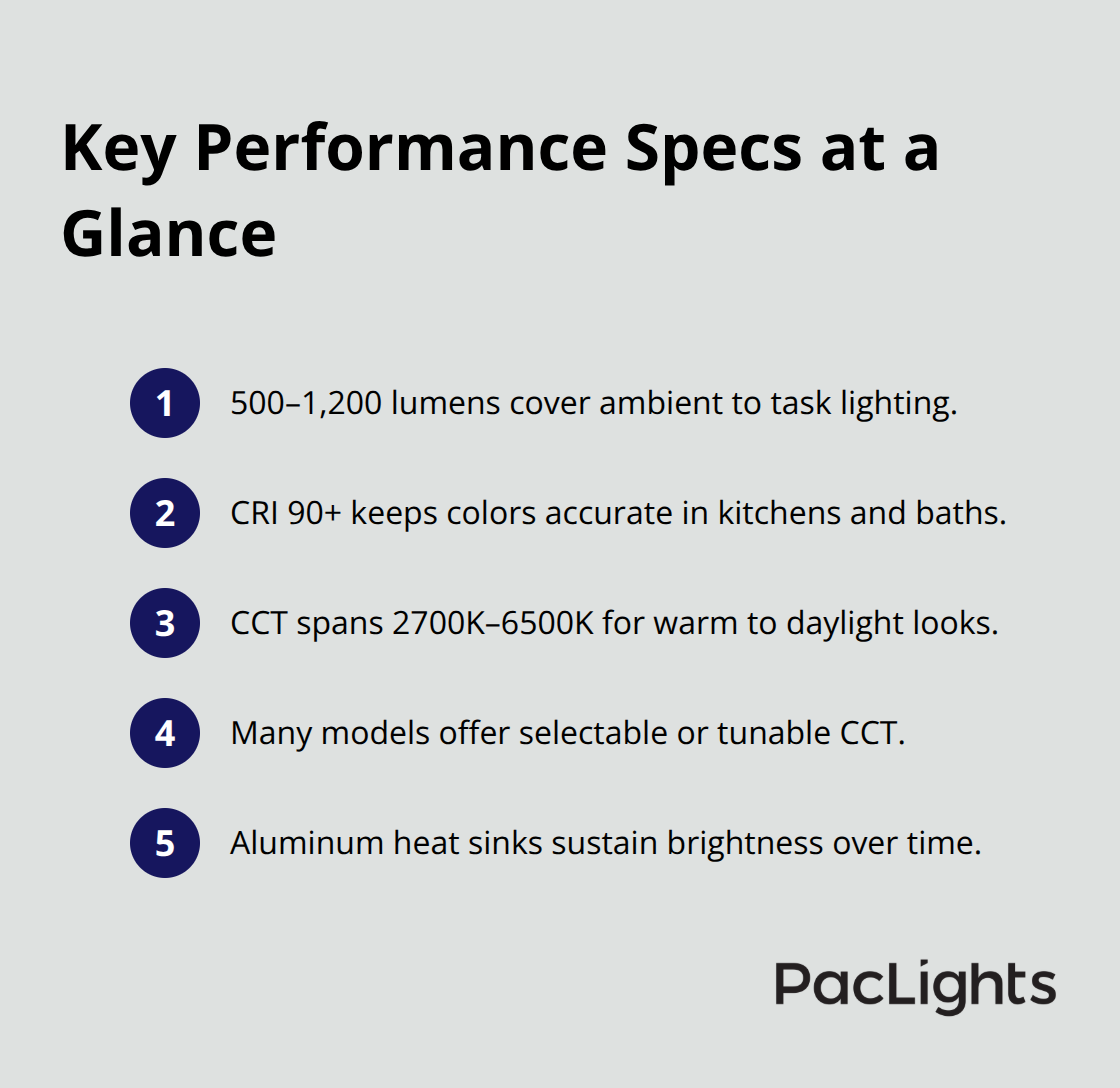
Most wafer downlights feature aluminum heat sinks and solid thermal design that keeps the LEDs cool and maintains brightness over time. The brightness typically ranges from 500 to 1,200 lumens, covering both ambient and task lighting needs. Quality models deliver color rendering index values of 90 or higher, which ensures accurate color reproduction in kitchens, bathrooms, and retail environments. Color temperature options span 2700K warm white through 6500K daylight, with many models offering selectable or tunable options so you can adjust the look without replacing fixtures.
Installation Speed and Flexibility Beat Traditional Recessed Lights
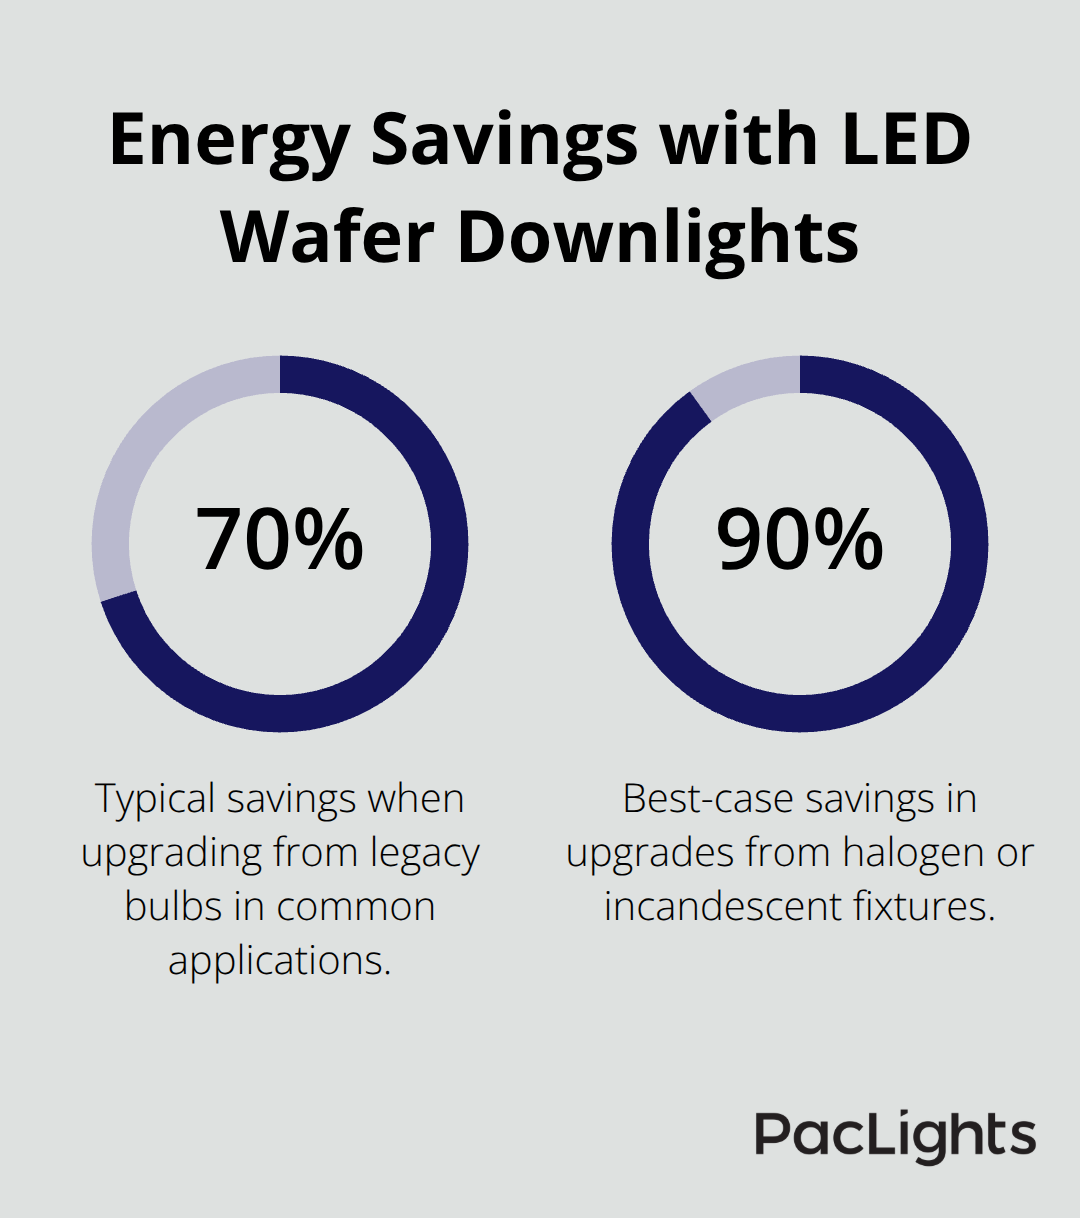
Canless wafer lights mount from below the ceiling, which means you avoid cutting into joists or routing around obstacles in the ceiling cavity. This approach cuts installation time significantly compared to traditional recessed lighting. LED wafer lights deliver 70 to 90 percent energy savings compared to incandescent or halogen alternatives, according to DOE comparisons. A 12-watt wafer downlight producing 1,050 lumens uses a fraction of the power that older recessed lights required for the same output. This translates to real savings on monthly energy bills.
ENERGY STAR-certified models come with verified efficiency ratings, and many qualify for utility rebates through programs supported by the Department of Energy.
Dimming, Beam Angles, and Installation Specifics
Dimmer compatibility matters: about 90 percent of flicker issues stem from incompatible dimmers, so using LED-rated dimmers and checking manufacturer compatibility lists prevents frustration. The beam angle typically falls between 15 and 45 degrees, letting you control how focused or spread the light is. Wider angles work for general ambient lighting, while narrower angles create accent lighting effects. Installation requires measuring your actual ceiling clearance, confirming the trim size (2-inch and 4-inch are common), and verifying IC or AT ratings if insulation or air-tight performance matters in your space.
Understanding these specifications sets the foundation for selecting the right fixture. The next section explores the different types of wafer downlights available and how their variations affect performance in different applications.
Wafer Downlight Features That Actually Impact Your Installation
Trim Size and Profile Depth: The Real Constraints
Trim size and profile depth create real constraints in remodel projects, and this is where most homeowners make poor decisions. A 6-inch wafer downlight with a standard trim requires roughly 6 inches of horizontal ceiling space, while shallow-trim versions reduce that footprint significantly. If your ceiling has joists spaced 16 inches apart, a standard trim might leave you only 2 inches of clearance on either side-enough technically, but tight for wiring and adjustment during installation. Shallow-trim models solve this by sitting closer to the drywall surface, typically under half an inch thick.
Amico’s 6-inch ultra-thin canless LED downlight exemplifies this approach, delivering 1,050 lumens at 12 watts with a profile so compact that it fits in spaces where traditional fixtures fail. The practical difference: shallow-trim fixtures give you flexibility in tight layouts and reduce the risk of hitting obstacles above the ceiling. Standard trims work fine in new construction or spaces with generous clearance, but remodels almost always benefit from the shallow option.
Dimmable vs. Non-Dimmable: Control Matters More Than You Think
Dimmable variants matter more than most people realize. About 90 percent of flicker complaints stem from pairing LED fixtures with older incandescent-rated dimmers, not from fixture defects. A dimmable wafer downlight paired with an LED-rated dimmer performs flawlessly down to 5 or even 1 percent brightness on quality models, enabling mood control and energy reduction beyond simple on-off switching.
Non-dimmable fixtures cost less but lock you into fixed brightness, which limits flexibility as your needs change. We recommend dimmable options for kitchens and living spaces where you adjust lighting throughout the day, and non-dimmable only for closets, hallways, or utility areas where brightness stays constant.
Color Temperature and CRI: Where Specification Mistakes Destroy Projects
Color temperature and CRI ratings determine whether your space looks cheap or polished, and this is where specification mistakes destroy projects. CRI 90 or higher guarantees accurate color rendering-skin tones look natural, paint colors photograph true, and retail merchandise displays appeal to customers. Anything below 90 CRI produces a washed-out, institutional appearance that no homeowner wants.
Color temperature selection depends on room function: 2700K warm white suits living rooms and bedrooms, 3000K works for kitchens where you need visibility without harsh light, and 5000K daylight serves offices and detailed work areas. Tunable or selectable color temperature models let you choose at purchase time without replacing fixtures later. The Amico fixture mentioned above offers five selectable color temperatures from 2700K to 5000K, eliminating the guesswork.
Real-World Fixture Options Across Price Points
TORCHSTAR dimmable slim LED lights provide a 36,000-hour lifespan with Energy Star certification and a wide 110-degree beam angle that spreads light evenly across rooms. Philips Hue Slim Downlight goes further with full RGBCW capability and app control for homeowners invested in smart ecosystems, though at premium pricing. For commercial applications, HALO HLB6 delivers the five-CCT range with wet-location listing and a half-inch profile that solves space constraints in offices and retail.
Spec CRI 90 or higher, match color temperature to room purpose, and choose dimmable whenever budget allows-these decisions compound over the fixture’s 10-to-20-year lifespan. Once you understand how these features affect performance, the next step involves assessing your specific ceiling type and calculating the brightness you actually need for your space.
How to Match Fixtures to Your Ceiling Type and Calculate Brightness Needs
Measure Your Actual Ceiling Cavity and Joist Layout
Start by measuring your ceiling cavity depth above the drywall, not the distance to the joists. Most homes have 2 to 4 inches of space between drywall and obstacles like HVAC ducts, plumbing runs, or electrical conduit. Wafer downlights under one inch thick fit this constraint, but standard recessed housings demand 6 to 8 inches and won’t work. Confirm your joist spacing too-16-inch on-center framing is standard in residential construction, but older homes sometimes use 12-inch or 24-inch spacing.
If joists are 16 inches apart and you want 6-inch fixtures, you have roughly 5 inches of horizontal clearance on each side, which leaves room for wiring and adjustment. Tighter spacing forces you toward 4-inch fixtures or shallow-trim designs that sit flush against drywall. This measurement determines whether your project succeeds or fails, so take time to verify it before ordering fixtures.
Verify IC, AT, and Wet-Location Ratings for Your Space
Confirm whether your ceiling needs IC rating (fixtures can touch insulation directly) or AT rating (air-tight to prevent air leakage through the ceiling plane). Most remodels benefit from IC-rated fixtures since you cannot predict what insulation exists above the drywall. Check your local building code-some jurisdictions require AT-rated fixtures in certain climates to prevent condensation and air infiltration.
For wet locations like bathrooms with steam showers, specify wet-location rated fixtures with protective glass lenses. Damp-location ratings work for standard bathrooms but fail in high-moisture environments. Confirm your ceiling material too-drywall accepts standard mounting hardware, but drop ceiling tiles require different clips, and plaster ceilings risk cracking if you overtighten mounting hardware.
Calculate Brightness Based on Room Function and Ceiling Height
Brightness calculation depends on room function and ceiling height. The general rule suggests spacing fixtures 4 to 6 feet apart for even illumination, but actual brightness depends on lumen output and beam angle. A 1,050-lumen fixture with a 110-degree beam angle spreads light across a wider area than a 1,200-lumen fixture with a 15-degree narrow beam designed for accent lighting.
For kitchens, try 4 to 5-inch fixtures over countertops at 3 to 4-foot spacing to handle task lighting, then add separate ambient fixtures in the ceiling center. Bathrooms need roughly 50 lumens per square foot according to IES guidelines, so a 75-square-foot bathroom requires 3,750 total lumens split across multiple fixtures. Living rooms and bedrooms work with 10 to 20 lumens per square foot for general ambient lighting. Higher ceilings (9 feet or more) need larger fixtures or more spacing because light spreads over greater distance.
Select Dimmers and Smart Controls That Match Your Fixtures
Dimmer compatibility ranks equally important-pair dimmable wafer lights with LED-rated dimmers only, not old incandescent dimmers, or you invite the 90-percent flicker problem. Test dimmer compatibility with the specific fixture model before installation since driver electronics vary between manufacturers.
Smart control options range from simple Bluetooth mesh (like Juno fixtures supporting SmartThings, Alexa, and Google) to full ecosystem integration like Philips Hue with app scheduling and scene creation. Commercial Electric offers bulk-pack options with five selectable color temperatures and Energy Star certification at competitive pricing, making them practical for larger remodels.
Lock in Color Temperature at Purchase Time
Specify color temperature at purchase time rather than assuming you can adjust it later-most fixtures lock into one temperature unless you select tunable white models upfront, which cost 20 to 30 percent more but eliminate regret if the chosen temperature doesn’t match your space after installation.
Final Thoughts
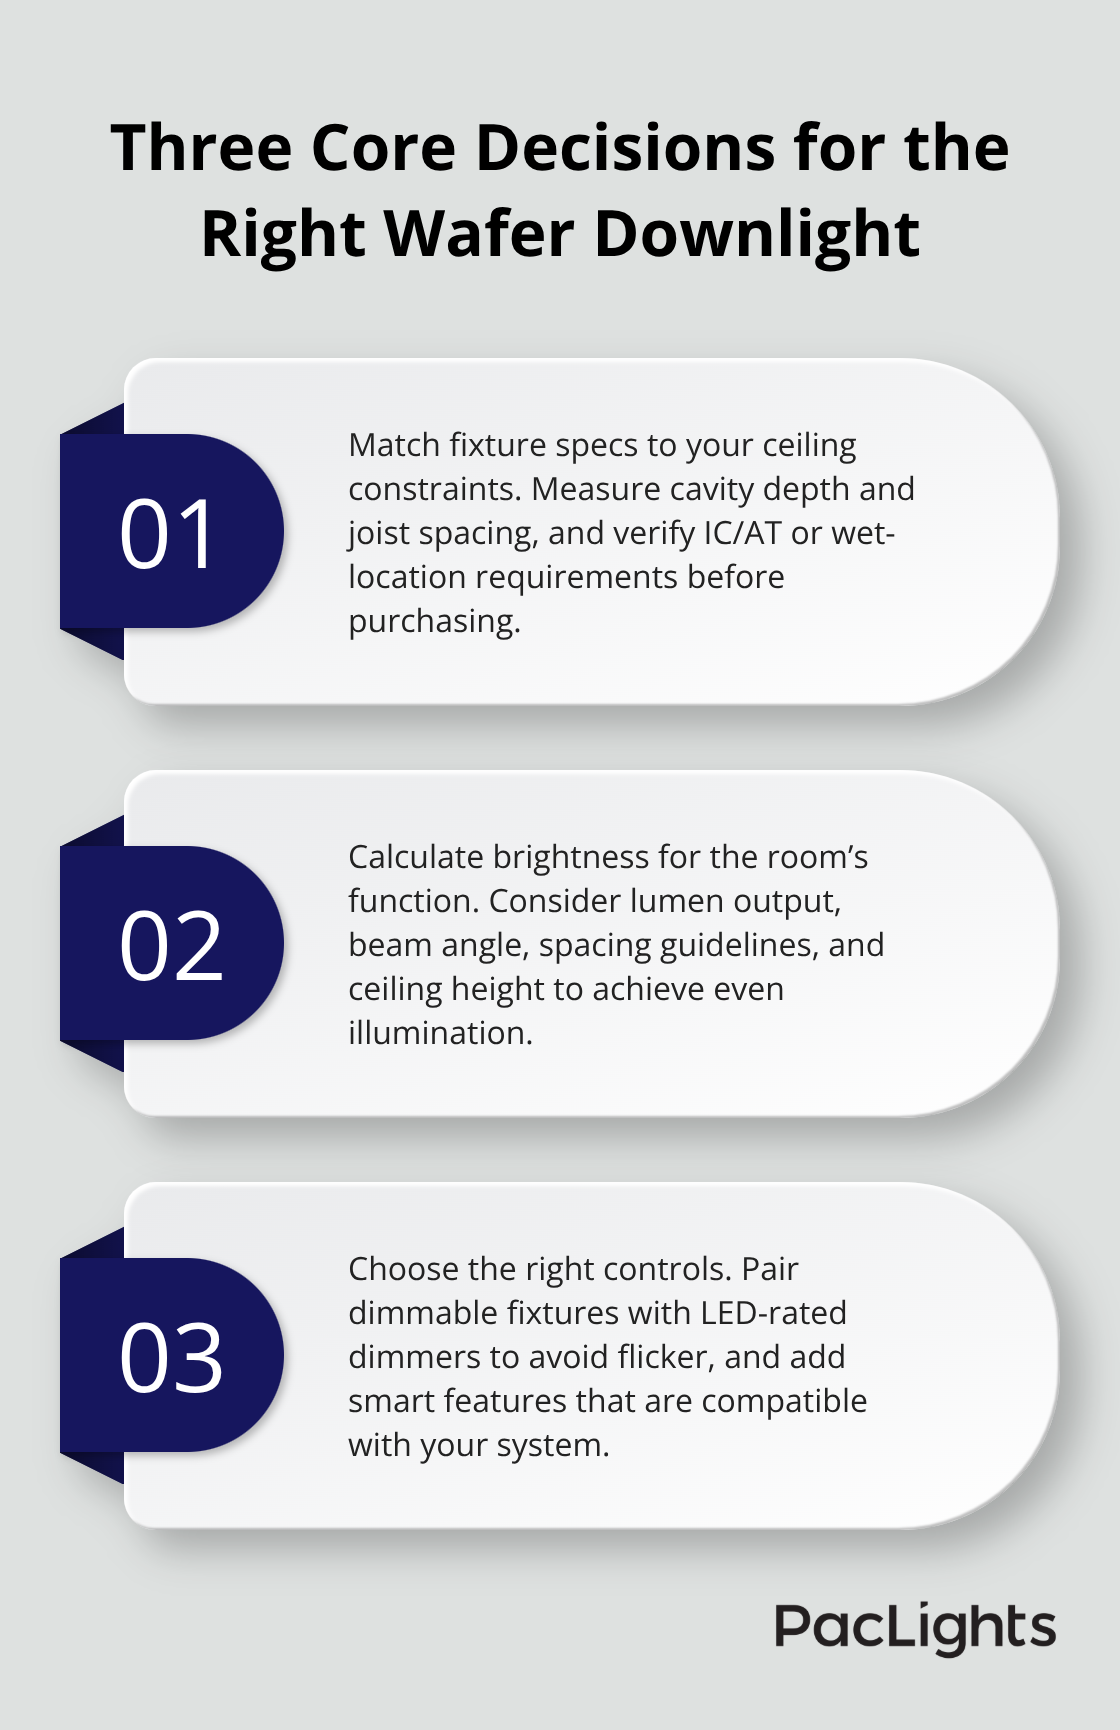
Selecting the right wafer downlight comes down to three core decisions: matching fixture specifications to your ceiling constraints, calculating brightness for your room’s function, and choosing controls that fit your lifestyle. Measure your actual ceiling cavity depth, confirm IC or wet-location ratings based on your space, and specify color temperature at purchase time rather than guessing.
This wafer downlight comparison guide helps you match fixture specifications to your constraints and avoid costly mistakes during installation.
Energy savings of 70 to 90 percent compared to incandescent or halogen fixtures reduce monthly utility costs immediately, while 25,000 to 50,000 hour lifespans eliminate the constant bulb replacement that older systems demanded. ENERGY STAR certification qualifies many models for utility rebates, which shortens payback periods significantly. The slim profile solves real installation problems in remodels where traditional recessed housings fail due to joists, plumbing, or ductwork overhead.
Measure your ceiling, document your joist spacing and any obstacles, then reference this guide to match fixture specifications to your constraints. We at PacLights provide free lighting layout designs and ROI assessments to help you optimize fixture placement and calculate long-term savings for your specific project. Contact our team to discuss your space and receive a customized plan that accounts for your ceiling type, brightness needs, and control preferences.
Disclaimer: PacLights is not responsible for any actions taken based on the suggestions and information provided in this article, and readers should consult local building and electrical codes for proper guidance.