

Surface mount compatibility is one of the biggest questions we hear from facility managers planning lighting upgrades. Many organizations assume their existing downlights will work with any smart control system, but that’s rarely the case.
At PacLights, we’ve seen countless projects delayed because of overlooked compatibility issues. This guide walks you through exactly what you need to check before investing in smart controls.
What Surface Mount Downlights Actually Are
Surface mount downlights sit directly on top of a standard ceiling junction box rather than recessing into a cavity, which fundamentally changes how they connect to smart controls. The fixture mounts flush or slightly proud of the ceiling surface, with its electrical connections made at a shallow junction box. This design means the downlight’s internal driver and control electronics are exposed to the ceiling space, not hidden behind drywall. Most commercial facilities use surface mount downlights in retrofit situations where adding recessed housing would require significant structural work, or in spaces with tight ceiling cavities like basements and mechanical rooms.
Junction Box Depth Creates Hard Constraints
The junction box is where compatibility fails most often. A standard surface mount downlight needs clearance for its driver, transformer, or control module, but a shallow box leaves only a few inches of space. When you upgrade to a smart downlight, you add wireless radio components and dimming electronics that consume physical room. Some smart downlight models require you to remove the original junction box entirely and install a deeper one, which means cutting into drywall and rerouting wiring-turning a simple fixture swap into a renovation. Others have mounting tabs designed for specific box types, so a fixture that works perfectly in one facility won’t fit in another.
Measure your junction box depth and compare it to the smart downlight’s installation guide before any purchase. Manufacturers like Philips Hue and GE Cync publish detailed specifications, but many facility managers skip this step and discover the incompatibility only after buying fixtures. The depth requirement alone eliminates roughly 30 to 40 percent of retrofit candidates without additional construction work.
Wiring Configuration Determines Control Options
Smart downlights operate through Wi-Fi, Zigbee, or proprietary wireless protocols, but they still require line voltage power delivered correctly to the fixture. Your existing ceiling wiring must support the control system you choose-mixing older two-wire circuits with modern smart fixtures often fails because the smart system needs a neutral wire to function. Some wireless dimming systems are non-neutral compatible, but these are specialty products and cost significantly more.
A licensed electrician should verify your circuit configuration before you invest in any smart control solution. Additionally, the dimmer or control switch you pair with the downlight must be explicitly LED-compatible. Leading-edge dimmers designed for incandescent loads will cause flickering, color shifting, or complete failure with modern LED fixtures. Trailing-edge dimmers work much better, but even then, the downlight’s minimum load specification matters-if you install only one or two small-die LED downlights on a single dimmer, the dimmer may not function properly because the load is too light.
What Your Electrician Needs to Verify
Confirm wiring configuration and dimmer compatibility with your electrician before finalizing any smart lighting retrofit. This verification step prevents costly mistakes and ensures your smart control system functions reliably once installed. Your electrician can identify whether your circuits support neutral wiring, assess whether your existing dimmers are LED-compatible, and recommend trailing-edge options if needed. This foundation of electrical compatibility determines whether your surface mount downlights can actually work with the smart controls you’re considering.
What to Check Before You Buy
Gather Your Downlight’s Model Number and Specifications
Start with your downlight’s model number and specifications-this single step eliminates most compatibility problems before they happen. Find the model number on the fixture itself or in your facility’s maintenance records, then contact the manufacturer directly or consult their technical documentation. You need to know three things: the fixture’s electrical specifications (voltage, wattage, control protocol), the junction box depth your installation requires, and whether the fixture supports dimming. Manufacturers like Philips publish detailed compatibility matrices showing which smart switches work with which downlights. GE Cync provides similar documentation through their product pages.
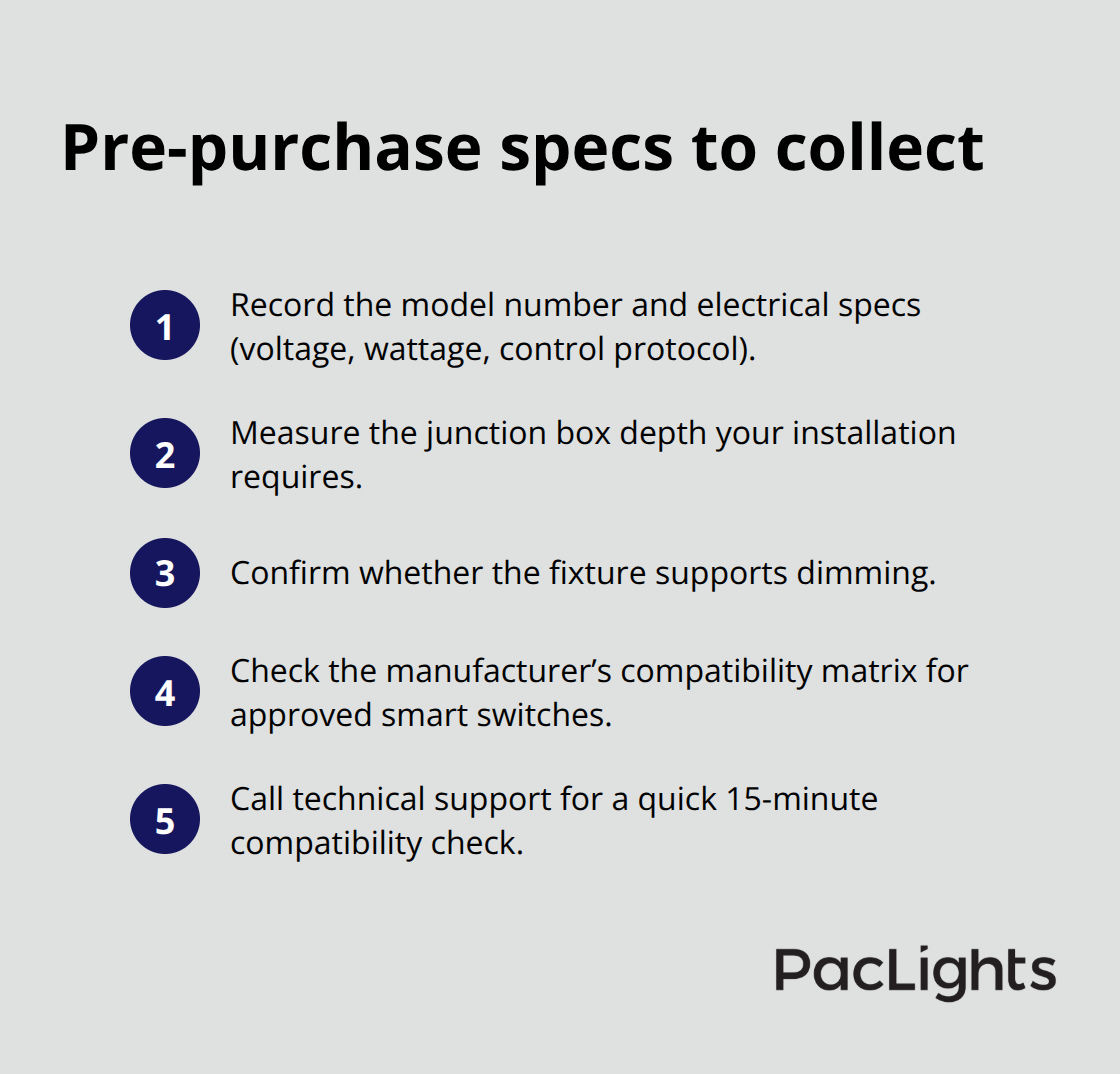
Many facility managers skip this verification and assume compatibility based on price or brand reputation alone-this is how projects stall. A 15-minute call to the manufacturer’s technical support team costs nothing and prevents weeks of delays after installation.
Verify Your Electrical Infrastructure with a Licensed Electrician
Your electrician’s assessment of your existing wiring and control infrastructure is equally critical. Ask them to document your circuit configuration, identify whether neutral wires are present, measure your junction box depth, and assess your current dimmer type. If your facility uses leading-edge dimmers, they are incompatible with LED downlights and will cause visible flickering or failure. Trailing-edge dimmers are the correct choice, but only if your downlight’s minimum load specification is met-installing a single 10-watt LED downlight on a dimmer designed for 60-watt minimum loads will result in erratic behavior. Some smart control systems like Lutron Caseta or Wink handle this better than others because they use lower minimum load thresholds, typically 10 watts or less.
Cross-Reference Specifications Against Smart Downlight Requirements
Document everything your electrician finds in writing and cross-reference it against the smart downlight’s installation requirements before purchasing. This compatibility verification should take 2 to 4 hours of professional time and costs between $300 and $600 depending on your facility’s complexity-far less than replacing incompatible fixtures after installation. Your electrician identifies the gaps between what you have and what the smart system needs, which then determines whether you can proceed with a simple fixture swap or whether you need additional construction work (such as junction box replacement or circuit modifications). Once you understand these constraints, you can evaluate which smart control options actually fit your facility’s existing infrastructure and budget.
Making the Switch to Smart-Compatible Fixtures
Once your electrician confirms your facility’s electrical infrastructure can support smart controls, the actual upgrade becomes straightforward-but your fixture selection determines whether you get reliable performance or years of frustration. The real benefit of switching to smart-enabled downlights isn’t the color-changing capability or voice control that manufacturers advertise; it’s energy savings and operational control. Commercial facilities using networked lighting controls with occupancy sensors and daylight harvesting reduce energy consumption by 20 to 30 percent according to real-world deployments documented by the U.S. Department of Energy. This translates directly to lower utility bills and faster payback on your fixture investment. A facility replacing 50 surface mount downlights with smart-compatible fixtures typically recovers the upgrade cost within 3 to 5 years through energy savings alone, assuming average commercial electricity rates of $0.12 per kilowatt-hour. The secondary benefits-remote scheduling, scene control across multiple zones, and the ability to adjust color temperature from 2700K to 5000K without replacing bulbs-matter less than the operational efficiency gains, but they do make facility management easier and improve occupant satisfaction in spaces like offices and retail environments.
Which Smart Control System Fits Your Facility
Your smart control choice depends on three variables: your existing electrical infrastructure, your facility’s size and complexity, and your tolerance for ongoing maintenance. Wireless dimming systems work well in smaller facilities with straightforward wiring because they require minimal setup and handle low minimum load thresholds (10 watts or less), making them compatible with even single small-die LED downlights. Larger commercial facilities with dozens of fixtures benefit from networked systems, which allow you to create scenes, set schedules, and integrate with building automation systems-but these systems require a hub device, more complex initial programming, and ongoing network management.

Zigbee-based options offer mid-range pricing and reasonable reliability, though some users report occasional connection dropouts in facilities with dense Wi-Fi interference. The critical decision is whether you want local control (a wireless dimmer at the wall that works even if your internet fails) or cloud-based control (app and voice commands that depend on network connectivity). Most commercial facilities should choose local-control-first systems with optional cloud integration rather than relying entirely on smart bulbs or fixtures controlled only through an app, because losing connectivity means losing the ability to turn lights on or off.
Installation Timeline and Labor Costs
Installation itself takes 2 to 4 hours per zone depending on the number of fixtures and whether your electrician needs to replace junction boxes or modify circuits. After installation, you’ll need time for initial programming-creating scenes, setting schedules, and configuring occupancy sensors typically requires 3 to 6 hours of skilled technician time for a 50-fixture installation. This setup cost ranges from $800 to $2,000 depending on system complexity and your region’s labor rates.
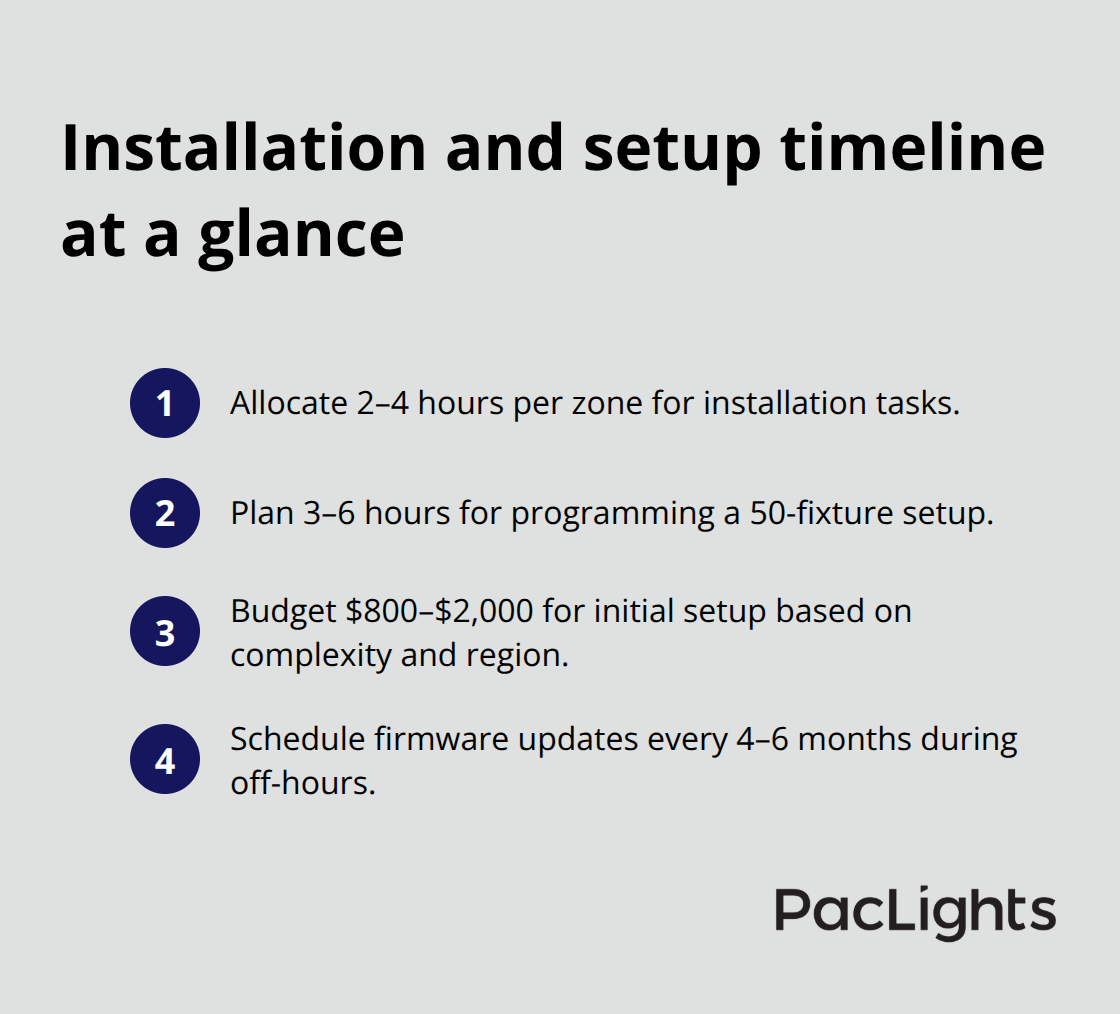
Once operational, the system requires minimal maintenance beyond occasional firmware updates, which manufacturers release every 4 to 6 months to fix bugs and improve reliability. Apply these updates during off-hours to avoid disrupting facility operations.
Network Infrastructure Requirements
The real ongoing expense comes from network infrastructure-ensure your facility’s Wi-Fi coverage extends to all fixtures and that your router has sufficient bandwidth to handle the additional connected devices. A facility upgrading 50 fixtures to smart-enabled downlights will add roughly 50 network connections, which can overwhelm older routers designed for 20 to 30 devices. Upgrading to a mesh Wi-Fi system or adding access points costs $300 to $800 but prevents the connectivity problems that make smart lighting unreliable.
Final Thoughts
Surface mount compatibility determines whether your smart lighting upgrade succeeds or stalls. Start by gathering your downlight specifications and scheduling an electrician’s assessment to document your junction box depth, circuit configuration, and current dimmer type. Then contact your smart downlight manufacturer to confirm compatibility before you purchase anything, which prevents costly mistakes and ensures reliable performance once your system operates.
Commercial facilities deploying networked lighting controls with occupancy sensors and daylight harvesting reduce energy consumption by 20 to 30 percent, and a 50-fixture retrofit typically pays for itself within 3 to 5 years through lower utility bills alone. Smart controls also give facility managers the ability to adjust lighting across zones remotely, create schedules that match occupancy patterns, and integrate with building automation systems that improve both efficiency and occupant experience. The real payoff comes from energy savings and operational control, not from the features manufacturers emphasize.
We at PacLights understand that lighting upgrades require careful planning and accurate information. Contact PacLights to discuss your specific situation and receive a clear picture of your upgrade costs and energy savings potential.
Disclaimer: PacLights is not responsible for any actions taken based on the suggestions and information provided in this article, and readers should consult local building and electrical codes for proper guidance.