

ADA compliance isn’t optional-it’s a legal requirement that affects how your facility operates. Flush mount accessibility standards dictate specific illumination levels, placement heights, and safety measures that many facility managers overlook.
At PacLights, we’ve helped countless organizations navigate these requirements without costly mistakes. This guide walks you through everything from understanding ADA standards to completing your installation safely and correctly.
What ADA Standards Actually Require for Downlights
The Physical Dimension Rule That Matters Most
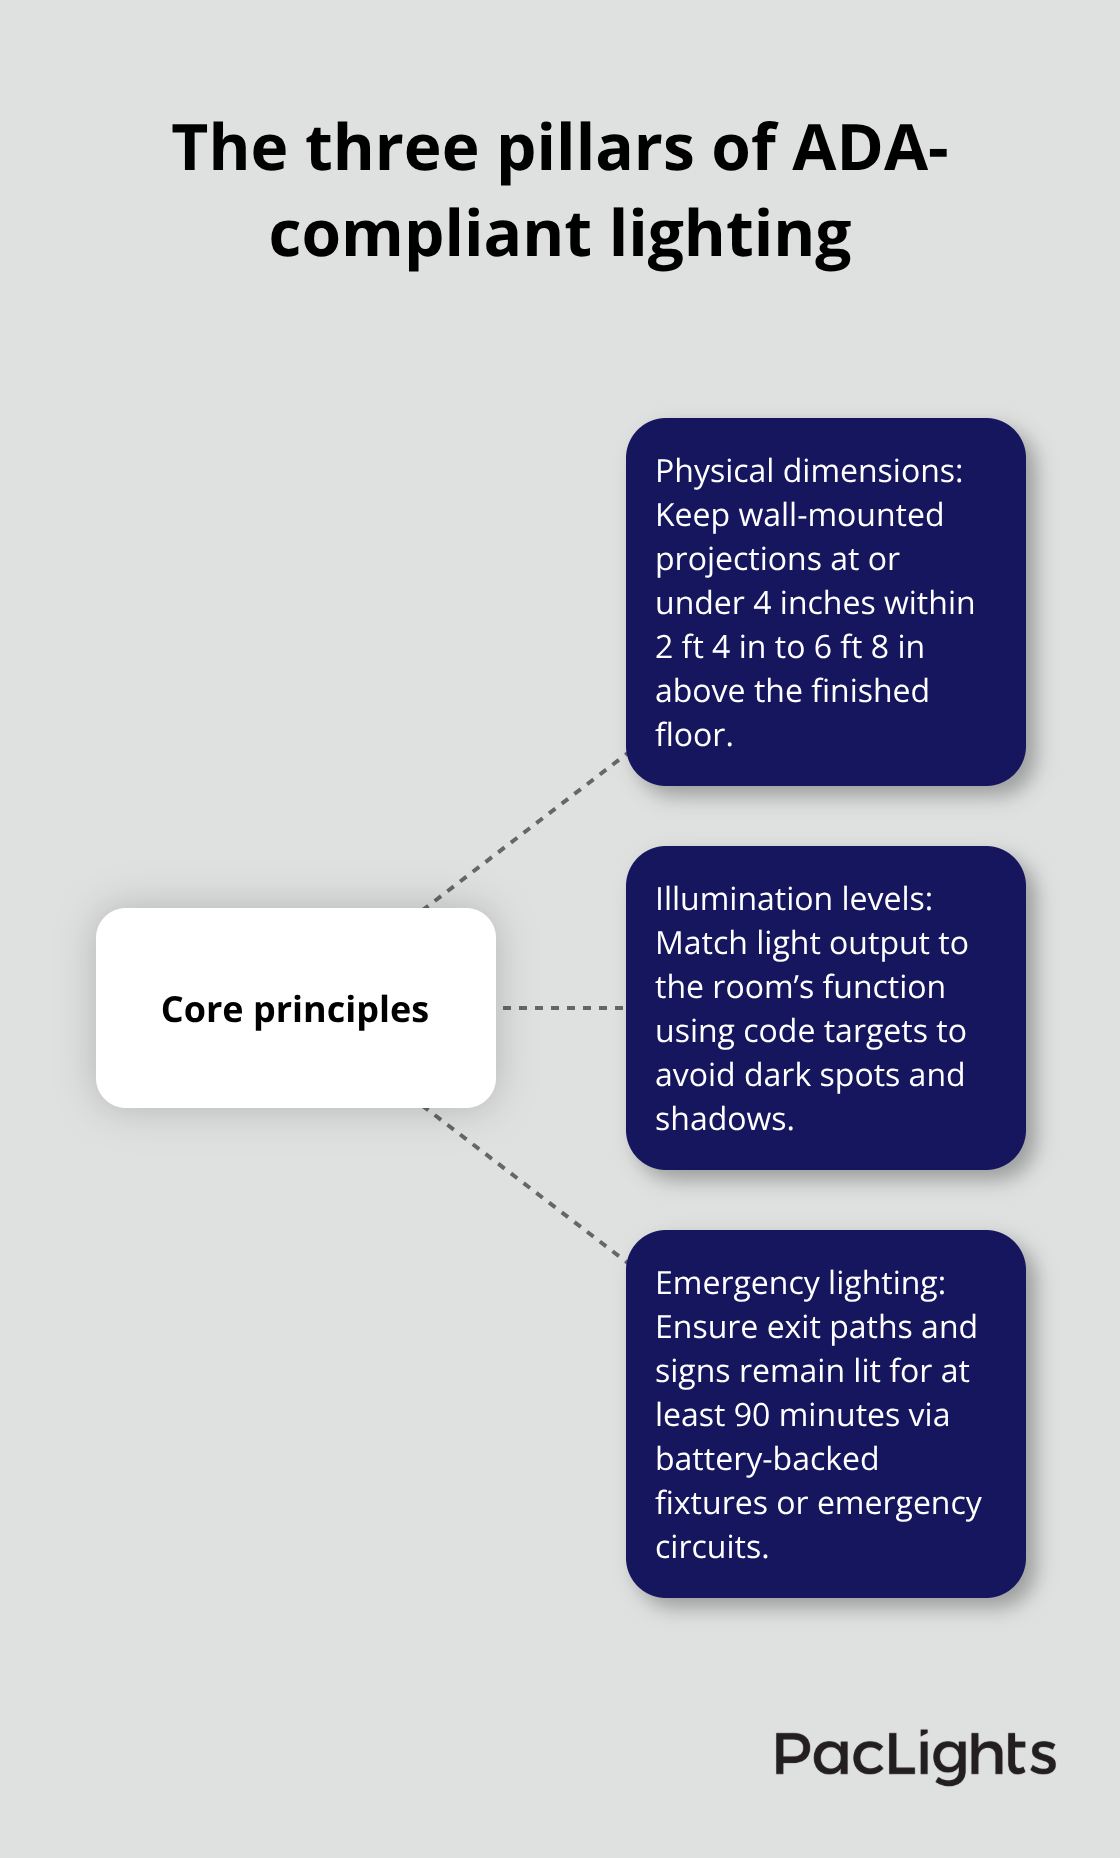
The ADA doesn’t care about brightness levels in the way most people think. The regulations focus entirely on physical dimensions: how far fixtures project from walls and where they mount vertically. Wall-mounted fixtures can project no more than 4 inches from the wall surface when installed between 2 feet 4 inches and 6 feet 8 inches above the finished floor. This projection limit exists because anything protruding further into a pathway creates an obstruction hazard for people with visual impairments who use canes or guide dogs.
Flush mount downlights largely sidestep this concern because they sit recessed into the ceiling, creating virtually zero projection. However, the mounting height rule still applies if you use any ceiling-suspended fixtures. The critical detail most installers miss: the 4-inch projection limit only applies within that specific height band. Fixtures mounted above 6 feet 8 inches or below 2 feet 4 inches face no projection restrictions, though mounting them too low creates head-strike risks.
Verifying Fixture Specifications Before Installation
For downlights specifically, the ADA requirement boils down to ensuring your fixture assembly doesn’t exceed 4 inches when measured from the wall surface to the furthest point of the trim ring or housing. You need to verify fixture specifications during selection, not after installation. This single step prevents costly rework and compliance failures.
Illumination Levels and Building Code Requirements
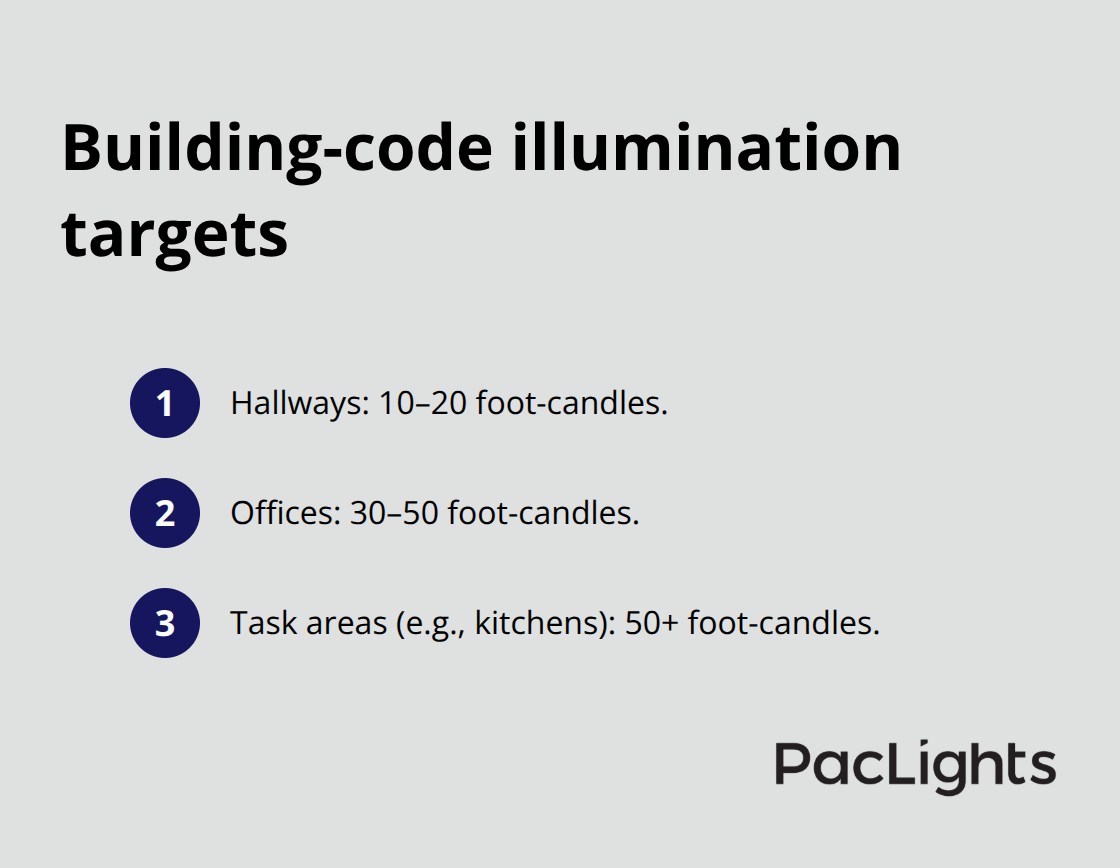
Illumination requirements do matter, but other codes set them, not the ADA itself. Building codes typically require 10–20 foot-candles in hallways, 30–50 in office areas, and 50+ in task-intensive spaces like kitchens. Most facilities underestimate how much light they actually need. A standard 10-watt LED downlight produces roughly 800 lumens, which covers about 40–50 square feet adequately.
For a typical 12-by-12-foot room, you need 4–6 fixtures for ambient lighting, not 2–3 as many people assume. This calculation prevents dark spots and shadows that create accessibility problems for all occupants, not just those with disabilities.
Emergency Lighting: A Separate but Essential Requirement
Exit signs and emergency egress paths must remain illuminated for at least 90 minutes during power loss. This typically means either battery-backed fixtures or a dedicated emergency circuit. Many facility managers ignore this until an inspection catches them. You should identify your exit routes, calculate fixture counts based on actual space dimensions and task requirements, then verify that each fixture meets the 4-inch projection standard and mounts within the safe height range.
The practical approach combines these three elements: physical compliance with projection and height limits, adequate illumination for the space type, and functional emergency lighting. Your next step involves assessing your current layout and calculating the exact fixture count your facility requires.
Planning Your Flush Mount Downlight Installation
Measure Your Space and Calculate Fixture Counts
Walk your facility with a measuring tape and notepad. Photograph each room from multiple angles, marking existing fixtures, windows, and architectural features that affect light distribution. Note the ceiling height in each space-this single measurement determines your entire fixture spacing strategy. An 8-foot ceiling requires fixtures spaced roughly 4 feet apart; a 10-foot ceiling allows 5-foot spacing. This spacing rule prevents dark zones between fixtures and eliminates the harsh shadows that create accessibility problems.
Count the total square footage you’re covering, then divide by 40–50 square feet per 10-watt LED downlight to establish your baseline fixture count. Most facilities need 40–60% more fixtures than their current setup provides. For a standard 12-by-12-foot room, plan for 4–6 fixtures minimum rather than the 2–3 many managers assume will suffice. This calculation prevents under-lighting spaces, which creates compliance violations and poor usability.
Match Fixture Wattage to Task Requirements
Select your fixtures based on the specific tasks happening in each zone. Hallways and general circulation areas need 10–20 foot-candles according to building codes, which a single 10-watt LED downlight handles across 40–50 square feet. Kitchens and task-intensive areas demand 50+ foot-candles, requiring either closer fixture spacing or higher-wattage options-typically 15–20 watts per fixture. Bathrooms occupy a middle ground at 30–50 foot-candles, with vanity areas needing stronger illumination than general bathroom space.
Choose dimmable LED-compatible fixtures from manufacturers like Kichler or FX Luminaire if your budget allows, as they cost 15–25% more upfront but deliver 20–30% energy savings through dimming flexibility. This investment pays for itself within 3–5 years on most commercial projects.
Verify Fixture Dimensions Before Purchase
Verify every fixture specification confirms the trim ring and housing assembly stays under 4 inches projection from the wall-this prevents rework after installation. Request product datasheets from your supplier showing exact dimensions; do not estimate. Confirm that each fixture you select meets the ADA projection requirements before you commit to your purchase order.
PacLights offers free lighting layout designs and ROI assessments that calculate exact fixture counts, wattage requirements, and long-term energy projections for your specific rooms. This approach eliminates guesswork from your planning phase and ensures your selections align with both ADA standards and your facility’s actual illumination needs. With your fixture specifications confirmed and quantities calculated, you can now prepare your ceiling and electrical infrastructure for the installation process.
Installing Fixtures and Running Safe Electrical Connections
Prepare Your Workspace and Verify Power Safety
Power off the circuit breaker before you touch any wiring, then verify the power is actually off with a voltage tester on the existing circuit. This single step prevents electrical shock and takes less than two minutes but protects your entire installation. For retrofit installations in existing ceilings, use your fixture template to mark hole locations on drywall, then cut openings typically 4 or 6 inches in diameter depending on your fixture housing size. Measure twice and cut once-undersized holes waste time, while oversized holes require patching.
Route Electrical Wire Through Ceiling Cavities
Once your ceiling openings are ready, run electrical wire from your main panel or existing circuit to each fixture location with fish tape if you’re working in tight spaces. Route wire through the ceiling cavity carefully to avoid puncturing insulation or creating pinch points that damage wire insulation. New construction installations require you to mount fixture arms directly to ceiling joists before drywall goes up, which creates a cleaner final look and simplifies wiring runs.
Secure Fixtures and Make Electrical Connections
Retrofit housings slide into your ceiling holes and clamp to the drywall using spring-loaded brackets that lock audibly when seated correctly-you’ll hear a distinct click confirming proper engagement. Connect wiring at each fixture using the standard color code: black wire to black, white to white, and bare copper or green ground wire to the ground screw on the fixture housing. Make connections tight enough that wires don’t pull free under gentle tension, then secure the fixture housing in place according to manufacturer specifications.
Retrofit installations typically take 20–30 minutes per fixture once your holes are cut and wire runs complete. Test each fixture individually before moving to the next one by restoring power at the breaker, flipping the wall switch, and confirming the light illuminates at full brightness. If any fixture dims or flickers, check wire connections at both the fixture and the panel-loose connections create resistance that reduces voltage and causes these problems. Never assume a fixture is defective until you’ve verified the electrical connection twice.
Run Final System Tests and Troubleshoot Issues
After all fixtures are installed and tested individually, run a final full-system test with all lights on simultaneously to confirm your circuit capacity handles the total load without breaker trips. If breakers trip under full load, you’ve either overloaded a single circuit or have a wiring fault-consult a licensed electrician before proceeding further, as this indicates a safety issue requiring professional diagnosis.
Final Thoughts
ADA-compliant flush mount accessibility protects your facility legally while creating spaces where everyone navigates safely. The three core principles matter equally: physical dimensions must stay within the 4-inch projection limit, illumination levels must match your space’s actual function, and emergency lighting must operate independently during power loss. Proper installation delivers immediate benefits beyond compliance-adequate lighting reduces accidents, improves navigation for all occupants, and creates environments where people work or visit without barriers.
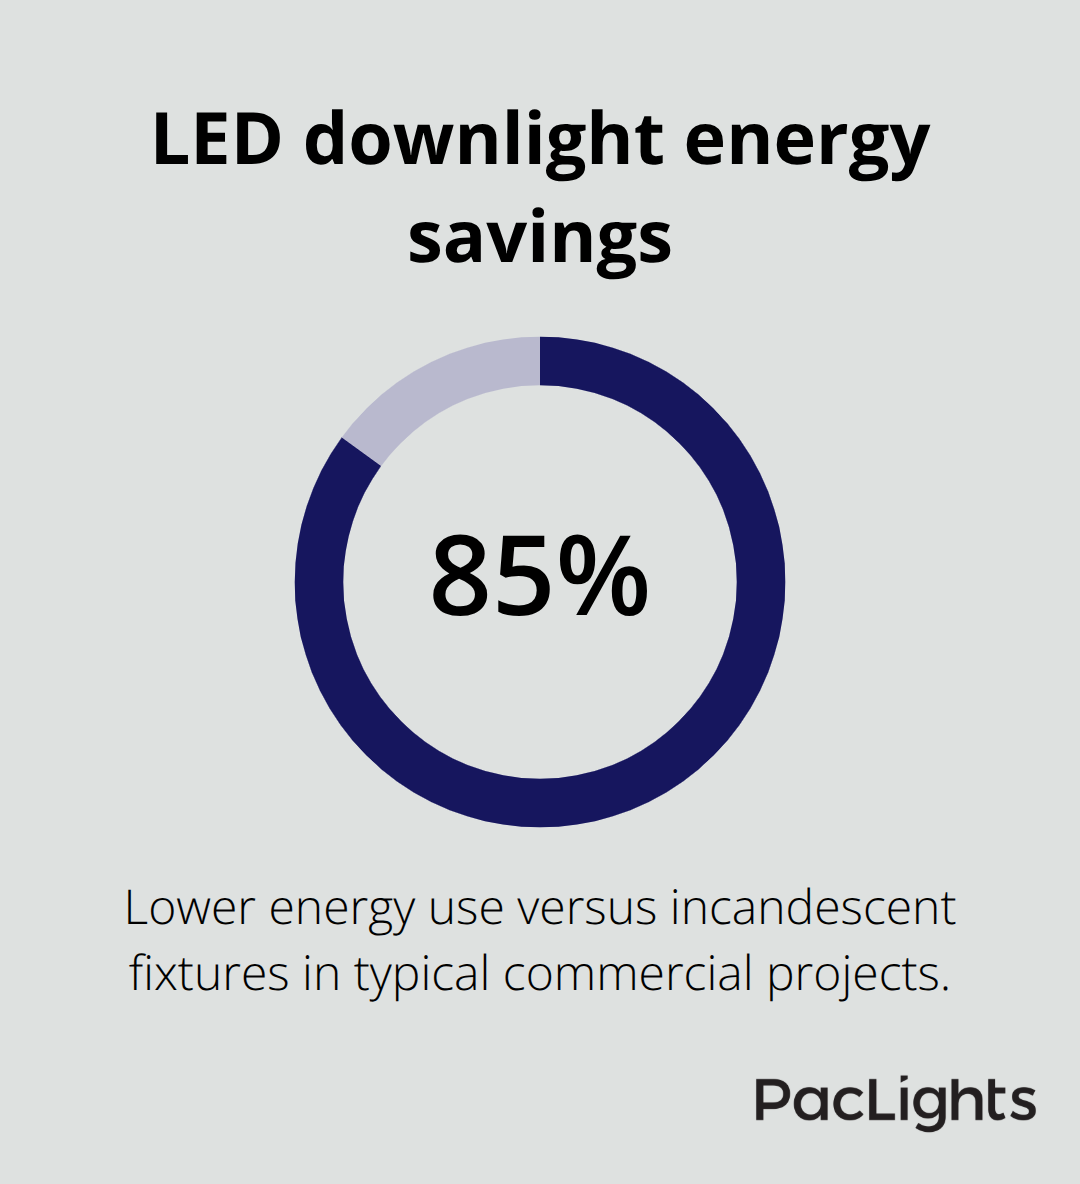
LED downlights reduce energy consumption by roughly 85% compared to incandescent alternatives, meaning your facility recovers installation costs through lower electricity bills within 3–5 years on most commercial projects. Maintenance keeps your system performing at peak efficiency: check mounting hardware every six months to confirm screws remain tight, clean fixtures monthly with a microfiber cloth to preserve brightness, and watch for dimming around 20,000 hours of operation as a signal for replacement timing.
A 12-by-12-foot room with 4–6 properly spaced fixtures costs more upfront than installing 2–3 undersized lights, but the difference in usability and safety justifies the investment immediately.
We at PacLights provide free lighting layout designs and ROI assessments that eliminate guesswork from your planning process, showing you exactly how many fixtures you need, what wattage delivers proper illumination, and how much you’ll save on energy costs annually. Contact us to discuss your facility’s specific requirements and start your ADA-compliant lighting upgrade today.
Disclaimer: PacLights is not responsible for any actions taken based on the suggestions and information provided in this article, and readers should consult local building and electrical codes for proper guidance.