

Recessed linear LED strip lights transform any space with clean, modern illumination that sits flush with your ceiling. These fixtures provide superior light distribution while maintaining a sleek, minimalist appearance.
We at PacLights know that proper installation makes all the difference between professional results and costly mistakes. This guide walks you through each step to achieve perfect placement and reliable performance.
What Tools Do You Actually Need
Professional installation starts with the right equipment, and corners cut on tools lead to delays and poor results. A reciprocating saw with 18-24 teeth per inch blades makes clean cuts in drywall without jagged edges that require extensive patches. Digital calipers that measure within 0.1mm accuracy prevent costly fit mistakes when you cut channels for LED strips. Non-contact voltage testers are non-negotiable for safety – the National Electrical Manufacturers Association reports that electrical accidents during DIY installations occur most often when circuits aren’t properly verified as dead.
Essential Cutting and Measuring Equipment
Measuring tape alone won’t deliver professional results. A laser level saves hours of adjustment time and prevents the uneven installations that plague amateur work. Heavy-duty clips rated for 50+ pounds provide long-term security that standard hardware store clips can’t match. Wire strippers designed for 12-18 gauge wire handle LED connections without damage to delicate conductors. Heat shrink tubing creates waterproof seals superior to electrical tape, which fails in warm ceiling spaces that reach 140°F.
Power Supply and Connection Components
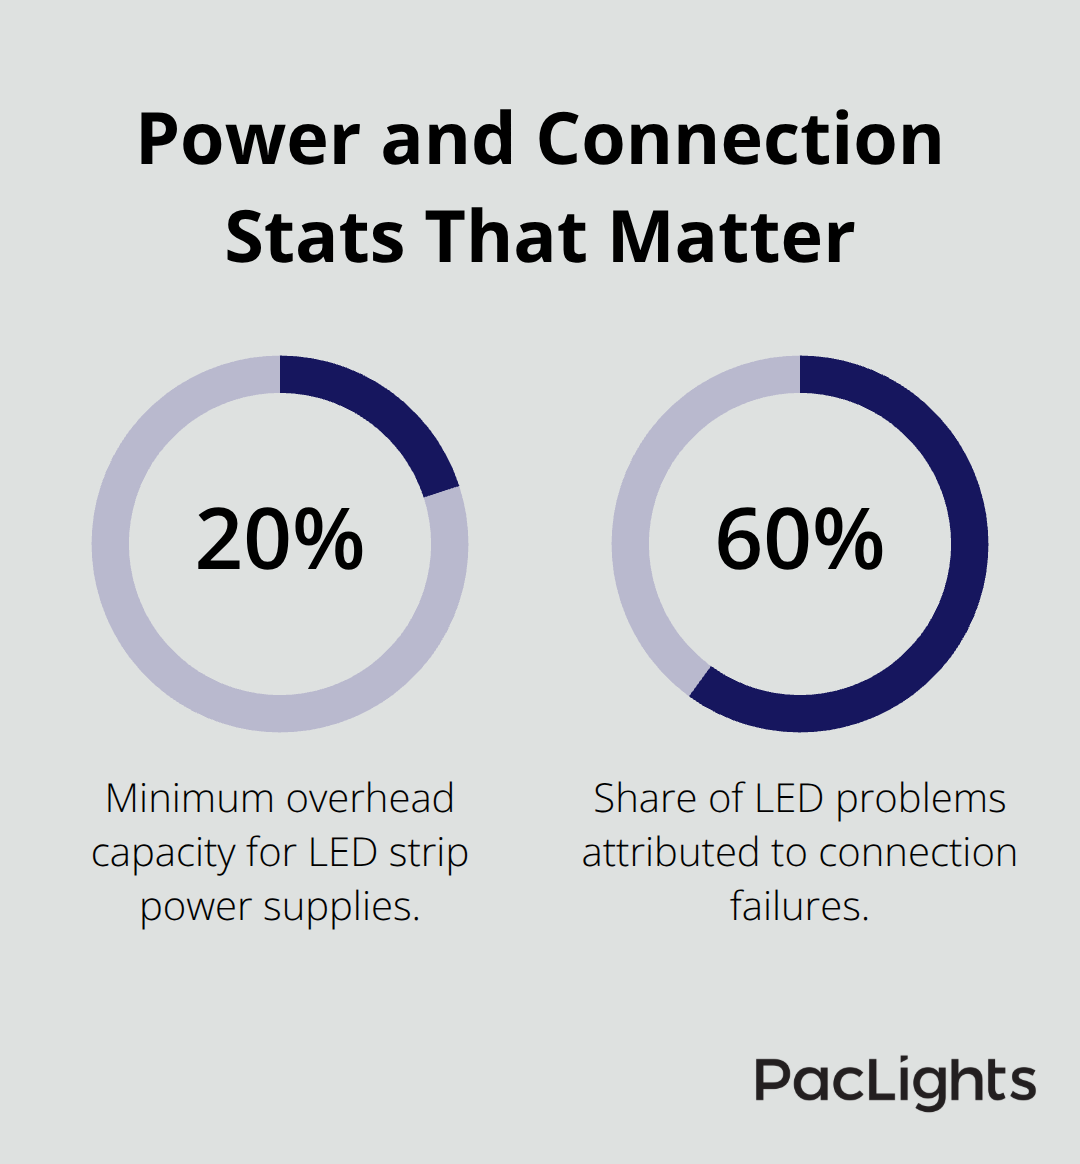
LED strip power requirements demand precise calculations. A 5-meter strip that consumes 14.4W per meter needs a minimum 90W power supply with 20% overhead capacity. Wago 221 connectors eliminate the connection failures that cause 60% of LED problems according to industry data.
IP65-rated strips work for indoor installations, while outdoor applications require IP68 waterproof ratings. Junction boxes must meet local electrical codes (consult your building department before purchase to avoid compliance issues that delay completion).
Safety Equipment and Testing Tools
Multimeters catch wiring errors before final installation and prevent future problems. Voltage drop exceeding recommended wire lengths can diminish LED brightness significantly – for every 100 feet of 18-gauge wire, a voltage drop of 2.4V occurs. Test circuits with proper equipment to verify connections work correctly. Safety glasses protect your eyes during cuts, and work gloves prevent cuts from sharp metal edges.
With your tools assembled and safety equipment ready, the next step focuses on precise layout planning that determines where each fixture will sit in your ceiling.
How Do You Execute the Installation
Mark your fixture locations with the Illuminating Engineering Society recommendation of 4-6 feet spacing for even light distribution. Place fixtures closer together in task areas where precision work occurs. Use a laser level to create perfectly straight reference lines across your ceiling – this prevents the uneven installations that mark amateur work. Measure twice and cut once applies here more than anywhere, as mistakes in drywall require extensive patches that delay completion for days.
Plan Your Layout Strategy
Draw your fixture positions on paper before you touch the ceiling. Calculate the exact spacing between each fixture to avoid awkward gaps or crowded areas. Check for obstacles like joists, pipes, or existing wiring that might interfere with your planned locations. Mark each position with a pencil dot, then verify measurements one final time before you proceed to cutting.
Create Clean Ceiling Openings
Cut your ceiling opening with the reciprocating saw in steady, controlled movements to prevent jagged edges that require extensive finish work. Start with pilot holes at each corner, then connect them with straight cuts that match your fixture dimensions exactly. Test-fit your fixture before you proceed – a gap larger than 1/8 inch creates visible imperfections that compromise the professional appearance you want.
Run Electrical Connections
Route electrical connections through the opening and leave 8 inches of wire length for easy connection work. Install electrical boxes that meet local code requirements (check with your building department for specific regulations). Position boxes so fixture mounting screws align properly with structural support. Verify that your wire gauge handles the electrical load without voltage drop issues.
Secure Fixtures and Connect Wiring
Mount your fixture flush with the ceiling surface with heavy-duty clips rated for 50+ pounds that provide long-term security. Connect wires with Wago 221 connectors rather than wire nuts, which cause the connection failures responsible for 60% of LED problems according to National Electrical Manufacturers Association data. Test each connection with your multimeter before you close up the installation – catch wiring errors now to prevent troubleshooting headaches later.
With your fixtures mounted and connections complete, the next step involves testing your installation to verify everything works correctly and address any performance issues that might arise.
How Do You Test Your Installation
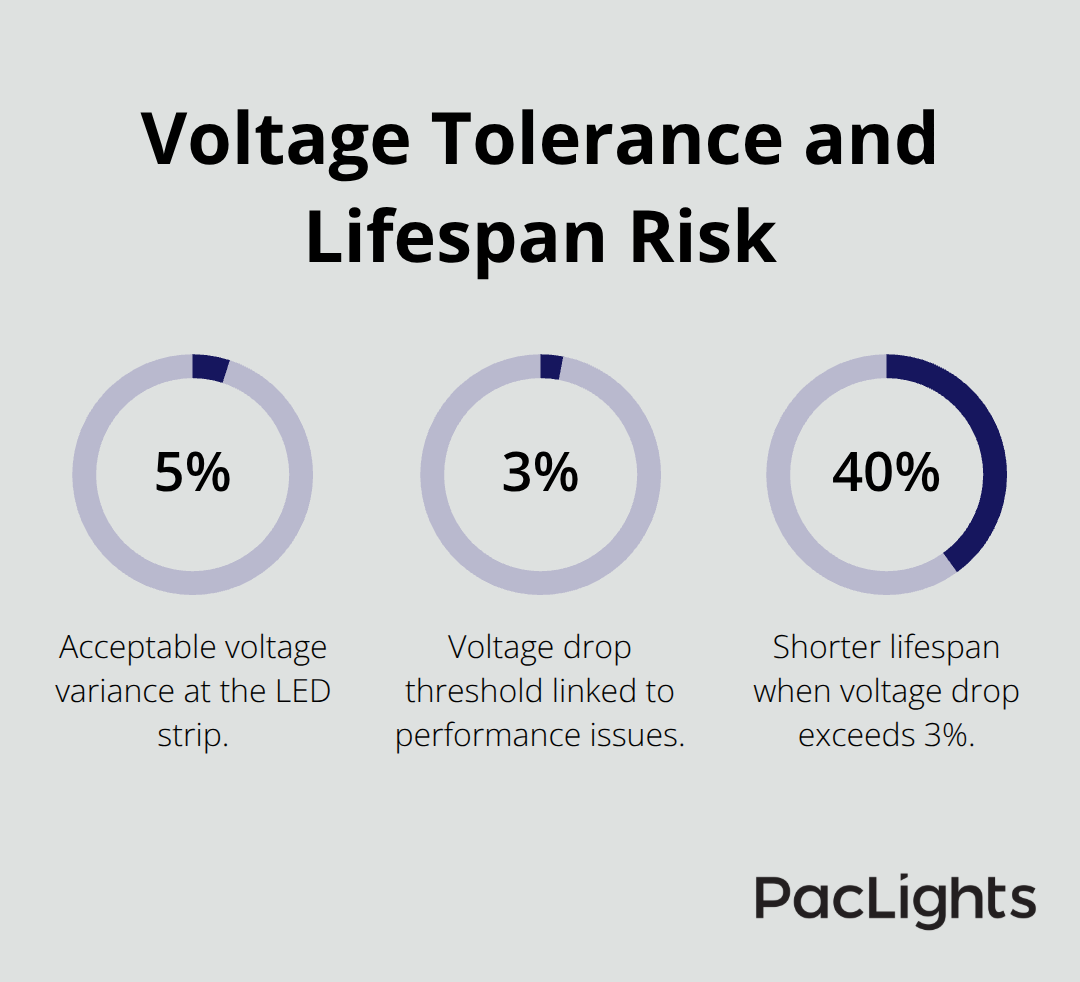
Turn the power back on and test each fixture individually with your multimeter to verify proper voltage at every connection point. A properly functioning LED strip should receive consistent voltage within 5% of its rated specification – anything outside this range indicates wiring problems that will cause premature failure. Check for voltage drop along the entire run, especially on installations longer than 16 feet where resistance accumulates. The Illuminating Engineering Society data shows that installations with voltage drops exceeding 3% experience 40% shorter lifespans than properly wired systems.
Fix Flickering and Dimming Problems
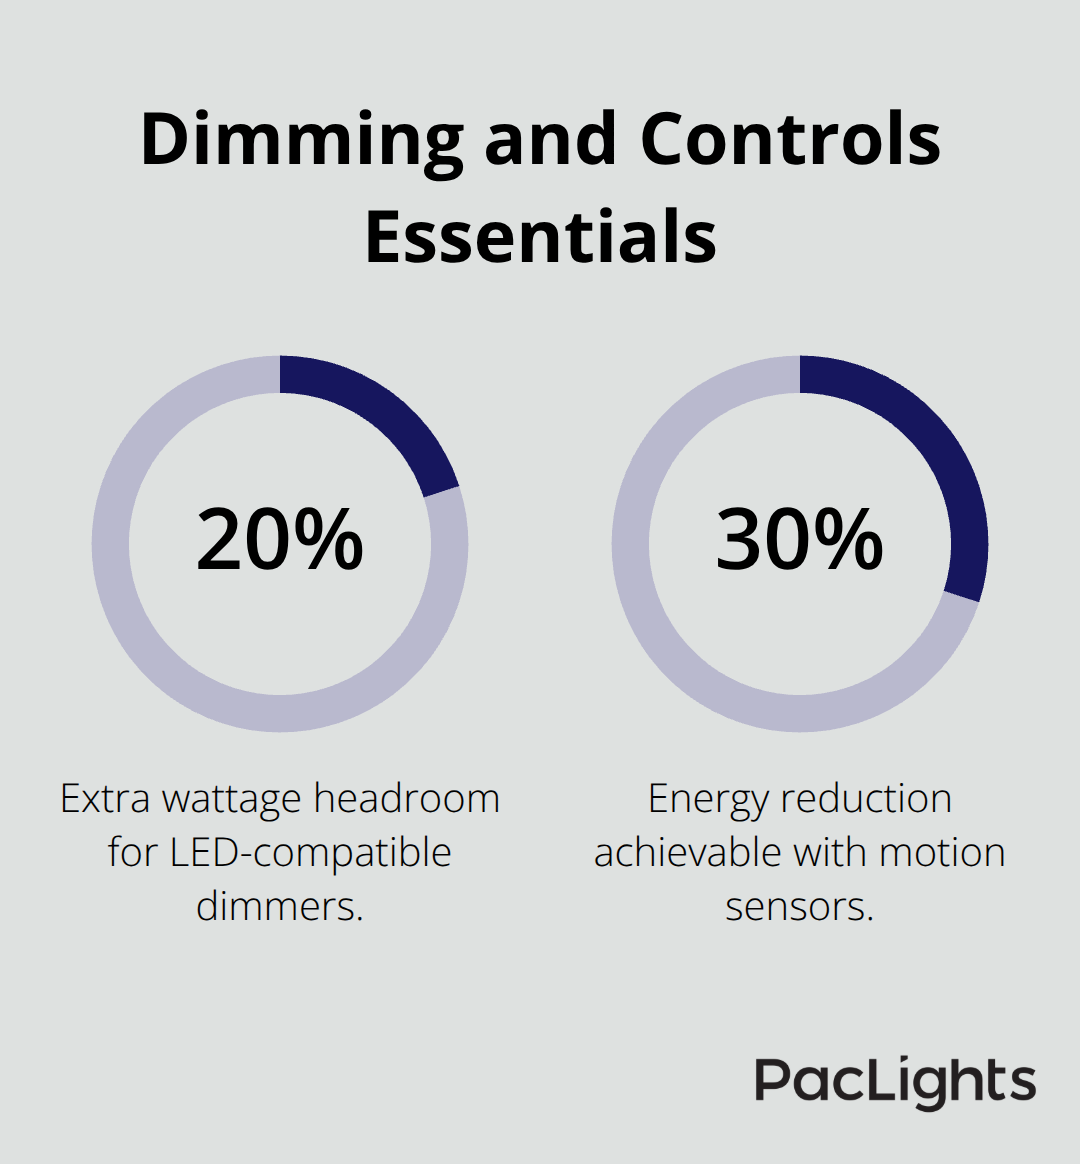
Flickering indicates loose connections or incompatible dimmer switches that can’t handle LED loads properly. Replace standard incandescent dimmers with LED-compatible models rated for your total wattage load plus 20% overhead capacity. Dimming problems often stem from undersized wire gauge – upgrade to 14-gauge wire for runs longer than 50 feet to eliminate voltage drop issues. Motion sensors reduce energy consumption by 30% in low-traffic areas but require specific LED-compatible models to prevent interference.
Test each fixture at full brightness and dimmed settings to verify smooth operation without strobing or sudden brightness changes.
Verify Electrical Safety Standards
Inspect all electrical connections for secure attachment and proper insulation before you close ceiling access points. Use your non-contact voltage tester to verify that electrical boxes remain properly grounded and that no stray voltage exists on fixture housings. Check that fixtures sit flush with the ceiling surface and that mounting clips hold securely under gentle pressure testing.
Establish Maintenance Protocols
Dust accumulation reduces LED brightness by 15% over six months (according to industry studies), so establish a monthly cleaning schedule with dry microfiber cloths to maintain optimal performance. Check connections annually for signs of corrosion or loose fittings that can cause flickering and performance issues over time. Monitor fixture temperatures during operation to identify potential overheating problems before they damage your LED strips.
Final Thoughts
Proper installation of recessed linear LED strip lights delivers exceptional energy efficiency and professional aesthetics that transform any space. Your installation provides 50,000+ hour lifespans with 80% energy savings compared to traditional fluorescent fixtures. The clean, flush-mounted appearance eliminates visual clutter while delivering superior light distribution across work surfaces and living areas.
Professional installation costs between $150-300 per fixture, but DIY installation saves money when you have the necessary skills and follow proper procedures. Complex installations that involve multiple circuits, structural modifications, or commercial applications require licensed electricians to meet code requirements and safety standards. Smart controls for LED fixtures can optimize energy use through advanced automation and centralized monitoring (reducing operational costs by up to 30% in commercial settings).
We at PacLights offer comprehensive solutions for your recessed linear LED strip light projects. Our products feature advanced controls and networked systems that optimize energy use for commercial and industrial facilities. Contact us for free layout designs and ROI assessments to help you make informed decisions about your next installation.
Disclaimer: PacLights is not responsible for any actions taken based on the suggestions and information provided in this article, and readers should consult local building and electrical codes for proper guidance.