

Cylinder pendant lights installation doesn’t have to be intimidating. Whether you’re upgrading a commercial space or refreshing a room at home, proper installation makes all the difference in both safety and aesthetics.
We at PacLights have guided countless customers through this process, and we’ve learned what works. This guide walks you through every step, from selecting the right fixtures to securing them safely overhead.
Sizing and Selecting Cylinder Pendants for Your Space
Matching Diameter to Surface Width
Start with your room dimensions and ceiling height because these two factors determine everything else. For a dining table or kitchen island, the cylinder diameter should be roughly one-third to one-half of the surface width. A 48-inch table calls for a 16 to 24-inch diameter cylinder. This sizing rule prevents fixtures that look either undersized and insignificant or oversized and overwhelming.
Ceiling height matters just as much. In spaces with 8-foot ceilings, you need compact cylinders with focused beam angles, typically 30 to 60 degrees. In spaces with 12-foot or higher ceilings, larger cylinders with wider beam spreads work better and reduce the number of fixtures needed. The spacing-to-height ratio should land between 1.6 and 2.0. This means for an 8-foot ceiling, space pendants roughly 12 to 16 feet apart. For a 12-foot ceiling, increase spacing to 19 to 24 feet. Get this calculation wrong, and you either overspend on too many fixtures or create dark spots that frustrate users.
Calculating Lumens and Light Output
Lumen output directly impacts how well your space functions. A 4-inch cylinder pendant typically delivers around 1,230 lumens, while an 8-inch version produces approximately 1,500 lumens. For task-heavy areas like kitchen counters or assembly spaces, try 4,000 to 5,000 Kelvin color temperature, which research shows improves task accuracy by 5 to 15 percent. For offices or general commercial spaces, 3,500 Kelvin provides comfortable ambient lighting without eye strain.
Calculate total lumen requirements by measuring your space’s square footage and multiplying by the recommended foot-candle level. A retail space typically needs 30 to 50 foot-candles, while an office requires 20 to 30. Modern LED pendants deliver approximately 120 lumens per watt, meaning a 10-watt pendant produces roughly 1,200 lumens. This efficiency matters because it lets you achieve proper brightness without excessive heat or electrical load.
Selecting Materials and Ratings
Cylinder materials directly affect both aesthetics and efficiency. Metal cylinders with reflective interiors bounce light downward and reduce wasted light, making them ideal for task-focused spaces. Glass cylinders offer elegance but require careful interior finish selection to avoid glare. Fabric cylinders diffuse light softly and work well in hospitality settings, though they accumulate dust faster than hard materials.
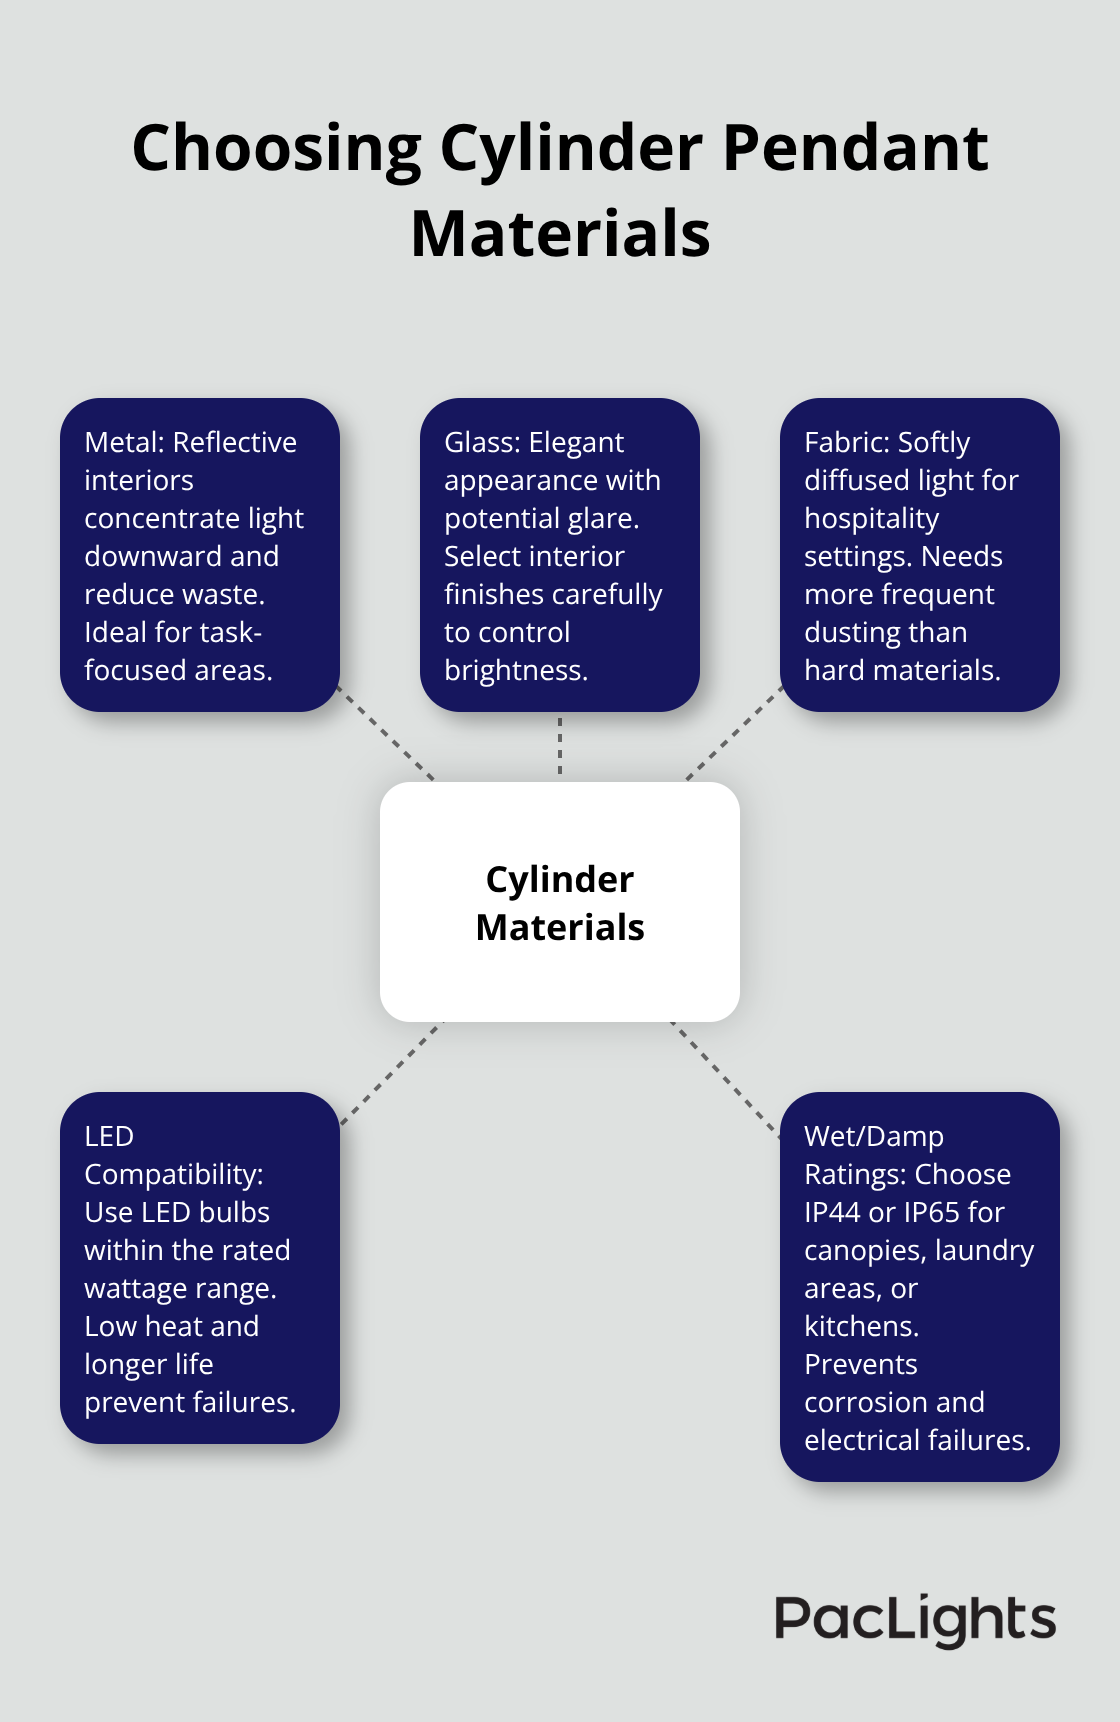
LED compatibility is non-negotiable. Standard incandescent and halogen bulbs generate excessive heat and fail quickly in enclosed cylinder fixtures. LED bulbs rated for your specific wattage range prevent overheating and extend fixture life. Energy savings are substantial. LED cylinder installations reduce lighting costs by 60 to 75 percent compared to older technologies, with typical payback periods of 18 to 24 months.
Wet or damp location ratings matter if your installation is in canopies, laundry areas, or kitchens. IP44 or IP65-rated cylinders cost 20 to 40 percent more than standard fixtures but prevent corrosion and electrical failures that lead to expensive downtime. Once you’ve selected the right cylinder for your space, the next step involves preparing your installation area and gathering the tools you’ll need to mount these fixtures safely.
Getting Your Space Ready for Installation
Before you touch any wiring or mounting hardware, spend time preparing your installation area properly. This phase determines whether your cylinder pendant lights will function safely and look professionally finished. Turn off power at the circuit breaker serving the installation area, then verify the circuit is dead using a voltage tester. This step prevents electrical shocks and fires. Many installers skip verification and rely on assumptions, which is how preventable accidents happen.
Assess Your Ceiling and Structural Capacity
Your ceiling type and structural capacity dictate both your installation method and timeline. Concrete ceilings require a hammer drill with masonry bits and wall plugs, which takes longer than working with drywall but ensures the fixture won’t fall. Suspended ceilings offer faster installation using clip-on or magnetic fixtures, reducing drilling time significantly. If your ceiling height exceeds 10 feet, plan for longer wire runs and verify your junction box can accommodate the extra cable length without cramping connections inside the canopy.
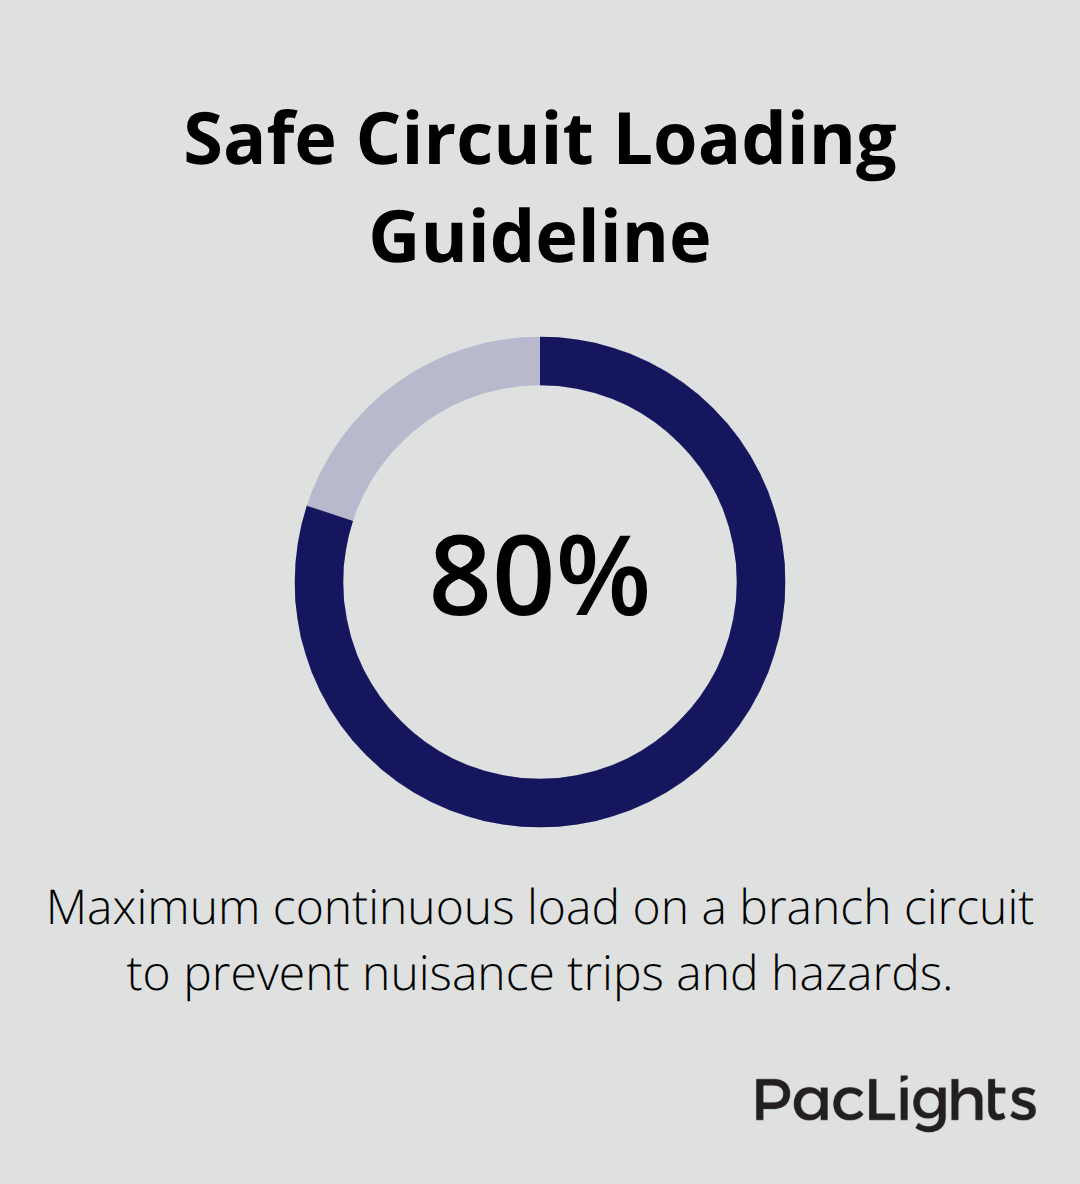
Check your branch circuit rating and ensure your continuous load stays at or below 80 percent capacity. A 20-amp circuit, for example, should carry no more than 16 amps continuously. Overloading causes nuisance breaker trips that frustrate occupants and suggest poor installation work.
Gather Tools and Materials
Collect your tools before starting: wire cutters, screwdrivers, electrical tape, wire nuts rated for your conductor gauge, a ladder, a drill with appropriate bits for your ceiling type, and safety gear including gloves and eye protection. Have a helper available for lifting heavy fixtures, particularly 8-inch cylinders that can weigh 15 to 20 pounds when fully assembled.
Mark Mounting Points with Precision
Mark your mounting points with precision using a template aligned to your spacing calculations from the previous phase. Measure twice and mark once. A 48-inch table with a single 20-inch cylinder pendant should have the mounting point centered above the table surface. For multiple cylinders, use a level and a chalk line to ensure alignment across the entire span. Stagger heights slightly if you install three or more pendants, with the center fixture hanging 2 to 4 inches lower than the outer ones, which creates visual depth and improves light distribution.
Confirm Mounting Height and Clearance
Confirm your mounting height accounts for both overhead clearance and task visibility. Standard practice calls for 30 to 36 inches between the fixture bottom and the work surface below. In spaces with 8-foot ceilings, this leaves 4 to 6 feet of headroom above the fixture, which feels open. In spaces with lower ceilings, you may need to reduce this gap to 24 to 30 inches, but never less than 24 inches to avoid head strikes during maintenance.
Plan Wire Routing and Cable Management
Plan your wire routing before drilling. Identify where cables will run from the junction box to each cylinder, and mark paths that keep wiring concealed and away from high-traffic areas. In commercial spaces, this attention to cable management separates professional installations from amateur ones. Once your space is marked, your power is confirmed off, and your tools are organized, you can move forward with the actual mounting process, which begins with installing the mounting bracket and securing the canopy to your ceiling structure.
Mounting and Wiring Your Cylinder Pendants
Securing the Mounting Bracket to Your Ceiling
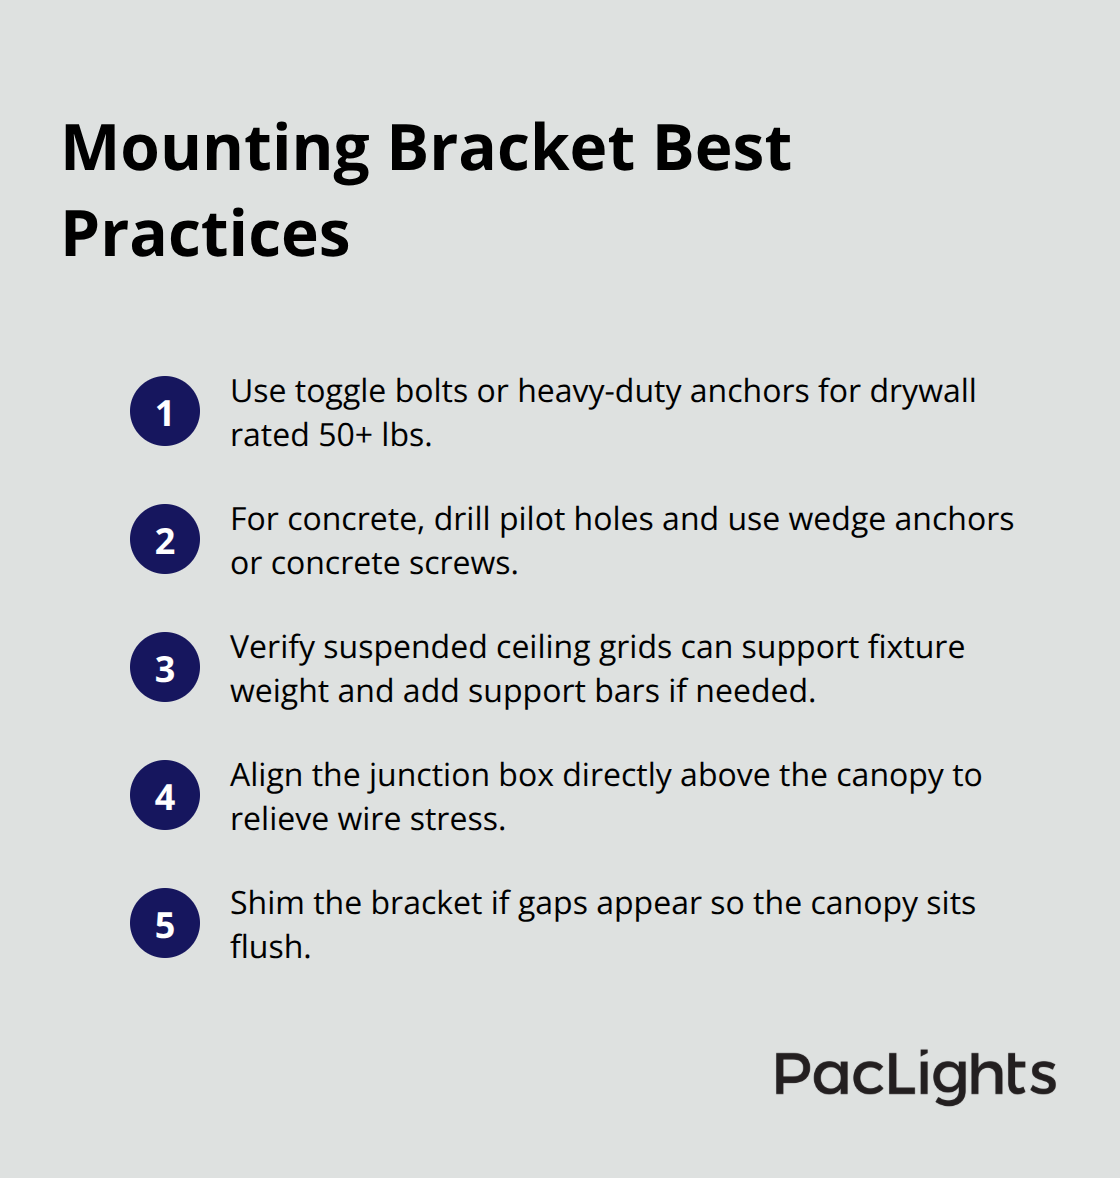
Secure the mounting bracket to your ceiling structure with fasteners appropriate for your ceiling type. For drywall, use toggle bolts or heavy-duty anchors rated for at least 50 pounds; cylinder fixtures typically weigh 15 to 20 pounds, so oversizing your hardware prevents sagging. For concrete ceilings, drill pilot holes with a hammer drill and masonry bits, then install wedge anchors or concrete screws. For suspended ceilings, verify the grid can support the fixture weight, and consider reinforcing the grid with additional support bars if you install multiple pendants in a line.
Position the mounting bracket so the junction box sits directly above where the canopy will rest. This alignment prevents stress on the electrical connections and keeps wires properly concealed. The canopy should sit flush against the ceiling with no gaps; if gaps appear, the bracket isn’t level or the ceiling is uneven. Use shims under the bracket to correct this before proceeding to wiring.
Making Electrical Connections
Strip approximately 5 millimeters of insulation from each conductor, then connect black to black, white to white, and ground to ground using wire nuts rated for your conductor gauge. Most cylinder pendants use 14 or 12 AWG wire, so match your connectors accordingly. Twist conductors together firmly before twisting on the wire nut, then wrap the connection with electrical tape for extra security.
Tuck all wires into the ceiling box without forcing them; cramped wires overheat and create fire hazards. If your junction box is more than 12 inches from the canopy, you’ll need extra cable length to avoid tension on the connections. Check your fixture’s wiring diagram before connecting anything, as some cylinder models include built-in drivers while others require external drivers mounted separately. Once all connections are secure and tested with a voltage tester showing zero current, attach the canopy to the mounting bracket and secure the pendant fixture to the canopy according to the manufacturer’s instructions.
Adjusting Height and Alignment
Adjust the fixture’s height to match your 30 to 36-inch target above the work surface. Most cylinder pendants use adjustable rod systems or cable suspension that allow post-installation tweaking. Measure down from the fixture bottom to the surface below and confirm the height matches your pre-installation calculations. If the height is off, loosen the adjustment mechanism, slide the fixture up or down, then retighten.
Verify the fixture hangs level using a level tool placed on the cylinder’s rim. A tilted fixture looks unprofessional and distributes light unevenly. Test the light immediately after installation to confirm stable operation and no flickering. Flickering indicates loose connections or incompatible bulbs, so resolve these issues before declaring the installation complete.
Finishing Details for Multiple Fixtures
For multiple pendants, stagger heights by 2 to 4 inches with the center fixture lower than the outer ones, which creates visual interest and improves light coverage. Keep wiring neat and concealed where visible, routing cables behind the canopy or along ceiling structures to maintain aesthetics. Check local electrical codes before considering your installation finished; some jurisdictions require licensed electrician verification for commercial installations, and skipping this step can void warranties or create liability issues.
Final Thoughts
Cylinder pendant lights installation succeeds when you follow the fundamentals we’ve covered throughout this guide. Size fixtures to your space and ceiling height, calculate lumens accurately, and select materials that match your environment. Secure brackets firmly, connect wiring by color code, and adjust height to your target range before testing immediately to catch flickering or loose connections.
Maintenance keeps your fixtures performing for years without interruption. Dust cylinders monthly with a soft cloth and avoid abrasive cleaners that damage finishes. Check mounting hardware quarterly and tighten any loose screws, and when LED bulb replacement becomes necessary, match the wattage and color temperature to your original specification. If flickering appears, swap the bulb first, then test the circuit with a voltage tester to isolate the problem.
Commercial spaces benefit most from professional-grade cylinder pendant lighting because these fixtures deliver consistent brightness across large areas and reduce energy costs by 60 to 75 percent compared to older technologies. Proper installation prevents downtime from electrical failures and eliminates safety hazards that expose you to liability. We at PacLights understand that lighting decisions impact both your budget and your space’s functionality, so explore our pendant lighting options to discover how professional-grade fixtures transform your space while reducing operational costs.
Disclaimer: PacLights is not responsible for any actions taken based on the suggestions and information provided in this article, and readers should consult local building and electrical codes for proper guidance.