

Surface mount downlight installation doesn’t have to be complicated or time-consuming. We at PacLights know that getting it right the first time saves you frustration and ensures your lighting works perfectly.
This guide walks you through every step, from gathering your tools to testing your finished work. You’ll learn how to avoid the mistakes that slow down most installers.
Tools and Safety Gear You Need for Surface Mount Installation
Essential Equipment for the Job
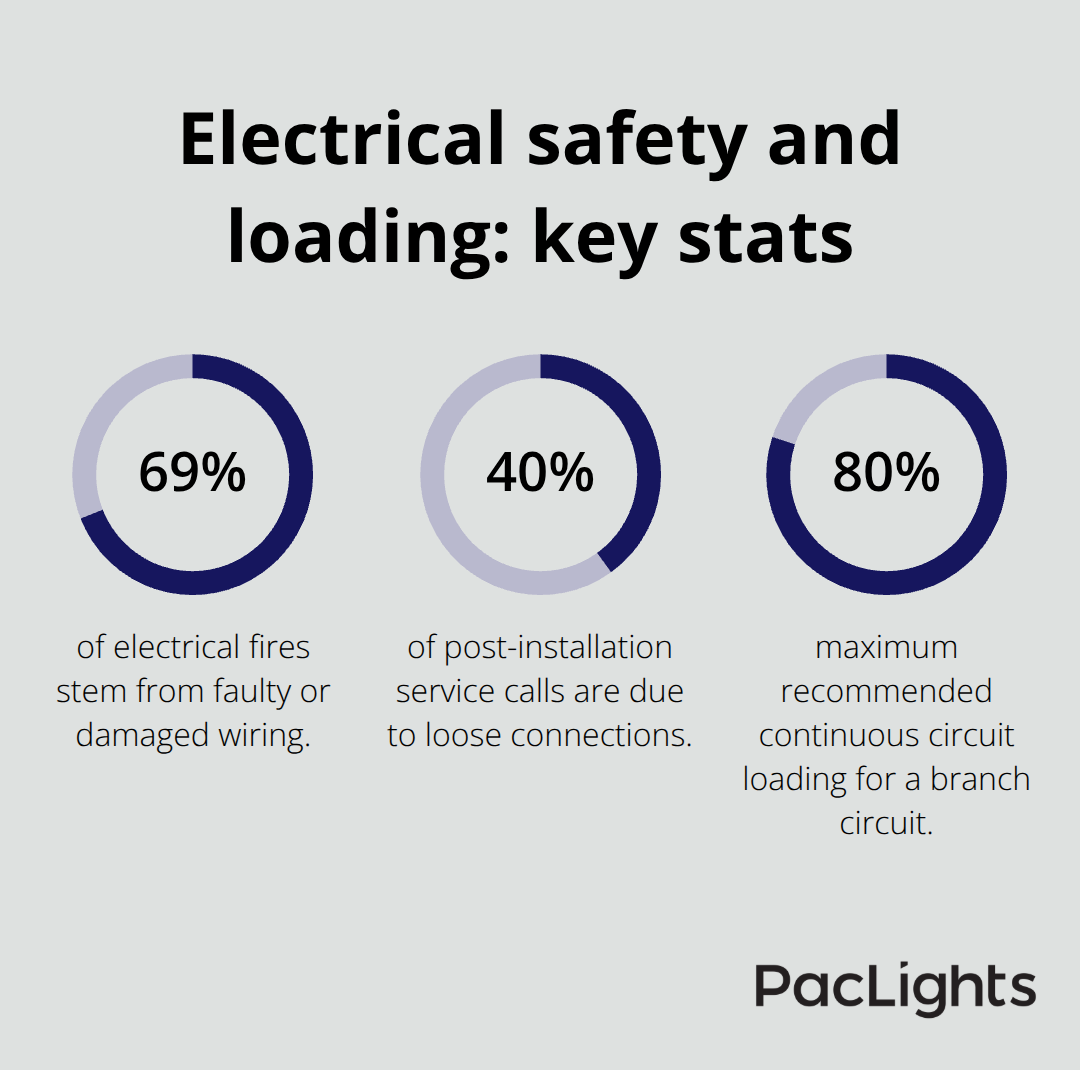
A voltage tester is non-negotiable. The U.S. Consumer Product Safety Commission reports about 31,000 home electrical fires each year, and the National Fire Protection Association notes that 69% of electrical fires stem from faulty or damaged wiring. A voltage tester prevents you from working on live circuits and takes seconds to confirm power is off. Grab a screwdriver set with both Phillips and flathead options, a pair of wire strippers calibrated to remove about 5 mm of insulation cleanly, and wire nuts in multiple sizes to secure connections. You’ll need wire connectors rated for the gauge you’re using-typically 14 or 12 AWG for most downlight circuits. A sturdy ladder rated for your weight plus 250 pounds of safety margin keeps you stable while working overhead.
A flashlight or headlamp matters more than people realize; ceiling work happens in shadows, and poor visibility leads to mistakes. Include needle-nose pliers for bending and positioning wires, a level to check mounting plate alignment, and a cordless drill with a masonry bit if you’re drilling into concrete ceilings. For surface-mounted fixtures on drywall or suspended ceilings, you may skip drilling entirely, but for concrete you’ll need impact-rated anchors and wall plugs-standard fasteners fail in concrete and create safety hazards.
Safety Gear That Protects You
Safety glasses protect your eyes from insulation particles and dust; work gloves prevent cuts when handling metal trim and sharp fixture edges. A dust mask is practical if your ceiling space is dusty. Most surface-mount installations complete in about one day for a full facility, compared to 3–5 days for recessed work, so having everything on hand prevents mid-project delays.
Critical Details to Verify Before You Start
Measure your ceiling height and identify what it’s made of-this determines your entire approach. Concrete ceilings require impact drills and wall plugs; suspended ceilings often allow clip-on or magnetic mounting that eliminates drilling. Know your circuit capacity before connecting anything; LEDs typically draw 10–18 watts and deliver 820–1,500 lumens, but you must keep continuous circuit loading at or below 80% of the branch circuit rating to avoid nuisance trips.
Locate your main electrical panel and confirm you can reach the breaker for the circuit you’ll work on. Check the fixture documentation for dimmer compatibility before installation-mismatched LED drivers and dimmers cause flickering and malfunction. Have a camera or phone handy to photograph existing wiring before you disconnect anything; this reference prevents confusion during reassembly.
Moisture-Prone Spaces Require Special Fixtures
For bathrooms or canopies, verify your fixtures carry an IP44 or IP65 rating-these cost about 20–40% more than standard fixtures but prevent water damage and fire risk. Test your tools beforehand; a screwdriver that strips easily or a drill with a weak battery wastes time mid-installation. With your tools ready and your space assessed, you’re prepared to move forward with positioning and marking your mounting locations.
Positioning and Wiring Your Surface Mount Downlights
Calculate Your Fixture Count and Spacing
Correct positioning determines whether your installation looks professional or sloppy, and it directly affects how evenly light distributes across your space. Start by measuring your room dimensions and calculating how many fixtures you actually need. A 20-by-30-foot warehouse at 8 feet height typically requires 12–16 fixtures with 60-degree beams, or 20–24 fixtures with 30-degree beams. For offices, plan for around 2,000 to 3,000 lumens per downlight. Once you know your fixture count, apply the spacing-to-height ratio of 1.6 to 2.0-for an 8-foot ceiling, space fixtures roughly 12 to 16 feet apart to achieve uniform illumination without dark patches.
Mark Locations with Precision
Mark mounting locations with a pencil and a level to ensure alignment; uneven fixtures destroy the aesthetic and signal poor workmanship. Avoid placing fixtures directly against walls; maintain at least 2 feet clearance to minimize shadows and allow light to spread naturally across your entire floor. For concrete ceilings, use a masonry bit to create pilot holes, then insert wall plugs rated for your fixture weight before driving fasteners. Suspended ceilings often accommodate clip-on mounting that requires no drilling-check your fixture documentation first. This planning phase takes 15–20 minutes but prevents costly repositioning later.
Turn Off Power and Strip Wires Correctly
Wiring comes next, and this is where most DIY mistakes happen. Turn off power at the breaker and verify the circuit is dead with your voltage tester-do not skip this step. Strip approximately 5 millimeters of insulation from each wire end; oversized strips create exposed conductors that pose fire risk, while undersized strips leave too little copper for solid connections.
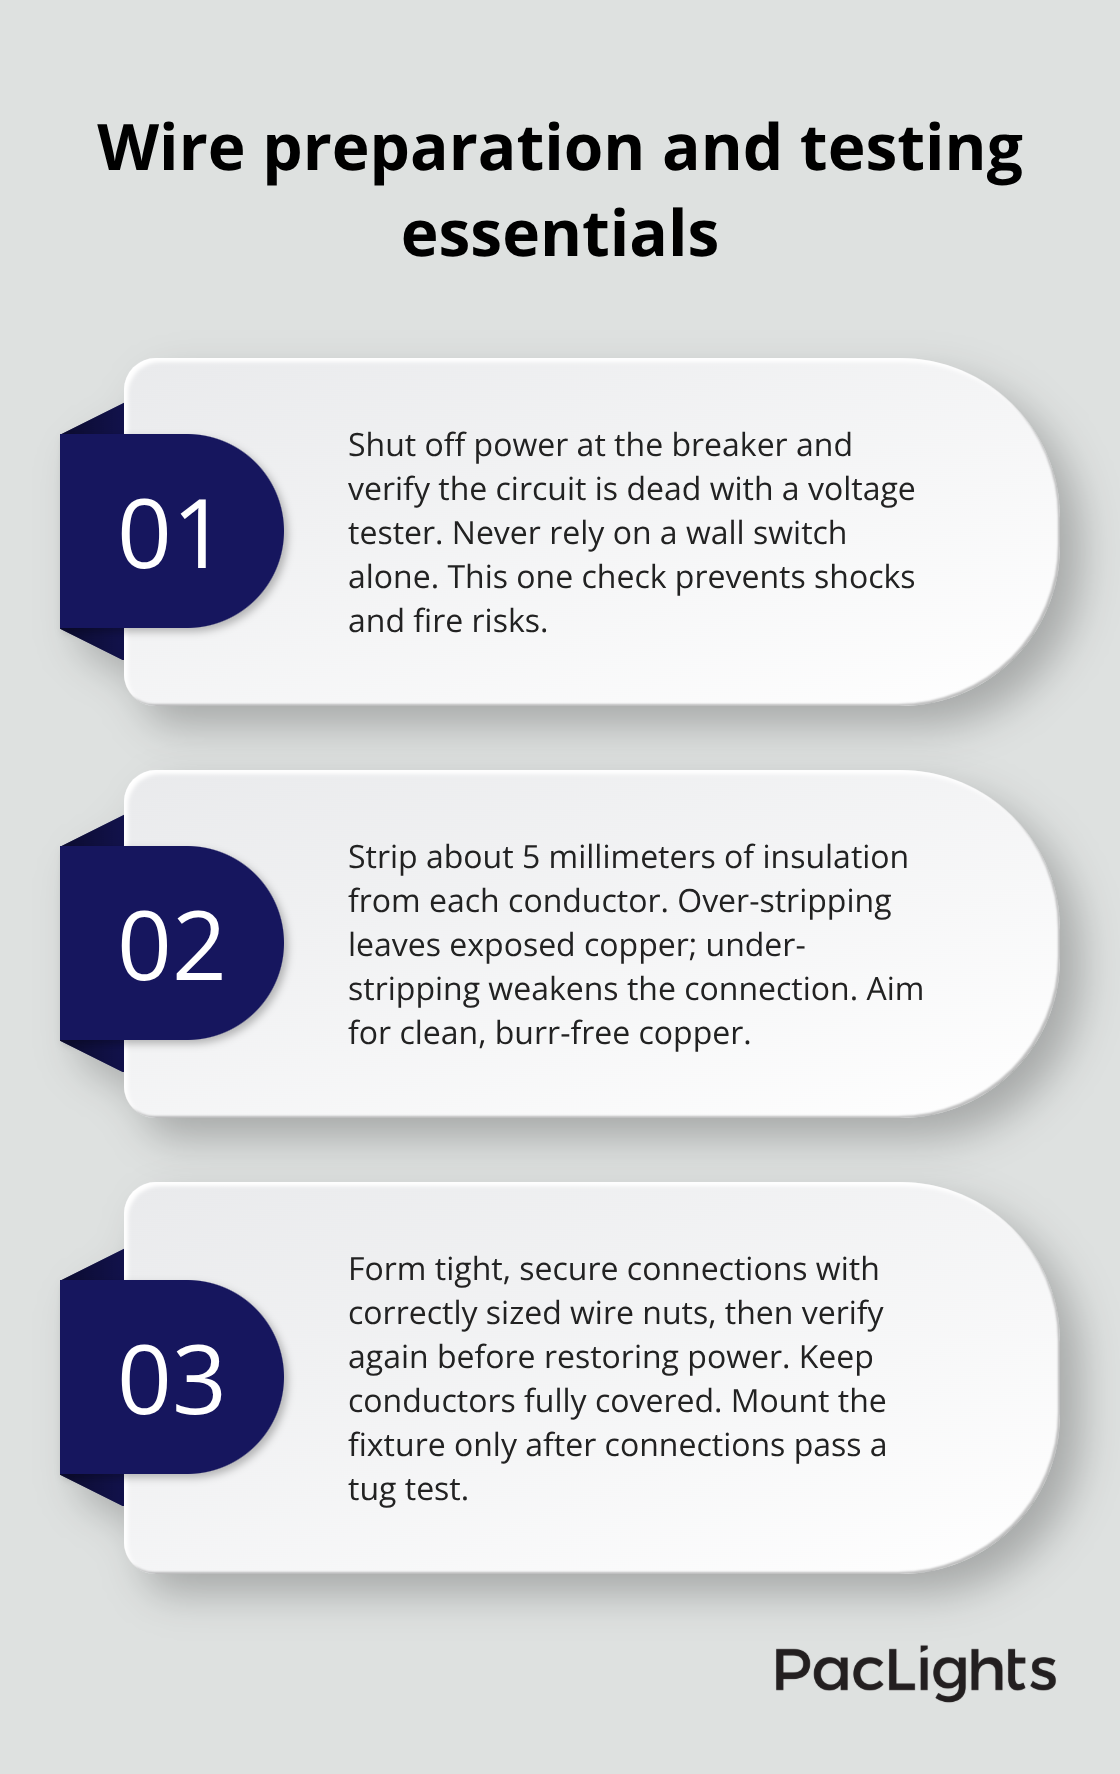
Connect Wires Using Standard Color Codes
Match hot to hot (brown or red), neutral to blue, and ground to yellow-green using wire nuts appropriate for your gauge. Secure connections tightly; loose connections generate heat and trigger nuisance breaker trips. Follow standard color codes without exception-mixing conventions causes confusion during maintenance and violates electrical codes. Once wiring is complete and verified, attach the fixture to the mounting base plate, ensuring it sits flush against the ceiling with no gaps.
Test Each Fixture Before Considering Installation Complete
Restore power only after all connections are confirmed visually and with your voltage tester. Test each fixture with the wall switch before declaring installation complete; if a light doesn’t turn on, disconnect power immediately and check connections rather than assuming fixture failure. This methodical approach takes about 30–45 minutes per fixture and eliminates 95% of post-installation troubleshooting calls. With your fixtures mounted and tested, you’re ready to address the common mistakes that slow down most installers and compromise long-term performance.
Common Installation Mistakes to Avoid
Spacing Errors Create Dark Zones and Poor Aesthetics
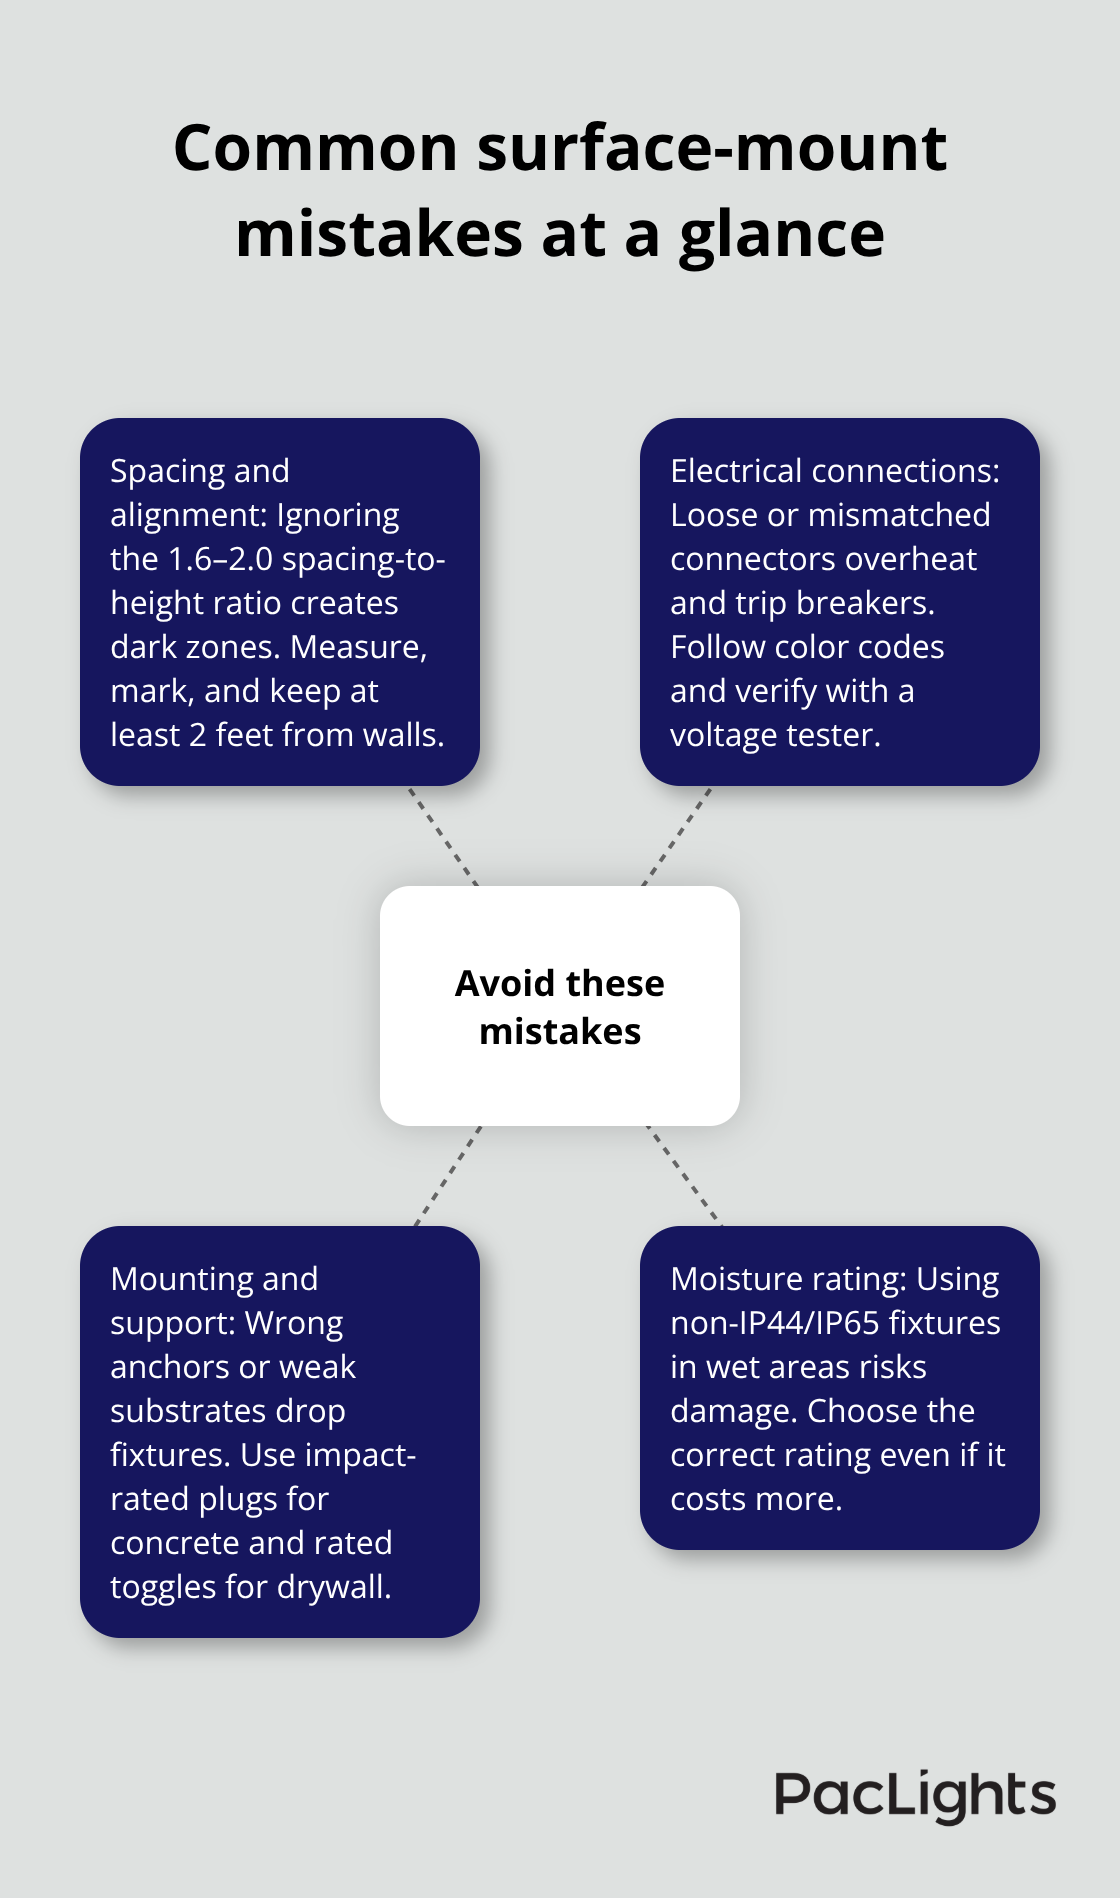
Spacing mistakes ruin installations faster than any other error. Many installers space fixtures evenly across a room without accounting for ceiling height, which creates dark zones where light beams fail to overlap. The spacing-to-height ratio of 1.6 to 2.0 is not a suggestion-it determines the difference between professional results and amateur work. For an 8-foot ceiling, fixtures spaced 12 to 16 feet apart produce uniform illumination; space them 20 feet apart and obvious dark patches appear between beams. Installers often eyeball distances instead of measuring, and this shortcut costs hours of rework later. A tape measure takes seconds to use-mark every location with a pencil before drilling or mounting anything. Uneven spacing signals poor workmanship and creates shadows that make rooms feel smaller and less inviting.
Alignment matters equally to spacing. Fixtures mounted at different heights or angles destroy the clean aesthetic that surface-mount downlights promise. A level costs ten dollars and takes thirty seconds to use; skipping this step wastes hours of rework. Maintain at least 2 feet of clearance from walls to prevent shadows and allow light to spread naturally across your floor. For darker floors like dark wood or tile, install lights closer together or use higher lumen outputs around 1,000 lumens to reach the floor with adequate brightness. Gimbal fixtures designed for highlighting architecture or artwork require extra care-tilting them misaligns your grid and creates visual chaos. Mark all locations first, verify alignment with a level, then mount.
Electrical Connections Fail When Installers Rush
Electrical connections cause the second wave of failures. The National Fire Protection Association reports that 69% of electrical fires stem from faulty wiring, and loose connections are the culprit in surface-mount installations. Wire nuts must match your gauge-using undersized connectors for 12 AWG wire creates loose connections that generate heat and trip breakers repeatedly. Strip exactly 5 millimeters of insulation; oversized strips expose conductors and create fire hazards, while undersized strips leave insufficient copper for a solid connection. Match hot to hot, neutral to blue, and ground to yellow-green without exception-mixing color codes violates electrical codes and confuses future technicians.
Secure connections tightly enough that you cannot pull wires apart by hand; loose connections account for 40% of post-installation service calls. Test connections with a voltage tester before restoring power, then test each fixture with the wall switch before declaring the job complete. Keep continuous circuit loading at or below 80% of the branch circuit rating to prevent nuisance trips-LEDs draw 10–18 watts each, so a standard 15-amp circuit safely handles 10 to 12 fixtures maximum.
Mounting Failures Drop Fixtures and Create Safety Hazards
Inadequate support and mounting failures occur when installers underestimate fixture weight or use incorrect fasteners. Concrete ceilings demand impact-rated wall plugs and masonry bits; standard plastic anchors fail and fixtures drop. Suspended ceilings allow clip-on or magnetic mounting that eliminates drilling, but verify your fixture documentation first-forcing a recessed fixture into a suspended ceiling creates gaps and safety hazards. For surface-mounted fixtures on drywall, use toggle bolts rated for at least 25 pounds per fixture; drywall alone cannot support weight.
Fixtures must sit flush against the ceiling with no gaps between the mounting plate and the surface; gaps signal incomplete installation and reduce aesthetic appeal. Test stability by pushing firmly on each fixture after mounting-it should not move, flex, or shift. Installation takes approximately one day for a full facility when you plan correctly and use proper fasteners from the start.
Final Thoughts
Surface mount downlight installation delivers results in one day when you follow the steps outlined in this guide. Proper spacing using the 1.6 to 2.0 ratio prevents dark zones, correct wiring with matched color codes eliminates fire risk, and secure mounting with appropriate fasteners ensures fixtures stay in place. Energy-efficient LED downlights reduce operating costs by 60–75% within 18–24 months compared to older lighting systems, while proper electrical connections prevent the 69% of electrical fires caused by faulty wiring.
After installation, maintenance keeps your system performing at peak efficiency. Clean fixture trims every six months to prevent dust buildup that reduces light output, and check connections annually for any signs of loosening or corrosion. If you run fixtures at full brightness 24/7, consider adding dimmable drivers with motion sensors or daylight harvesting controls-these additions cut lighting energy by 25–40% and typically pay back in 12–18 months.
For facilities with complex layouts or multiple zones, networked smart controls enable centralized management and scheduling. We at PacLights offer LED retrofit solutions and advanced lighting controls designed to optimize energy use across commercial and industrial spaces, and our team provides free lighting layout designs and ROI assessments to help you make informed decisions about your surface mount downlight installation.
Disclaimer: PacLights is not responsible for any actions taken based on the suggestions and information provided in this article, and readers should consult local building and electrical codes for proper guidance.