

Surface mounted downlight installation in commercial spaces requires careful planning and execution. Getting it right means better lighting performance, lower energy bills, and a professional appearance that impresses clients and employees.
At PacLights, we’ve guided countless businesses through this process. This guide walks you through every step, from assessing your space to optimizing performance after installation.
Planning Your Installation Site
Measure Your Space and Ceiling Type
Measure your ceiling height and identify the ceiling material first-these two factors determine everything else. An 8-foot ceiling in a standard office behaves completely differently from a 12-foot warehouse ceiling with a concrete slab. Concrete ceilings require impact drills and wall plugs, while suspended ceilings may allow clip-on or magnetic fixtures that avoid drilling altogether.
Calculate Light Output and Fixture Quantity
Next, calculate the light output you actually need. Most offices require around 2,000 to 3,000 lumens per downlight, but this shifts dramatically based on the task. A retail showroom displaying merchandise needs higher output to ensure colors appear accurate, while a corridor needs far less. Measure the square footage of the area you’re lighting, then divide by the number of fixtures you plan to install.
A 20-by-30-foot warehouse with an 8-foot ceiling typically needs 12 to 16 fixtures with 60-degree beam angles to avoid dark spots; switching to narrower 30-degree beams increases that count to 20 to 24 fixtures. The spacing-to-height ratio should land between 1.6 and 2.0 for uniform illumination. This means if your ceiling sits at 8 feet, space fixtures roughly 12 to 16 feet apart.
Select Fixture Size, Color Temperature, and Environment Rating
For ceiling height guidance, smaller 4-inch fitters suit 8-foot ceilings for an unobtrusive look, while taller spaces justify 6-inch fitters for better light distribution. A 4-inch fixture delivers around 1,230 lumens, while an 8-inch fixture reaches approximately 1,500 lumens. Choose your color temperature based on function: kitchens and task-heavy areas benefit from 4,000 to 5,000 Kelvin, which improves task accuracy by 5 to 15 percent compared to warmer temperatures, while offices work well at 3,500 Kelvin as a balanced middle ground.
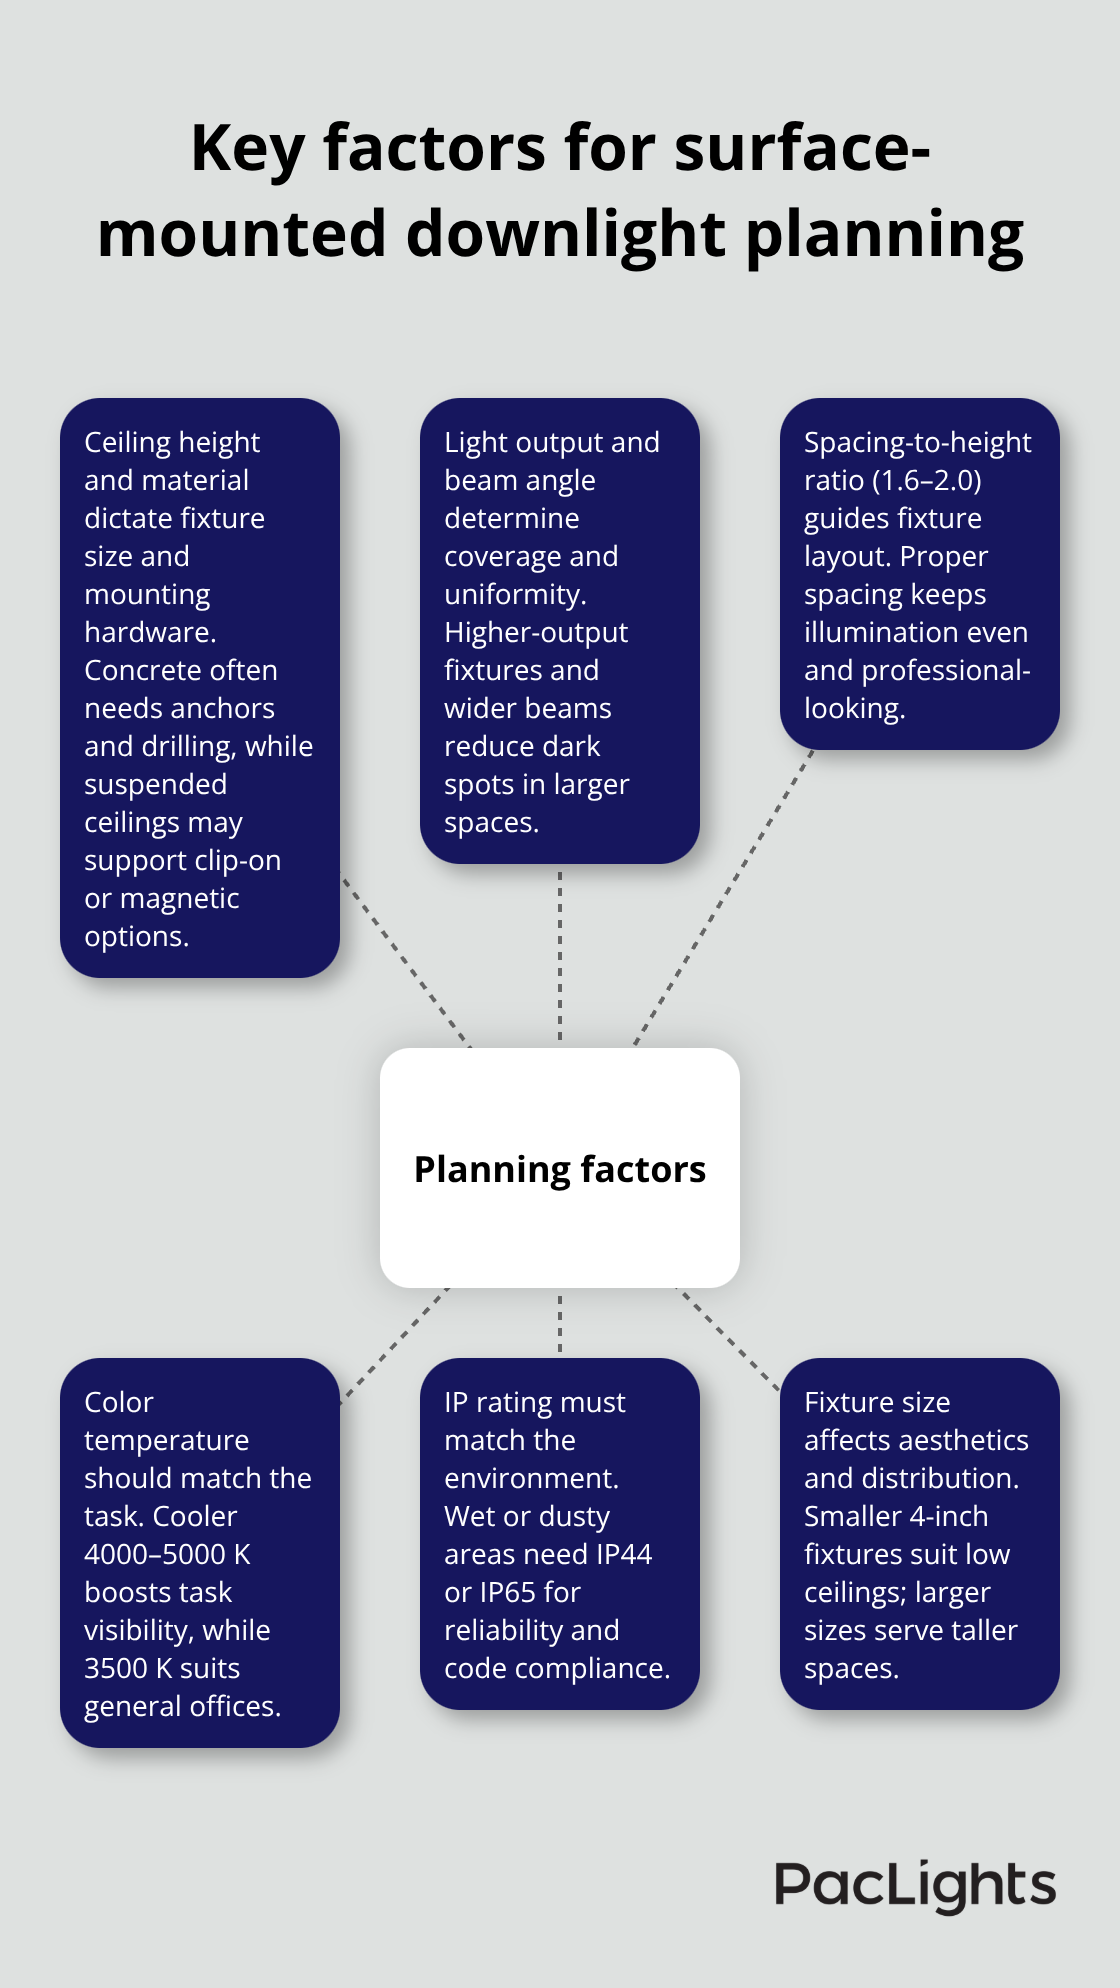
Wet-location variants with IP44 or IP65 ratings cost 20 to 40 percent more but are non-negotiable for parking garages, canopies, and laundry spaces where moisture or dust exposure is constant.
Understand Installation Speed and Energy Savings
A full facility goes live in a single day with surface-mounted fixtures, whereas recessed downlight renovations typically require 3 to 5 days. This speed advantage translates directly to lower labor costs and minimal business disruption. LED wattage typically ranges from 10 to 18 watts, delivering 820 to 1,500 lumens with modern fixtures achieving around 120 lumens per watt. Facilities converting to LED surface-mount downlights report 60 to 75 percent savings on lighting costs, with most projects paying back their investment in 18 to 24 months through utility bills alone.
With your space assessed and specifications locked in, you’re ready to prepare the mounting surface and handle the electrical work that brings your lighting plan to life.
Installation Process and Best Practices
Isolate Power and Mark Your Mounting Points
Turn off the power from the circuit breaker and use a voltage tester to confirm zero electricity at the work point-never rely on the wall switch alone. Mark your mounting points using the fixture’s base plate as a stencil, ensuring alignment with your room layout to prevent tilt or misalignment. Verify the plate sits level before moving forward; a tilted base plate creates uneven light distribution and looks unprofessional.
Prepare the Mounting Surface
For concrete ceilings, use an impact drill with masonry bits and wall plugs to anchor the base plate securely. Installation speed depends heavily on ceiling preparation-solid concrete slabs take longer to drill than suspended ceilings, but they offer superior stability for surface-mounted fixtures. Suspended ceilings may allow clip-on or magnetic fixtures that avoid drilling altogether, cutting labor time significantly.
Handle Wiring and Connections Correctly
Wiring follows standard color codes: brown or red for live, blue for neutral, and yellow-green for earth. Strip about 5 millimeters of insulation from each wire, use wire connectors to join them, and ensure no exposed conductors remain visible.
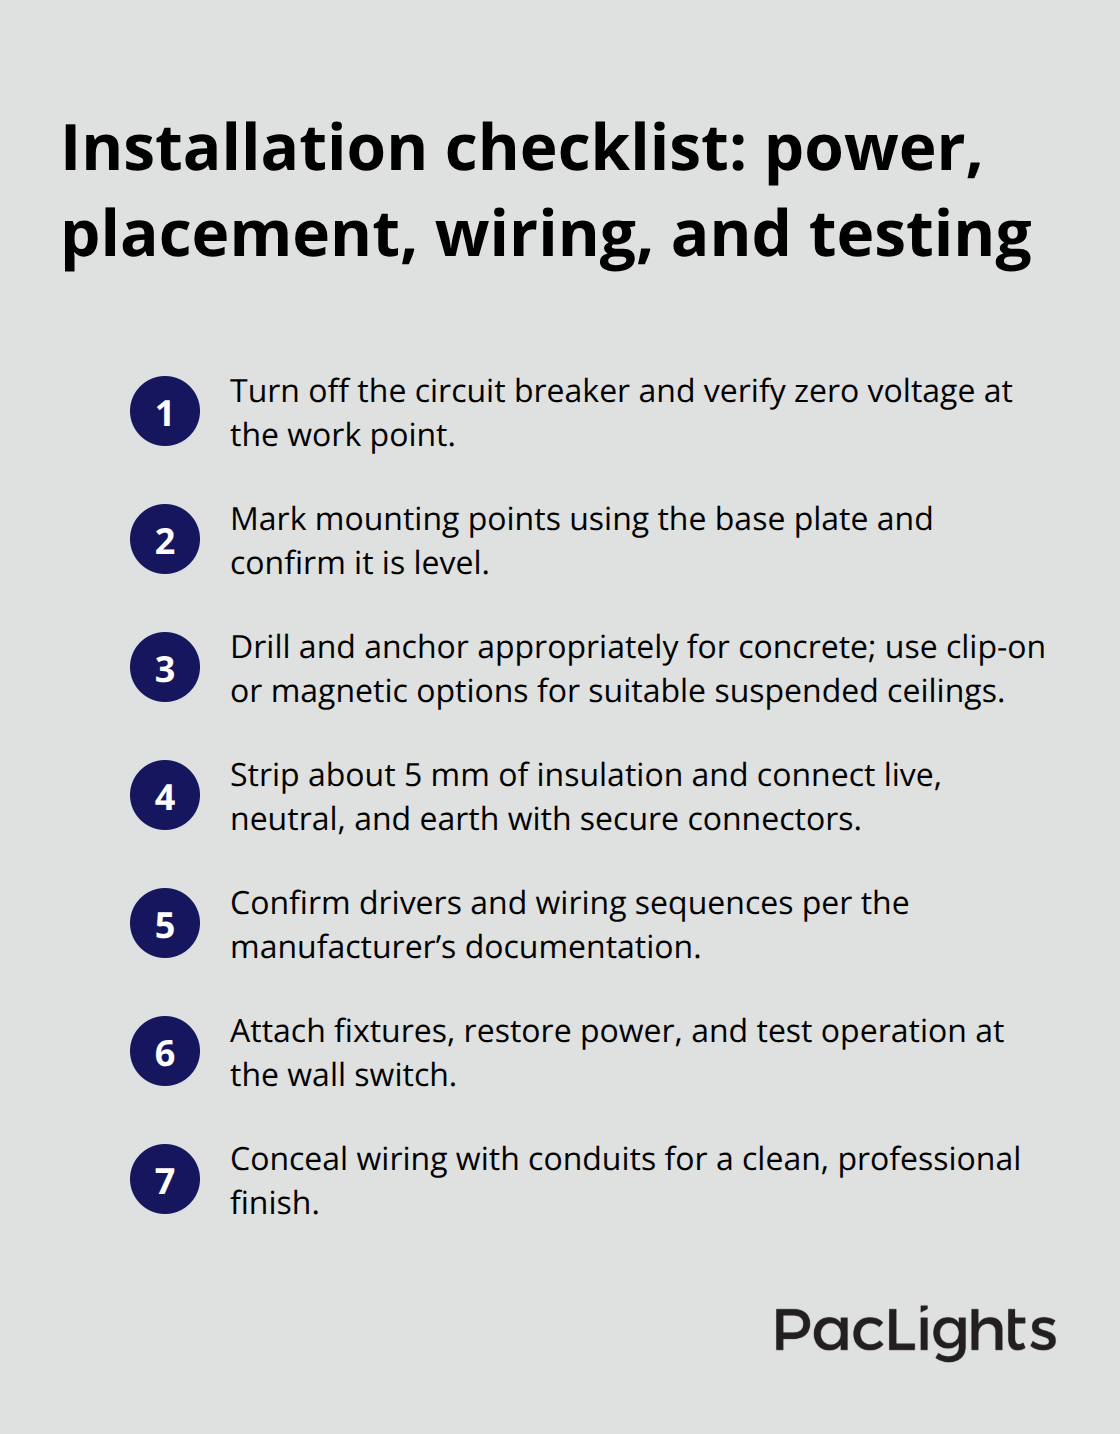
Some fixtures have built-in drivers, while others require external drivers mounted separately-check your manufacturer’s documentation before assembly, as this determines your wiring sequence. Loose wire connections remain the most common installation failure-verify each connector is hand-tight and doesn’t pull free under gentle tension.
Secure Fixtures and Test Performance
Attach the downlight to the base plate and restore power only after all connections are verified. Test the fixture with the wall switch; if it doesn’t illuminate, recheck all connections before assuming a failure. Wire conduits hide visible cables and improve the finished appearance, particularly in high-visibility areas like retail showrooms or office corridors. Surface-mounted downlights avoid the ceiling void entirely, which means faster installation and lower labor costs than recessed options.
Address Environmental and Electrical Requirements
For damp or humid locations, IP44 or IP65 rated fixtures are mandatory, not optional; standard fixtures fail quickly in moisture-heavy environments like parking garages or laundry spaces. Improper circuit loading causes nuisance trips and reliability issues-keep continuous loads at or below 80 percent of the branch circuit rating per electrical code. If you’re uncertain about any electrical work, consult a licensed electrician rather than risk fire hazards or code violations. A single day of professional installation beats three to five days of recessed downlight work, delivering faster ROI and minimal business disruption. With your fixtures installed and tested, the next phase focuses on fine-tuning brightness, color temperature, and automated controls to maximize performance and energy savings.
Optimizing Performance After Installation
Scale Brightness to Occupancy and Daylight
Once your surface-mounted downlights power on, optimization work begins immediately. Most facilities run fixtures at full brightness around the clock, which wastes energy and shortens LED lifespan unnecessarily. Dimmable drivers paired with 0-10V or DALI controls let you scale brightness to actual occupancy and daylight availability. A 4,000 Kelvin color temperature works well for most office tasks, but if your space has high windows, reducing brightness to 70 percent during peak daylight hours cuts lighting energy by 25 to 40 percent according to the Department of Energy. Install dimmers on a single zone first and test the dimming performance over two weeks to spot any flicker or color shift issues before rolling out controls across the entire facility. Triac dimming adds roughly 15 to 25 percent to upfront fixture costs, but the energy payback typically arrives within 12 to 18 months in spaces with variable occupancy.
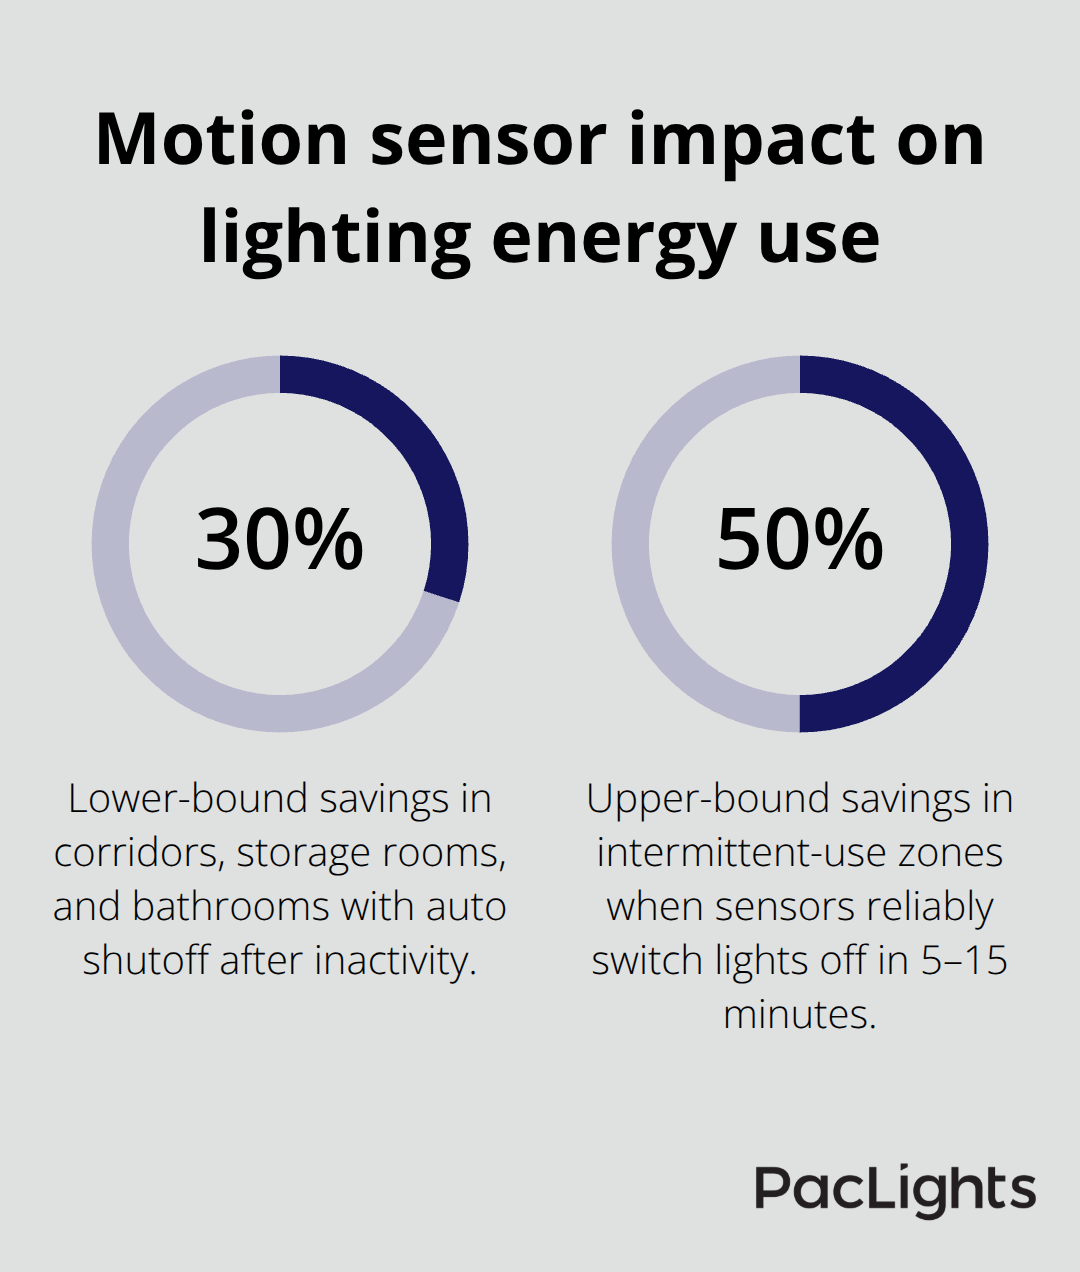
Deploy Motion Sensors in Intermittent-Use Areas
Motion sensors and daylight harvesting systems deliver the fastest return on investment in areas with intermittent use. Corridors, storage rooms, and bathroom spaces waste substantial energy when lights stay on during unoccupied periods. Motion sensors cut energy consumption by 30 to 50 percent in these zones by automatically switching fixtures off after 5 to 15 minutes of inactivity.
Start with your highest-traffic areas first-entry corridors and main hallways consume the most lighting hours, so automating those spaces delivers measurable results fastest.
Implement Networked Smart Controls
Networked smart controls using protocols like Casambi or Tuya IoT enable centralized scheduling and real-time monitoring from your phone or building management system, allowing you to adjust brightness and color temperature remotely without climbing ladders or calling an electrician. Measure your baseline energy consumption for two weeks before adding controls, then remeasure monthly for the next three months to quantify actual savings. Facilities converting from manual-only fixtures to automated controls typically see 35 to 45 percent total lighting energy reductions, with payback periods dropping to 18 to 24 months when combined with LED efficiency gains.
Combine Sensors with Daylight Harvesting for Taller Spaces
If your ceiling height exceeds 10 feet, pair motion sensors with daylight harvesting to avoid over-dimming in naturally lit zones (this prevents occupant complaints about sudden brightness changes). Networked controls let you set different brightness schedules for different zones based on actual usage patterns, maximizing both comfort and energy savings simultaneously.
Final Thoughts
Surface mounted downlight installation in commercial spaces delivers measurable results when you follow the planning, installation, and optimization steps outlined in this guide. LED fixtures consume 75 percent less energy than traditional lighting while lasting 25,000 to 50,000 hours, and most facilities report 60 to 75 percent savings on lighting costs within 18 to 24 months. Motion sensors and daylight harvesting push those savings higher, cutting energy consumption by an additional 30 to 50 percent in intermittently occupied spaces.
Long-term maintenance becomes nearly invisible with LED technology, and dimmable drivers paired with networked controls let you adjust brightness and color temperature remotely without climbing ladders or calling an electrician. A single day of installation versus three to five days for recessed alternatives means your team returns to normal operations faster and your labor costs stay lower. Document your baseline energy consumption before adding controls, then measure monthly to track actual savings and identify additional optimization opportunities.
Your next step is straightforward: measure your space, calculate your fixture requirements using the spacing-to-height ratios covered earlier, and specify the correct IP ratings for your environment. We at PacLights offer free lighting layout designs and ROI assessments tailored to your specific space, helping you make informed decisions before purchasing and guiding you through fixture selection, control options, and long-term performance expectations.
Disclaimer: PacLights is not responsible for any actions taken based on the suggestions and information provided in this article, and readers should consult local building and electrical codes for proper guidance.