

Installing wrap lights correctly makes the difference between a polished look and a frustrating project. At PacLights, we’ve seen countless installations go wrong because people skip the planning phase or rush through the wiring.
This wrap lights installation guide walks you through every step, from preparing your space to testing your connections. We’ll also cover the most common problems we hear about and how to fix them fast.
Pre-Installation Planning and Preparation
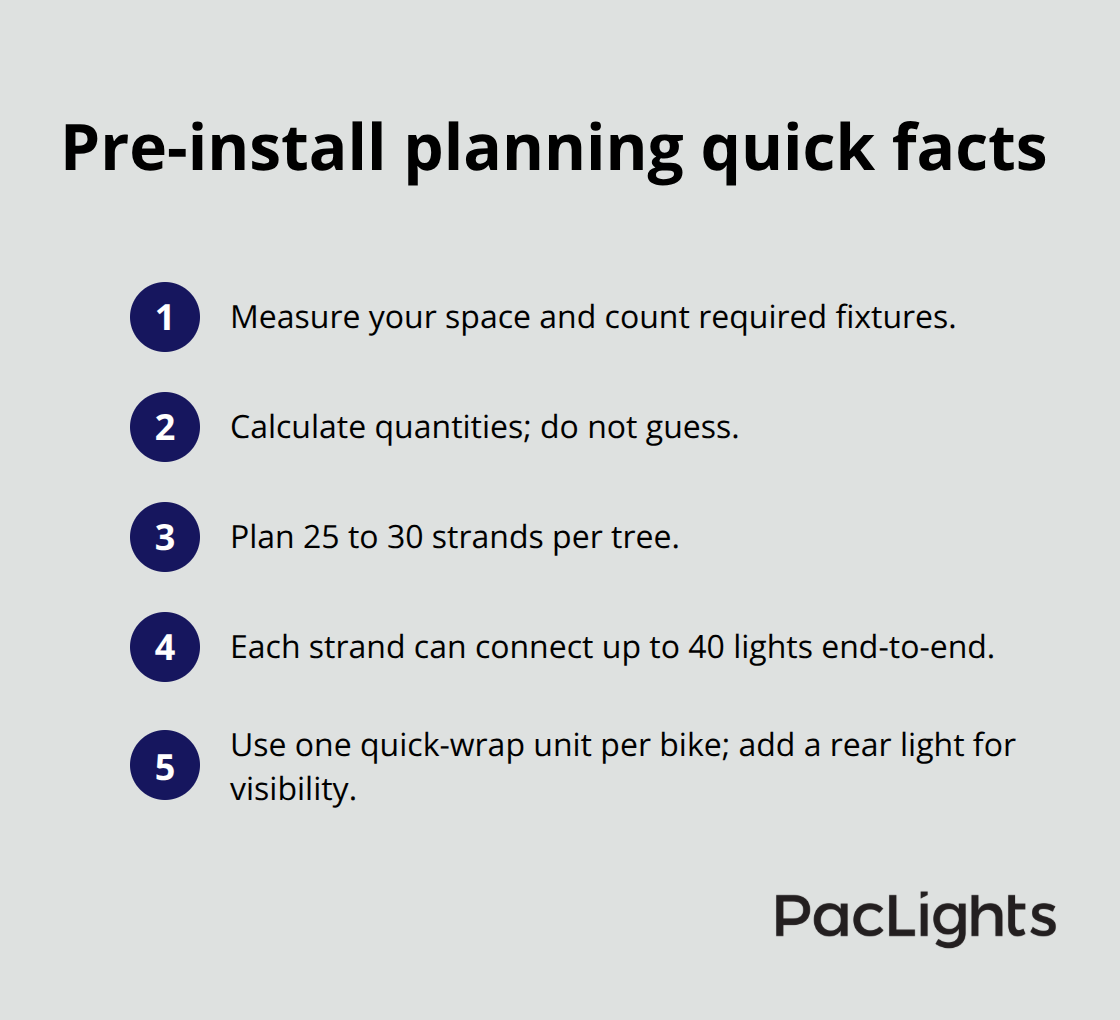
Before you connect a single wire, you need to understand what you’re working with. Start by measuring the area where you’ll install wrap lights and count how many fixtures you actually need. Most installations fail because people guess at quantities instead of calculating them. If you’re wrapping a tree with LED mini lights, plan for 25 to 30 strands per tree, with each strand capable of connecting up to 40 lights end-to-end. For bike lighting using a quick-wrap system like the Schwinn 11 Lumen Quick Wrap Light Set available on Target, you’ll typically need just one unit per bike, though adding a rear light improves visibility significantly.
Document your measurements and take photos of your installation area from multiple angles. This gives you a reference when you order materials and prevents costly mistakes.
Gather Your Tools and Materials First
Collect everything before you start work. For tree wrapping, you’ll need a standard extension cord and a three-way splitter to distribute power across multiple strands. For bike mounting, the quick-wrap design handles most of the work, but verify you have snug straps and a secure mounting location before installation begins. Check your local electrical codes first-some jurisdictions have specific requirements for outdoor lighting installations, especially if you’re connecting multiple strands or working near water sources. Test your lights before mounting them. This catches faulty strands immediately rather than after you’ve wrapped them around branches or secured them to a bike frame. A three-way splitter lets you isolate a faulty strand and identify exactly where problems occur, saving hours of troubleshooting later. Have replacement bulbs or spare strands on hand; don’t assume everything will work perfectly the first time.
Prioritize Safety Over Aesthetics
Never mount wrap lights in wet conditions or on damp surfaces. Water and electricity create serious hazards. If you’re installing outdoor fixtures, check weather forecasts and plan for a dry day with at least six hours of dry conditions ahead. For tree lighting, start trunk wrapping by plugging in the first strand with the male end outside for easy access-this prevents you from standing on wet ground while handling connections. On bikes, mount the light in a front position to maximize forward visibility and keep the beam aligned away from riders’ eyes to avoid glaring other cyclists. Inspect all cords and connections for damage before plugging anything in. Frayed wires or cracked connectors indicate you need replacements. Keep your installation area clear of obstacles and have someone nearby when testing electrical connections for the first time. With proper preparation complete, you’re ready to move forward with the actual mounting process.
How to Mount and Wire Wrap Lights Correctly
Position Your Fixture Before Fastening
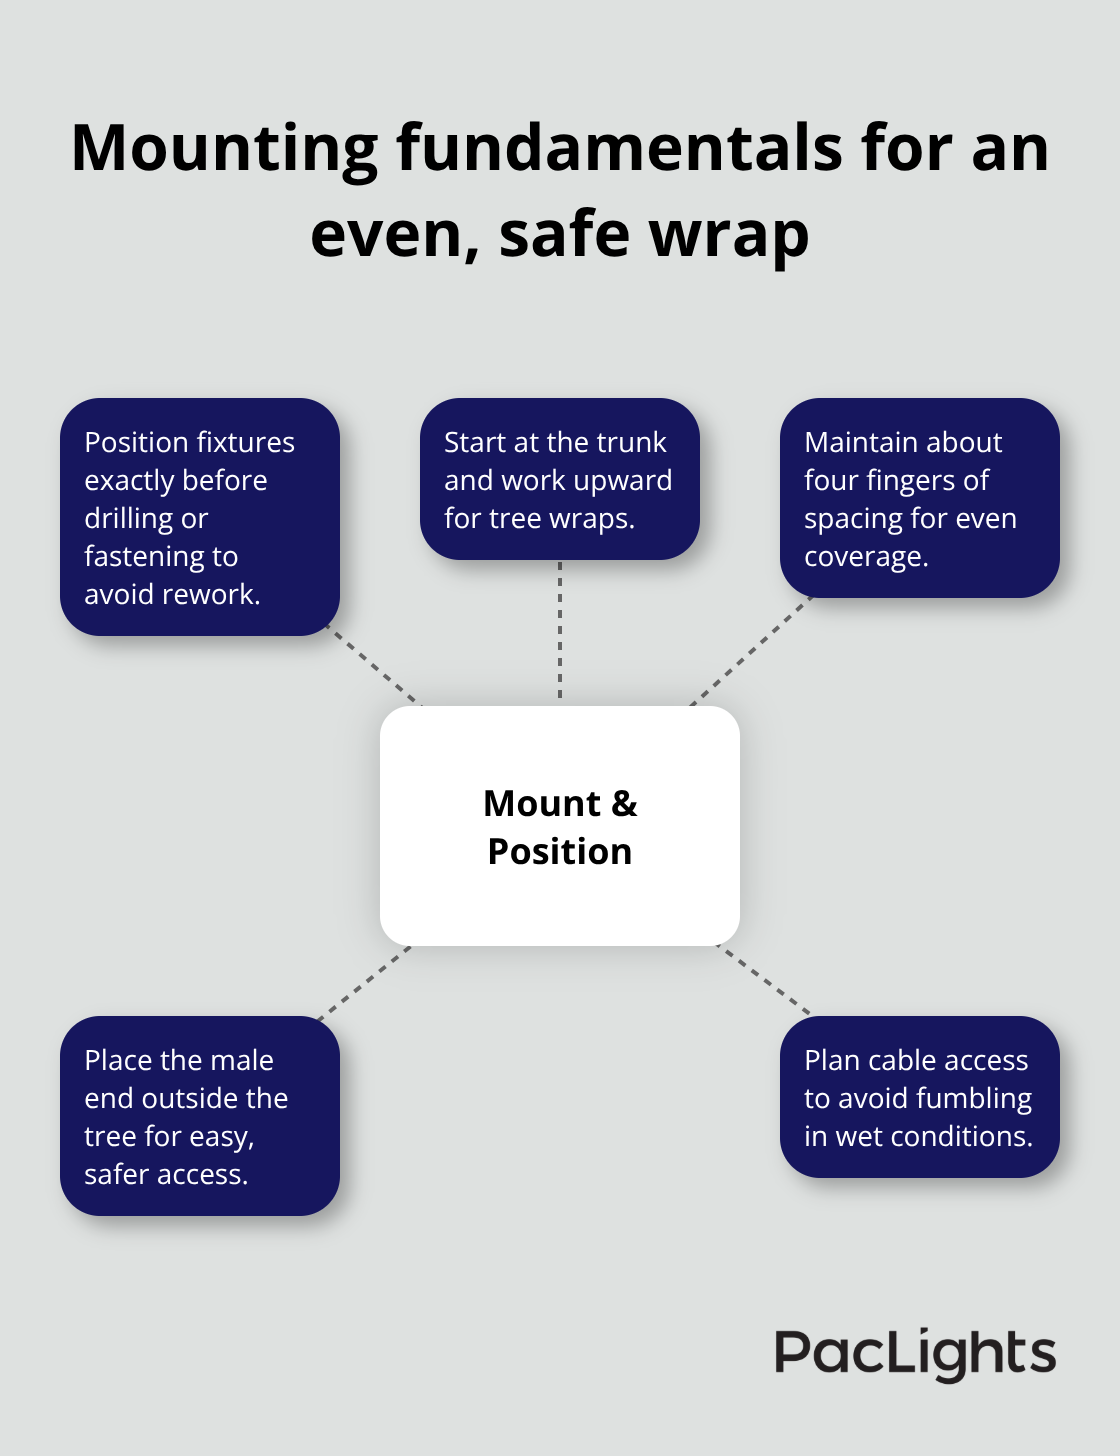
Position your fixture exactly where it needs to go before drilling or fastening anything. For tree wrapping with LED mini lights, start at the trunk and work upward, spacing wraps about four fingers apart as you spiral around. Plug in the first strand with the male end positioned outside the tree for easy access-this simple detail prevents you from fumbling with connections later or standing in wet conditions. The spacing matters because uneven gaps create visual dead zones that ruin the finished look.
Select the Right Location for Bike Lights
For bike lighting using quick-wrap systems like the Schwinn 11 Lumen Quick Wrap Light Set from Target, select a front position that maximizes forward visibility and allows the beam to project ahead of the rider. Mount the light snugly so vibrations from bumpy roads don’t rotate or detach it. A loose wrap will gradually shift during rides, throwing your beam angle off and potentially glaring other cyclists. Check the beam angle before final tightening and align it downward and forward, never toward riders’ eyes.
Wrap Trees Branch by Branch for Natural Flow
For tree installations, once trunk wrapping reaches the base, continue wrapping into the lower branches for a cohesive appearance. Never jump from one branch to another-wrap up and down each individual branch methodically. This creates natural flow instead of random scattered light. Wrap lights into a small ball before attaching them to a branch; this improves handling and prevents tangling as you work. If excess lights remain on a strand after covering your target area, double back to fill gaps for even coverage rather than leaving dark spots.
Connect Wiring and Test Immediately
Connect your electrical wiring with a three-way splitter distributing power across multiple strands, which also isolates faulty sections if problems emerge during the season. Test wire connectors immediately after wiring each section-don’t wait until everything is installed to discover a faulty strand. This approach catches issues early and saves hours of rewiring. For bike installations, verify the quick-wrap straps are genuinely snug before riding; loose mounting creates safety hazards and ruins the light’s positioning. When electrical connections pass your initial tests and fixtures sit securely in place, flickering lights or connection failures may still surface as the season progresses-issues we address in the troubleshooting chapter ahead.
Troubleshooting Common Wrap Light Problems
Most wrap light problems surface weeks into installation, not immediately after you finish mounting. Flickering lights usually point to connection issues rather than defective bulbs, and the fix is faster than you think.
Isolate Flickering Lights with Your Splitter
Start by isolating the problem strand using your three-way splitter-disconnect each strand one at a time until the flickering stops. This tells you exactly which strand is failing instead of wasting time checking every light individually. For tree installations with 25 to 30 strands per tree, a single faulty connection can ruin the appearance of your entire display.
Once you identify the problem strand, inspect every connection point along that run. Push connectors together firmly until they click or seat completely-loose connections create intermittent power loss that causes flickering. If the strand still flickers after reseating connections, replace it rather than troubleshooting further. The cost of a replacement strand is minimal compared to the frustration of chasing an intermittent electrical fault through your installation.
For bike lighting using quick-wrap systems like the Schwinn 11 Lumen Quick Wrap Light Set from Target, flickering usually means the wrap straps have loosened from vibration. Tighten the straps firmly and verify the connector hasn’t shifted during rides. If the light still flickers, check the beam angle alignment-a misaligned light sometimes appears to flicker when it’s actually rotating.
Fix Mounting Stability Issues Before They Worsen
Mounting stability problems emerge when vibration or weather gradually shifts your fixtures out of position. For tree wrapping, verify your spacing remains consistent at four fingers apart along the trunk and branches. Wind and temperature changes cause branches to flex and shift wrapped lights, creating uneven gaps over the season.
Walk around your tree monthly and look for areas where wraps have bunched up or separated. Tighten any loose wraps immediately rather than waiting for a major storm to tear them loose. For bike installations, test your quick-wrap mount after the first few rides on rough terrain. Bumps and vibrations gradually work straps loose even when you think they’re tight. Dismount and retighten before the light rotates enough to glare oncoming traffic or lose its forward beam angle.
Maintain Connections Throughout the Season
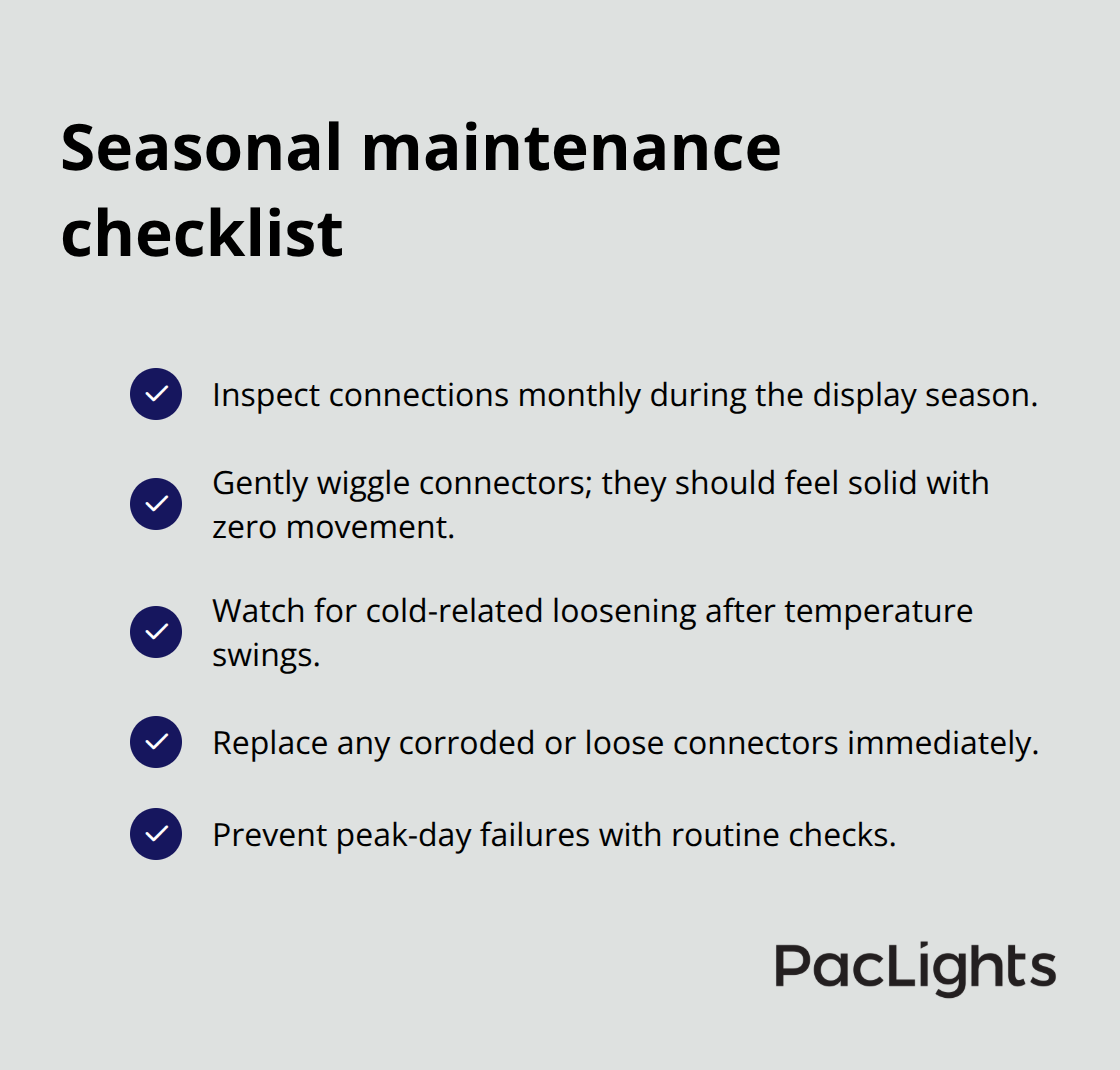
Check connections throughout the season, especially after heavy use or temperature swings. Cold weather causes metal connectors to contract slightly, loosening connections that felt snug in warm conditions. At the start of each month during your display season, walk your installation and test every connection by gently wiggling the connector-it should feel solid with zero movement. Replace any connector that wiggles or shows corrosion. Regular maintenance during the season prevents most of the failures we observe, and it takes far less time than emergency repairs after your lights fail during peak display days.
Wrapping Up
Successful wrap lights installation comes down to three things: proper planning, careful execution, and consistent maintenance. Rushing through any phase creates problems that multiply over time. Installations that last multiple seasons share one common trait-the owners invested time upfront to understand their space, gather the right materials, and test connections before final assembly.
Your maintenance routine determines how long your wrap lights perform reliably. Check connections monthly during your display season, especially after temperature swings or heavy wind (metal connectors contract in cold weather, loosening connections that felt secure in warmer conditions). A five-minute monthly inspection prevents the flickering and failures that typically emerge weeks into installation. Replace any connector showing corrosion or movement immediately rather than hoping it stabilizes on its own.
For tree installations using 25 to 30 strands per tree, walk around your display monthly and verify spacing remains consistent at four fingers apart along the trunk and branches. Wind gradually shifts wrapped lights, creating uneven gaps that ruin your visual impact. Contact PacLights for professional guidance on your wrap lights installation guide if you encounter problems beyond loose connections or faulty strands-we provide free lighting layout designs and ROI assessments to help you make informed decisions about your lighting investments.
Disclaimer: PacLights is not responsible for any actions taken based on the suggestions and information provided in this article, and readers should consult local building and electrical codes for proper guidance.