

Wafer downlights are transforming how homeowners light their spaces. These ultra-slim fixtures fit seamlessly into tight ceiling cavities, giving you a modern look without the bulk of traditional recessed lights.
At PacLights, we’ve helped countless customers through wafer downlight installation projects. This guide walks you through everything from planning to flipping the switch on your upgraded ceiling.
Why Wafer Downlights Outperform Traditional Recessed Lights
Space and Installation Advantages
Wafer downlights operate in a completely different league from the can lights that have dominated residential ceilings for decades. Traditional recessed fixtures require 6–8 inches of clearance above the ceiling, making them impossible to install in shallow plenums, basements, or retrofitted spaces.
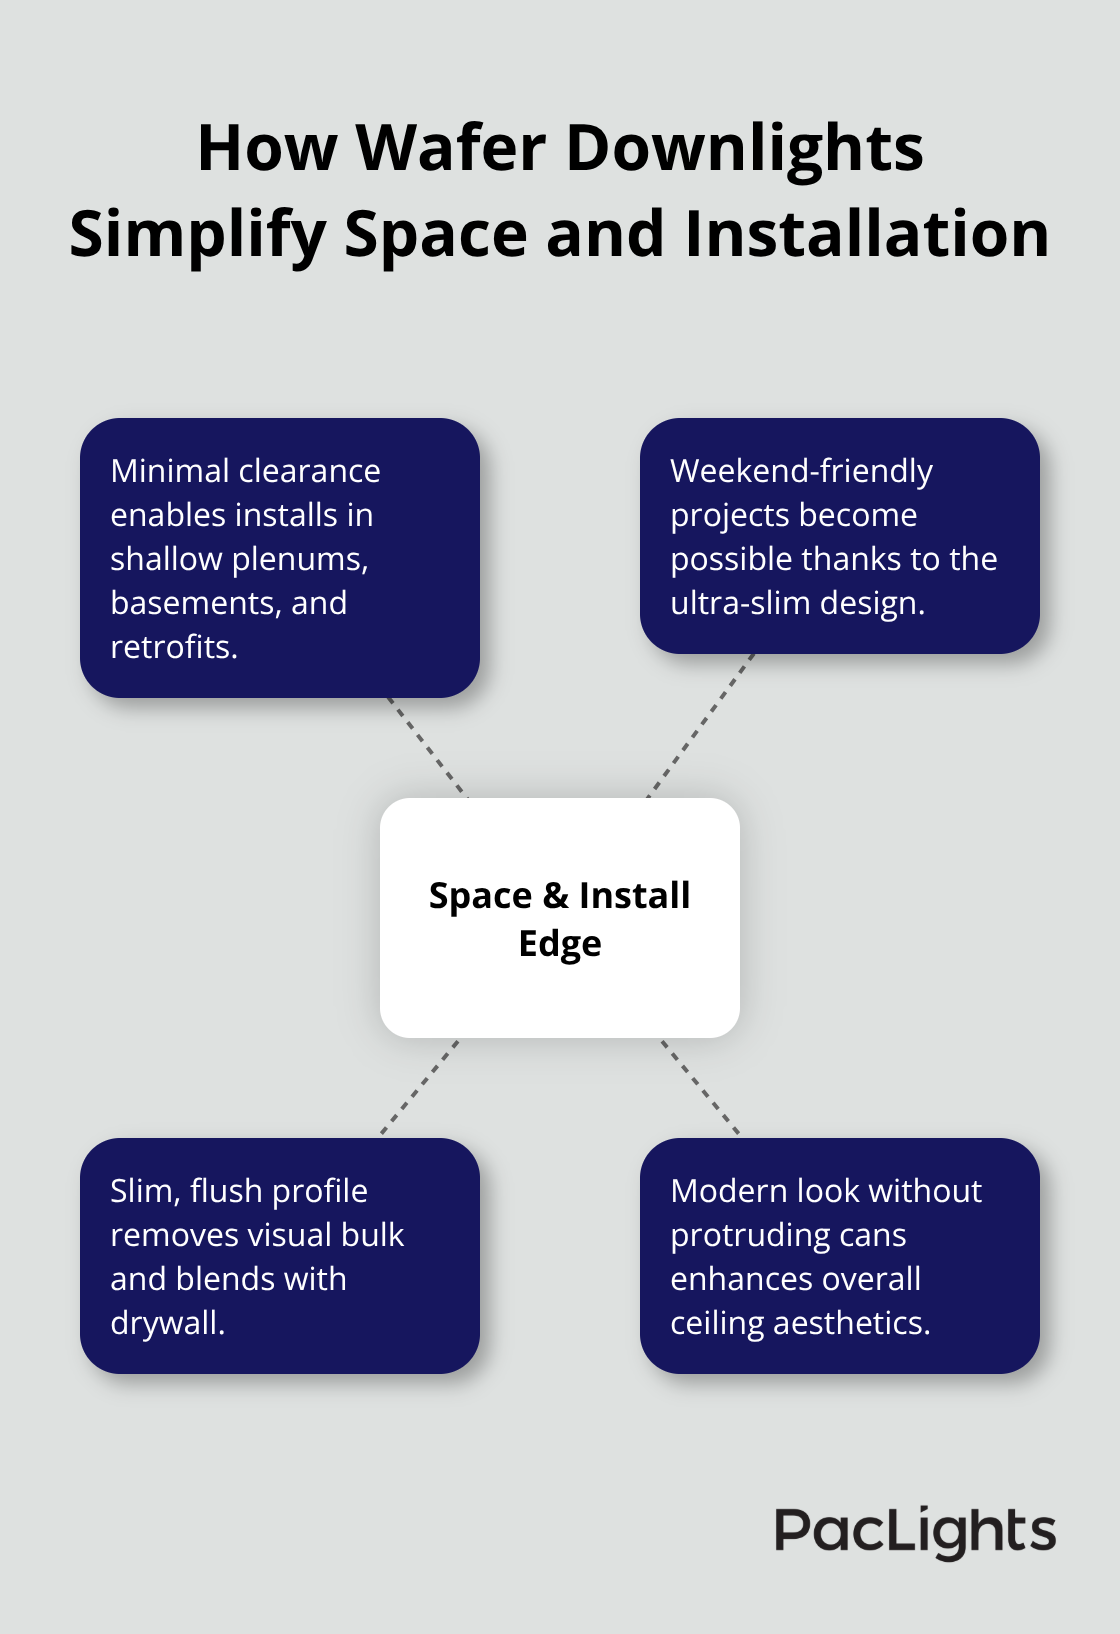
Wafer downlights need just 2 inches of space, which transforms what was previously an impossible project into something a homeowner can actually accomplish on a weekend. The slim profile also eliminates the visual bulk-no protruding can sits in your ceiling cavity, just a thin, flush fixture that blends seamlessly with your drywall.
Energy Savings That Add Up Fast
Energy efficiency data shows wafer downlights consume 6–12 watts compared to 50–60 watts for traditional incandescent recessed lights, delivering roughly 80–90% energy savings. If you run ten fixtures for five hours daily, switching to wafer downlights saves approximately 2,000 kilowatt-hours per year. At average U.S. electricity rates, that translates to roughly 240 dollars in annual savings. The fixtures also produce significantly less heat, which reduces your air conditioning load during summer months-a secondary benefit that compounds your savings over time.
Superior Light Quality and Color Accuracy
Wafer downlights deliver color temperatures ranging from 2700K (warm white) to 6500K (daylight), with Color Rendering Index ratings typically between 80–90. This means colors appear more accurate than older recessed lighting, which matters in kitchens where food prep requires accurate color perception and in living spaces where you want clothing and artwork to look right. The consistent light output across multiple fixtures creates even illumination without dark patches or hot spots. Most wafer fixtures support dimming when paired with compatible dimmers, giving you control over ambiance without sacrificing efficiency.
Customizable Ambiance Without Extra Wiring
Some models include switchable white technology-Juno Wafer Downlights, for example, feature a simple switch with five color temperature adjustments, letting you customize ambiance without installing separate controls or hiring an electrician to rewire your switches. The modern aesthetic is undeniable. Wafer downlights sit flush with your ceiling line, creating a clean, contemporary look that traditional can lights simply cannot match. This flush installation eliminates the shadow lines and visual clutter that older recessed lighting creates.
With these advantages clear, the next step is preparing your space for installation. Understanding your current ceiling structure and electrical setup determines whether you can tackle this project yourself or need professional support.
Getting Your Space Ready for Wafer Downlights
Measure Your Ceiling Cavity and Check for Insulation
Before you cut a single hole in your ceiling, you need to understand what you’re working with. Measure your ceiling cavity depth from the drywall surface to the joists or structural elements above. Wafer downlights require just 2 inches of clearance, but you should verify this measurement in at least three spots across your installation area since ceiling heights vary in older homes. Use a stud finder to locate joists, then drill a small pilot hole to measure the actual depth. This takes fifteen minutes and prevents costly mistakes.
Next, check whether your ceiling has insulation directly above it. If insulation sits on top of the drywall, you must use IC-rated fixtures to prevent overheating and fire risk. Non-IC fixtures in insulated ceilings can reach dangerous temperatures and void warranties. Look at your existing electrical setup and determine whether you can connect to an existing circuit or need a new one.
Calculate Your Electrical Load and Plan Your Circuit
Most LED wafer downlights draw 10-15 watts each, meaning you can typically run 10-12 fixtures on a single 15-amp circuit. Calculate your total load by multiplying fixture wattage by quantity, then dividing by 120. For example, twelve 12-watt fixtures equal 1,440 watts divided by 120, which gives you 12 amps-safely under your 15-amp limit. If your calculation exceeds 12 amps, plan a new circuit from your breaker panel. This is where hiring a licensed electrician makes sense unless you have experience with electrical panel work.
Select the Right Specifications for Your Space
Color temperature choice affects how your space feels-2700K delivers warm, residential ambiance while 5000K-6500K suits task-oriented areas like kitchens and bathrooms where you need accurate color perception. Choose CRI 90 or higher if you prepare food or work with textiles and artwork, as lower CRI ratings distort colors noticeably.
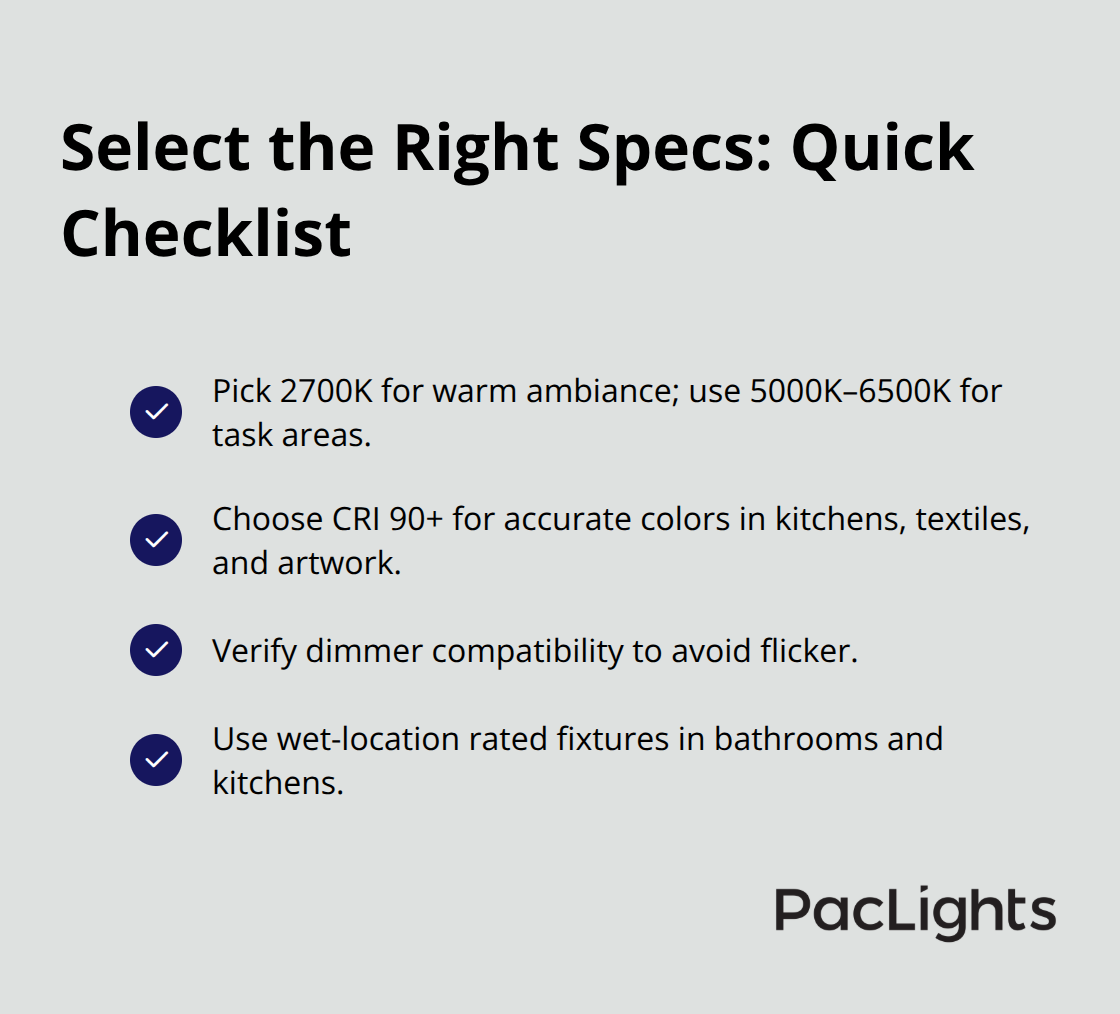
Dimming compatibility depends on your existing dimmer switches. Older triac dimmers sometimes cause flicker with certain LED drivers, while ELV (electronic low voltage) dimmers work more reliably with LED fixtures. If you have questions about your dimmer type, a quick photo sent to your fixture manufacturer often yields a definitive answer before you buy.
Wet-location rated fixtures are mandatory for bathrooms and kitchens, not optional. Standard fixtures fail in moist environments within months. Quality wafer downlights carry wet-location ratings and switchable white technology, making them suitable for multiple applications from residential to hospitality spaces.
Gather Tools and Create Your Installation Layout
Collect your tools before installation day: a 4.25-inch hole saw for standard fixtures, a stud finder, voltage tester, screwdrivers, wire strippers, electrical tape, a ladder, and a vacuum for dust management. Measure your ceiling thickness and joist spacing, then create a simple sketch showing fixture locations spaced roughly 4 feet from walls and 4-6 feet apart from each other. This spacing delivers about 30% better light distribution than closer placements and prevents dark patches.
Having all materials on hand eliminates frustrating mid-project supply runs and keeps your momentum going. With your space assessed, specifications selected, and tools ready, you can move forward with confidence into the actual installation process.
Installing Your Wafer Downlights
Power Off and Mark Your Ceiling
Turn off power at the breaker before marking anything on your ceiling. Use a voltage tester to confirm power is actually off, not just switched off at the wall. Mark your fixture locations using the spacing plan you created earlier. A 4.25-inch hole works for standard 4-inch fixtures, while a 6.25-inch hole fits 6-inch models. Cut slowly and keep the hole saw perpendicular to the ceiling to avoid angled cuts that prevent proper fixture seating. Vacuum immediately after cutting to prevent drywall dust from contaminating your wiring connections.
Measure twice, cut once. A misaligned hole larger than needed creates gaps where trim rings won’t sit flush, forcing you to patch and restart.
Run Cable and Make Electrical Connections
Run your electrical cable from your power source to the first fixture location, leaving 12 to 16 inches of cable at each hole for wire connections. Staple cables to joists every 4.5 feet to keep them secured and prevent sagging. If you’re starting a new circuit from your breaker panel, stop and hire a licensed electrician unless you have panel experience. Many jurisdictions require permits for new circuits, and electrical inspectors catch shortcuts.
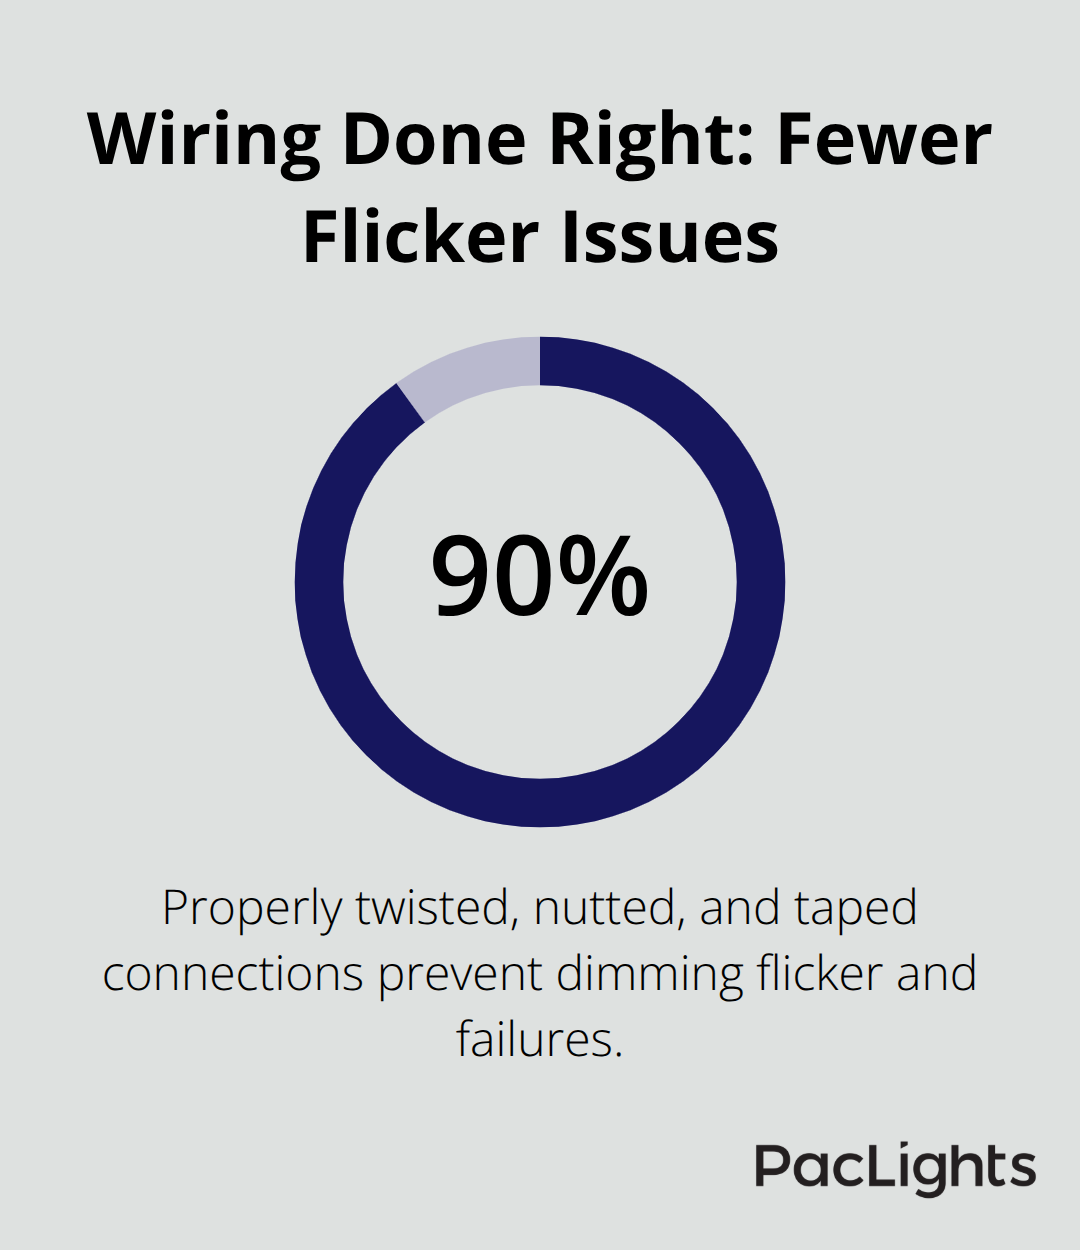
Connect black wire to black, white to white, and green or bare copper to ground. Twist wires clockwise three to four times before applying wire nuts, then wrap with electrical tape to lock them in place and prevent accidental separation during fixture installation. This deliberate approach takes an extra minute per connection but eliminates 90% of dimming flicker and connection failures.
Insert Fixtures and Deploy Spring Clips
Insert the fixture into the ceiling hole and deploy the spring clips by pushing them outward until they grip the ceiling material tightly. The fixture should sit completely flush with the drywall surface with no gaps or protrusion. If the trim ring sits at an angle or the fixture tilts, stop and check your hole size and ceiling thickness. Adjust the springs until everything aligns perfectly.
Restore power at the breaker and test your lights. If a fixture doesn’t illuminate, power down immediately and check your wire connections before troubleshooting further. Installation takes 30 to 60 minutes per fixture when you work methodically. Rushing creates wiring errors that cost hours in diagnosis later.
Final Thoughts
Wafer downlight installation transforms your ceiling into a modern, efficient lighting system that cuts your electricity costs by 80–90% compared to traditional recessed fixtures. Ten fixtures running five hours daily save approximately 2,000 kilowatt-hours annually, which translates to roughly 240 dollars off your electricity bill each year. The slim 2-inch profile opens installation possibilities in spaces where old can lights simply won’t fit, and your ceiling looks cleaner without the visual bulk of traditional fixtures.
Your next step depends on your comfort level with electrical work. If you have experience with basic wiring and your installation involves connecting to an existing circuit, a weekend project becomes realistic. If you’re adding new circuits or working with unfamiliar electrical systems, hiring a licensed electrician prevents costly mistakes and protects your home’s safety.
We at PacLights understand that lighting decisions affect both your daily experience and your long-term costs. Contact PacLights to explore wafer downlight options and connect with our lighting specialists who can answer specific questions about your project.
Disclaimer: PacLights is not responsible for any actions taken based on the suggestions and information provided in this article, and readers should consult local building and electrical codes for proper guidance.