

Surface mount downlight design has become the standard for modern interiors because it delivers clean aesthetics without sacrificing performance. The right fixtures create uniform lighting that feels intentional and professional, not flat or harsh.
At PacLights, we’ve seen how beam angles, spacing, and smart controls transform a space from ordinary to exceptional. This guide walks you through the decisions that matter most.
What Makes Surface Mount Downlights Work Visually
Surface mount downlights succeed because they sit directly on the ceiling, giving you complete control over how light spreads into your space. The beam angle you select determines everything: a narrow 24-degree beam concentrates light for accent work on artwork or merchandise, while a wide 60-degree beam spreads light across general areas like conference rooms or retail floors. The IES Handbook recommends matching beam angles to room width-for a room 20 feet wide, a 40-degree beam typically delivers even coverage without dark spots or excessive brightness near walls. Narrow beams create drama and visual hierarchy; wide beams feel democratic and functional. Choose based on your actual space dimensions and task requirements, not on what feels aesthetically pleasing in isolation.
Trim Finishes Shape the Entire Aesthetic
The trim finish you select matters far more than most designers realize. Matte white disappears into standard ceilings and works well for offices where lighting should feel invisible; matte black creates modern industrial appeal and suits lofts or contemporary retail; brushed metal adds sophistication without drawing attention. The finish directly impacts how your ceiling reads visually-a matte white trim on a white ceiling creates seamless integration, while brushed nickel on the same ceiling becomes a design statement. Dark walls absorb roughly 30 to 50 percent more light than light walls, according to lighting simulation standards, so your trim choice influences perceived brightness and may require adjustments to spacing or lumen output. Plan trim finishes during your initial layout phase, not as an afterthought, because changing them later disrupts the visual continuity you worked to achieve.

Spacing and Lumen Output Drive Uniformity
Uniform lighting depends on precise spacing and adequate output working together. The basic rule: space downlights at roughly 1.5 times your ceiling height apart. For a 10-foot ceiling, that’s about 15 feet between fixtures. If you deviate-placing fixtures 20 feet apart-you create dark zones between them that feel uneven and unprofessional. Higher lumen output lets you space fixtures further apart; lower output demands tighter spacing. A 3,000-lumen fixture in a retail space might need spacing of 12 feet, while a 1,500-lumen fixture requires 8-foot spacing to hit the same lux level. Use the formula: total lumens needed equals room area multiplied by target lux multiplied by a maintenance factor of 0.8. For a 100-square-meter office targeting 400 lux, you need 32,000 lumens total. Divide that by your fixture output to determine quantity. This approach eliminates guesswork and prevents over-specifying or under-lighting.
Anti-Glare Design Protects Visual Comfort
Glare control separates professional installations from mediocre ones. Surface mount downlights with diffusers reduce glare by scattering light rather than concentrating it directly into occupants’ eyes. Frosted acrylic diffusers (as thin as needed for your application) soften harsh hotspots and create a more pleasant visual experience, particularly in offices where screen work dominates. The Unified Glare Rating (UGR) standard measures discomfort glare; fixtures with UGR below 19 meet most commercial standards. Recessed downlights often offer better glare management through their recessed design, but surface-mounted fixtures with quality diffusers perform equally well when specified correctly. Test your layout with lighting simulation software before installation to verify UGR compliance and avoid costly redesigns after fixtures are mounted.
How to Space and Position Surface Mount Downlights for Uniform Coverage
Calculate Spacing Based on Ceiling Height and Beam Angle
Spacing rules determine whether your installation looks intentional or accidental. The 1.5-times-ceiling-height formula works as a starting point, but real-world projects demand adjustments based on beam angle, lumen output, and room reflectivity. A 10-foot ceiling with 40-degree beam fixtures might support 15-foot spacing, but dark walls that absorb 30 to 50 percent more light than light surfaces require you to reduce spacing to 12 feet. Narrow beam angles concentrate light more efficiently, allowing wider spacing; wide angles scatter light over larger areas and need tighter placement to avoid dark zones. Avoid placing fixtures too close to walls-position them at least 3 feet from perimeter walls to prevent uneven wall washing and hotspots.
Select Fixture Output to Reduce Quantity and Improve Layout
Higher-output fixtures simplify your spacing strategy and reduce the total number of units you need to install. For a 20-by-30-foot retail space targeting 500 lux, calculate total lumens needed: 600 square meters × 500 lux × 0.8 maintenance factor equals 240,000 lumens. If you select 3,000-lumen fixtures, you need 80 fixtures-an impractical number. Choose higher-output fixtures like 4,000 to 5,000 lumens instead, which reduces fixture count to 48 to 60 units and improves spacing practicality. Grid layouts work best for general illumination in offices and retail; perimeter placement combined with central fixtures works for spaces where walls need visual emphasis. Always map ceiling obstacles-joists, HVAC ducts, sprinkler heads, fire alarms-before finalizing your layout, because working around these elements often forces spacing compromises that affect uniformity.
Match Lux Levels to Room Function and Task Requirements
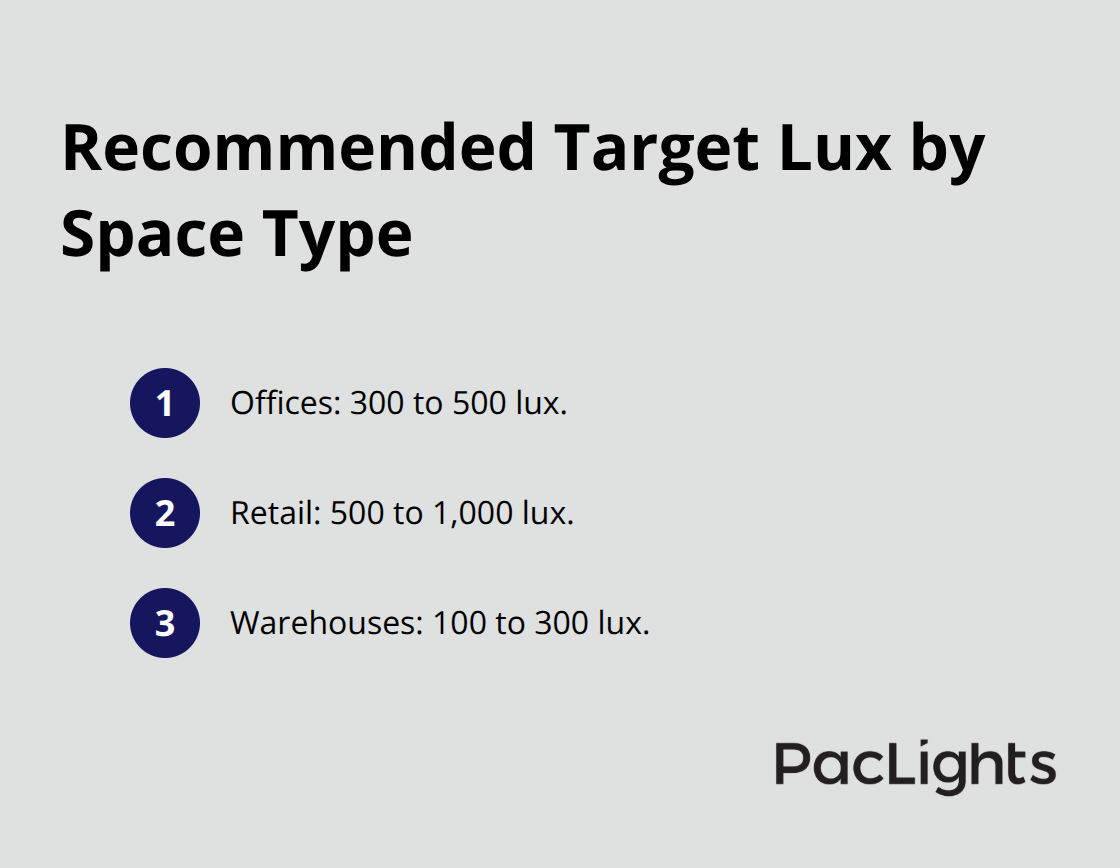
Lux consistency separates professional installations from amateur work, and matching fixture specifications to room function and occupant tasks makes the difference. Commercial offices need 300 to 500 lux according to IES standards; retail spaces demand 500 to 1,000 lux; warehouses operate at 100 to 300 lux. These targets exist because they reflect what occupants actually see and feel.
A conference room lit at 250 lux feels dim and fatiguing; at 400 lux, it feels alert and professional.
Verify Your Layout with Simulation Software Before Installation
Use lighting simulation software like DIALux, Relux, or AGi32 before installation to model your space, verify lux distribution across the floor, and identify dark spots or glare hotspots. These tools generate photometric reports that prove compliance to building codes and give clients confidence in your design. Anti-glare matters equally-fixtures with Unified Glare Rating below 19 protect visual comfort, especially in open offices where screen work dominates. Frosted acrylic diffusers reduce glare effectively without sacrificing brightness; they scatter light rather than concentrating it. Test your final layout with simulation software and verify UGR values before mounting anything. This step prevents costly redesigns after installation and demonstrates professional competence to your client.
With your spacing, lumen output, and glare control locked in, the next critical decision involves selecting the right LED technology and control systems that transform your static layout into an adaptive, energy-efficient lighting solution.
Why LED and Smart Controls Transform Surface Mount Downlights
LED Technology Delivers Measurable Performance Advantages
LED technology in surface mount fixtures produces measurable performance advantages that directly impact your bottom line. Modern LED panels exceed 50,000 hours of lifespan, meaning a fixture burning 8 hours daily lasts roughly 17 years before replacement becomes necessary. This longevity eliminates the constant maintenance cycles of incandescent or fluorescent alternatives. LED fixtures consume 60 to 75 percent less energy than older technologies while producing equivalent or superior light output, according to U.S. Department of Energy data. A 3,000-lumen LED downlight draws approximately 30 watts, while an incandescent fixture producing similar output consumes 150 watts.
For a retail space with 60 downlights running 12 hours daily, switching to LED saves roughly 2,880 kilowatt-hours annually, translating to approximately $360 per year in electricity costs at average commercial rates. Over a 10-year period, that single space saves $3,600 in energy alone, plus avoids the labor costs of replacing burned-out bulbs every few months. LED panels also emit minimal heat compared to incandescent sources, reducing HVAC cooling demands in climate-controlled environments like offices and retail spaces.
Diffusers Create Uniform, Comfortable Light
Frosted acrylic diffusers behind LEDs create uniform, warm light without the harsh glare characteristic of bare incandescent bulbs. These diffusers directly support the anti-glare objectives you verified in your simulation software before installation. The combination of LED output and quality diffusion produces professional results that occupants notice and appreciate.
Smart Controls Adapt Light to Actual Conditions
Smart controls and dimming systems amplify LED efficiency gains by adapting light output to actual occupancy and daylight conditions rather than running fixtures at full brightness continuously. Occupancy sensors detect when spaces stand empty and reduce light to 10 or 20 percent, preventing waste in storage areas, hallways, and meeting rooms that experience intermittent use. Daylight harvesting systems measure incoming natural light through windows and automatically dim electric fixtures to maintain target lux levels without oversupply, reducing energy consumption by 20 to 30 percent in perimeter zones according to lighting control manufacturers.
Dimming Extends Lifespan and Supports Circadian Health
Dimming also extends LED lifespan by reducing electrical stress; a fixture dimmed to 70 percent output operates at lower temperatures and degrades more slowly than one running constantly at full brightness. Dim-to-warm technology shifts color temperature from cool 4000K during peak work hours to warm 2700K in evening hours, supporting circadian rhythms and reducing eye strain without requiring fixture replacement. This adaptive approach transforms static lighting into a system that responds to human needs throughout the day.
Control Systems Deliver Significant ROI
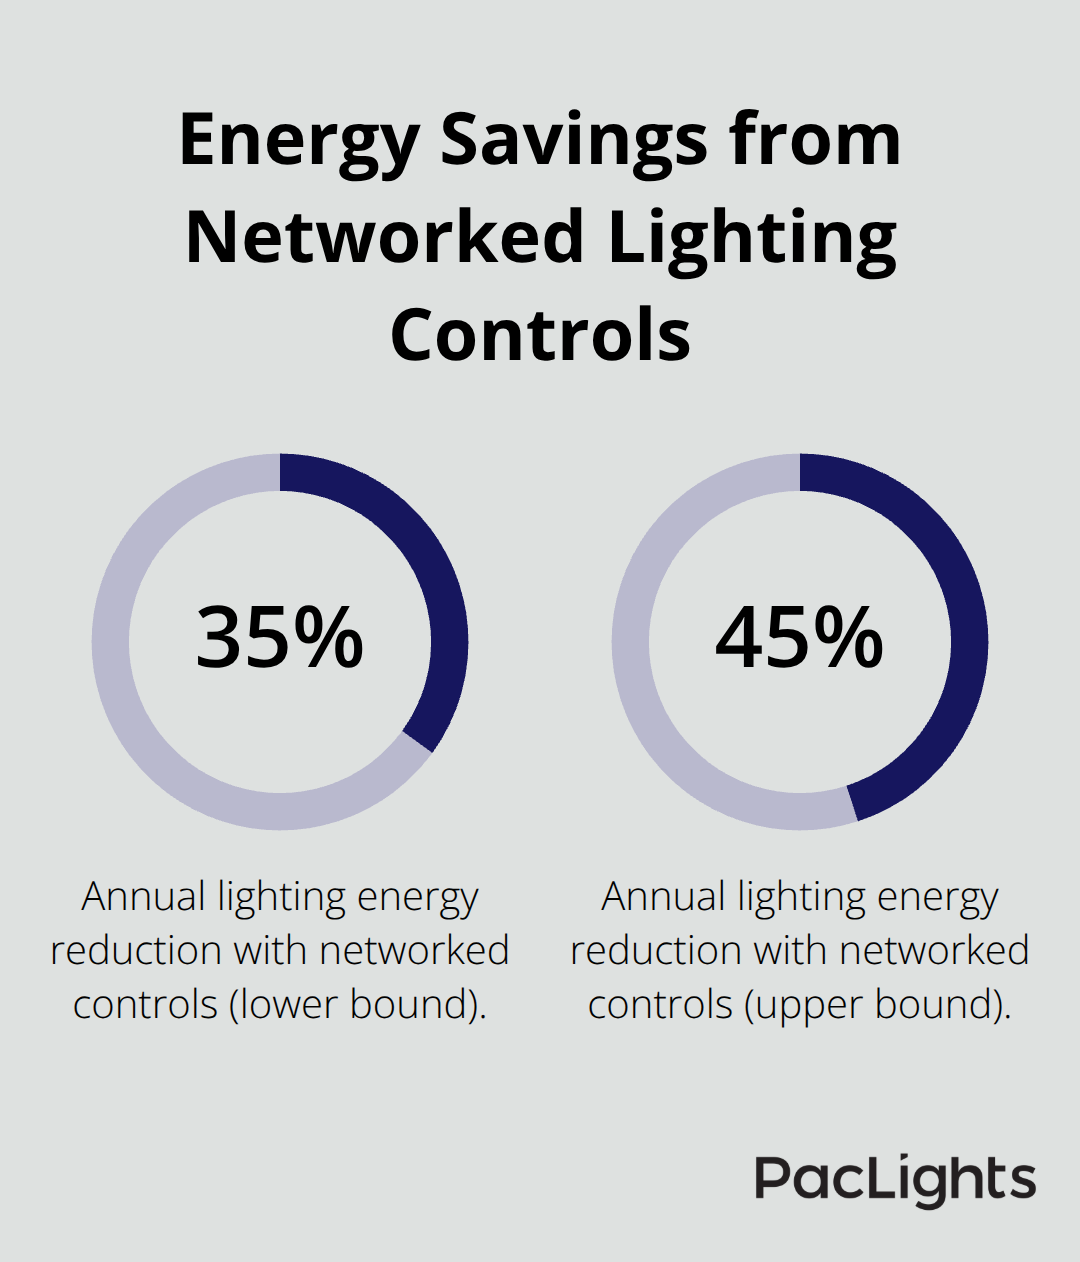
Networked lighting controls enable remote monitoring, automated scene scheduling, and integration with building management systems, allowing facility managers to adjust lighting across multiple zones from a single interface. For a 50,000-square-foot office building, strategic dimming and occupancy control can reduce annual lighting energy consumption by 35 to 45 percent, saving $8,000 to $12,000 annually depending on local electricity rates and operating hours. This ROI typically recovers the cost of control systems within 2 to 3 years, after which savings flow directly to your budget. Avoid oversimplifying control systems; basic on-off switches waste the efficiency potential of LED technology.
Instead, specify fixtures compatible with dimming drivers rated for your LED panels, ensuring smooth operation across the full 0 to 100 percent range without flickering or color shift.
Final Thoughts
Surface mount downlight design succeeds when precise spacing, LED technology, and smart controls work together to transform your space. Beam angles shape light distribution, trim finishes establish visual identity, and lux calculations prevent under-lighting or waste. Your spacing formula, lumen output decisions, and simulation software verification eliminate guesswork and deliver professional results that occupants notice and appreciate.
The real payoff comes from matching these technical decisions to your actual environment. A retail space needs 500 to 1,000 lux with tight spacing and high-output fixtures; an office thrives at 300 to 500 lux with flexible control systems; a warehouse operates efficiently at 100 to 300 lux. Quality diffusers and UGR compliance protect visual comfort, while LED technology and dimming systems deliver measurable ROI within 2 to 3 years through energy savings alone.
Modern design and performance standards no longer conflict-surface mount fixtures deliver clean aesthetics without sacrificing efficiency or comfort. We at PacLights help you translate these principles into your specific space through lighting layout designs and ROI assessments that match your actual needs and budget.
Disclaimer: PacLights is not responsible for any actions taken based on the suggestions and information provided in this article, and readers should consult local building and electrical codes for proper guidance.