

Poor recessed lighting layout ruins even the most beautiful rooms. Shadows in the wrong places, glare where you don’t want it, and dark spots where you need light most.
We at PacLights see homeowners struggle with spacing, beam angles, and lumens every day. This guide breaks down the exact measurements and room-specific strategies that create professional lighting results.
Understanding Recessed Lighting Basics
Types of Recessed Lights and Their Applications
Three main recessed light types serve completely different purposes, and you must choose the right type for each area. General lights provide broad illumination across entire rooms, task lights focus intense beams on work areas, and accent lights highlight specific features like artwork or architectural details. Each type demands different spacing, beam angles, and lumen outputs to function effectively.
Key Measurements and Spacing Requirements
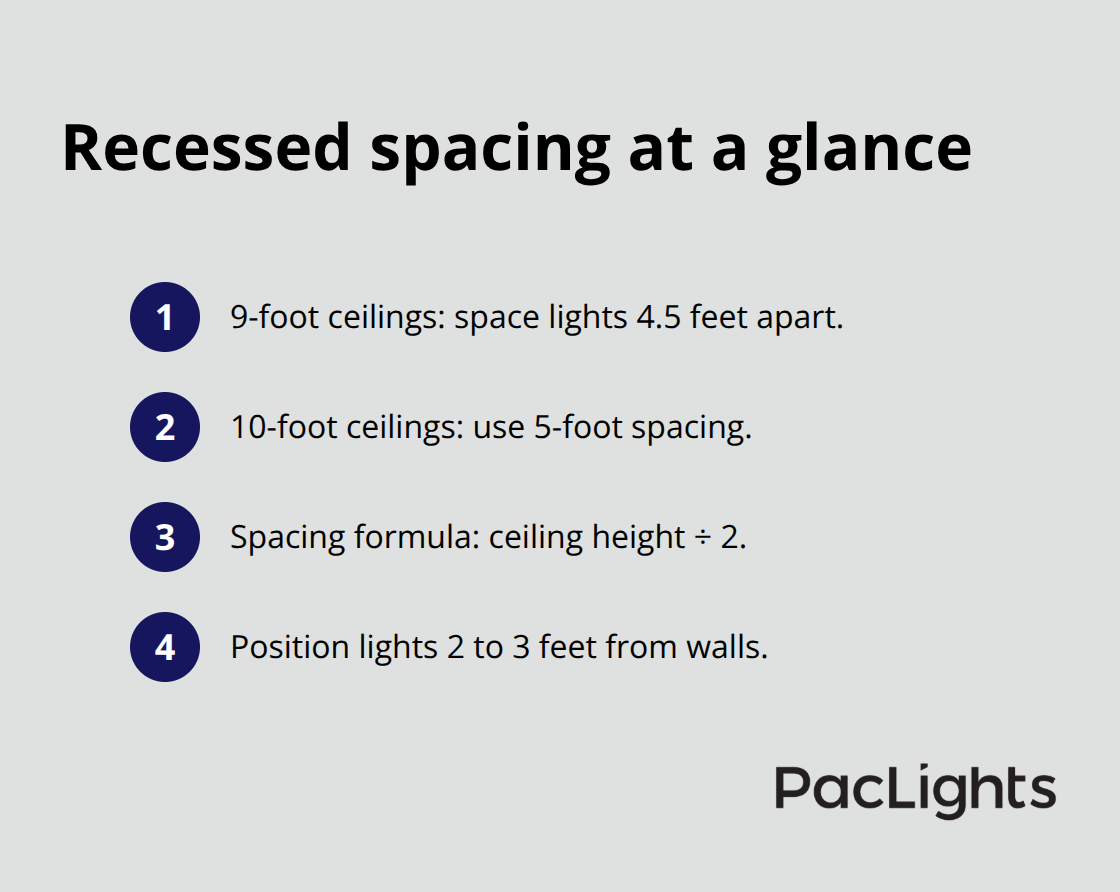
Standard 4-foot spacing between recessed lights works for 8-foot ceilings, but this generic rule fails in most real situations. For 9-foot ceilings, space lights 4.5 feet apart. For 10-foot ceilings, use 5-foot spacing. The formula divides ceiling height by two to get optimal spacing distance (ceiling height ÷ 2 = spacing distance). Wall placement matters more than most guides admit – position lights 2 to 3 feet from walls to prevent harsh shadows and create even light distribution across surfaces.
Lumens and Color Temperature Considerations
Most rooms need 20 lumens per square foot for ambient light, but kitchens require 50 lumens per square foot for task areas. A typical 6-inch LED recessed light produces 600 to 1000 lumens, which means a 200-square-foot room needs approximately 8 to 10 fixtures for proper illumination. Color temperature affects room atmosphere dramatically – 2700K creates warm, cozy environments for bedrooms and living rooms, while 4000K provides crisp, focused light for kitchens and bathrooms. Different color temperatures in the same space create an unprofessional, disjointed appearance that undermines your entire design.
These technical foundations set the stage for room-specific strategies that address the unique challenges each space presents.
Room-by-Room Planning Strategies
Kitchen Lighting Layout Best Practices
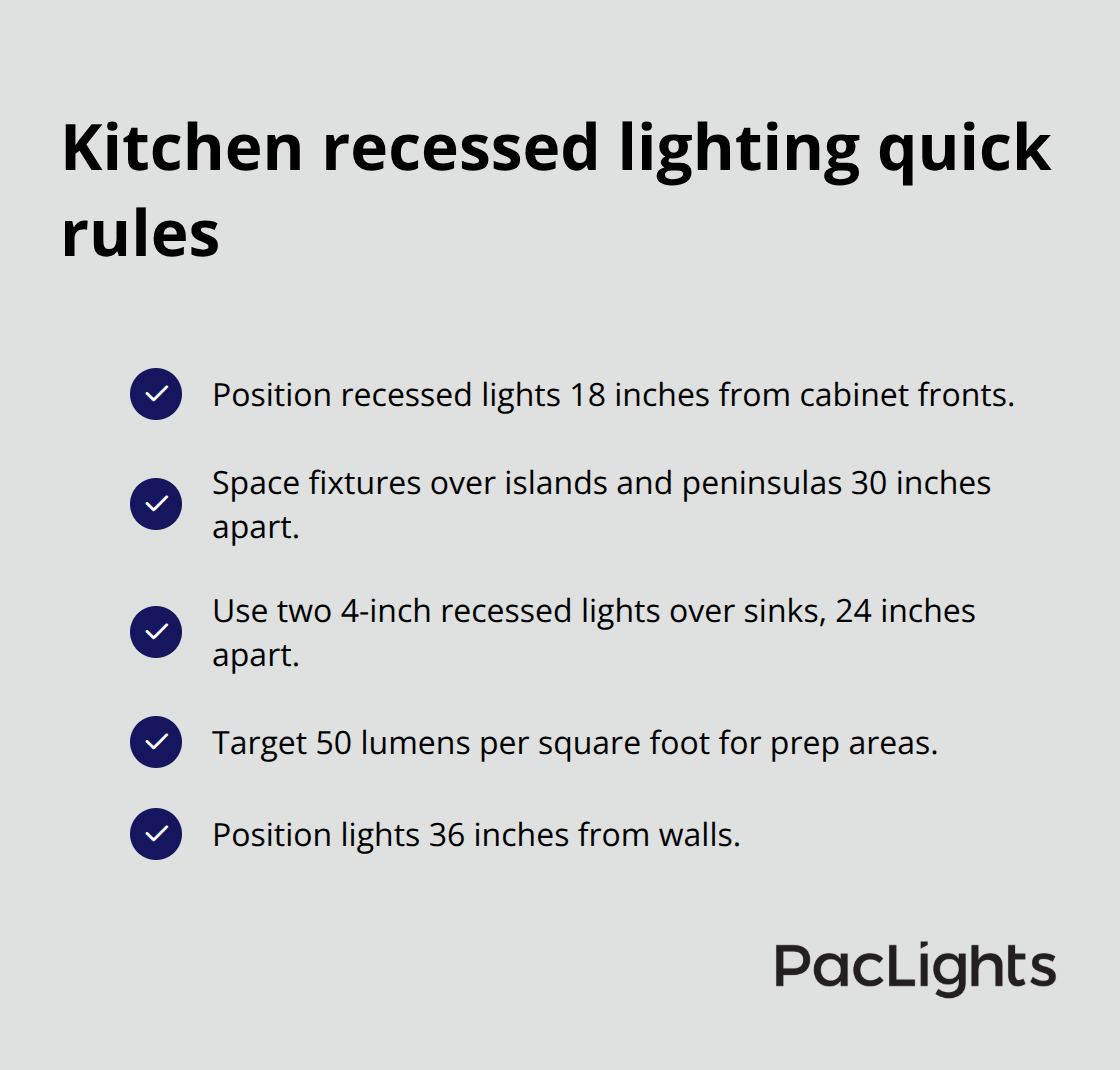
Kitchens demand three distinct zones that most homeowners completely mess up. Position recessed lights 18 inches from cabinet fronts to eliminate shadows on countertops – this distance prevents your body from blocking light while you work. Install lights directly over islands and peninsulas with 30-inch spacing between fixtures, never more. Task areas above sinks require two 4-inch recessed lights positioned 24 inches apart for optimal illumination.
The National Kitchen and Bath Association recommends 50 lumens per square foot for prep areas, which means a standard 10×12 kitchen needs approximately 12 to 15 recessed fixtures total. Position lights 36 inches from walls to create proper wall effects that make your kitchen appear larger and brighter.
Living Room and Bedroom Placement Guidelines
Living rooms work best with perimeter placement that avoids the center ceiling completely – this creates intimate, layered illumination instead of harsh overhead glare. Space 6-inch recessed lights 6 feet apart along room edges, positioned 30 inches from walls. This approach eliminates the flat, commercial appearance that center-mounted fixtures create.
Bedrooms require asymmetrical placement with lights concentrated over seating areas and dressing zones, not centered over beds where they create unwanted glare. Install dimmers on every bedroom circuit because fixed brightness ruins functionality (especially for late-night navigation). Position fixtures to highlight architectural features while maintaining comfortable ambient levels.
Bathroom and Hallway Requirements
Bathrooms present unique moisture and safety challenges that generic rules ignore completely. Install vapor-rated recessed lights 3 feet from shower areas and never directly above bathtubs where steam condensation causes premature failure. Mirror areas need two lights positioned 36 inches apart and 30 inches from the mirror surface to eliminate facial shadows.
Powder rooms require only two 4-inch lights maximum – more creates harsh, unflattering illumination in small spaces. Hallways need lights every 6 to 8 feet with 4-inch fixtures positioned down the center line to prevent the tunnel effect that makes narrow spaces feel cramped.
Specialty Area Considerations
Hallway intersections need dedicated fixtures positioned 18 inches from corners to prevent dark transition zones that create safety hazards at night. Stairways require lights at the top and bottom of each flight, with intermediate fixtures for runs longer than 12 feet. Closets benefit from single centered fixtures with motion sensors for automatic activation.
These room-specific strategies require precise technical calculations that account for ceiling height, beam angles, and electrical capacity limitations.
Technical Installation Considerations
Ceiling Height and Beam Angle Calculations
Ceiling height calculations beyond the basic spacing formula separate professional installations from amateur disasters. For ceilings above 10 feet, beam angle becomes the determining factor – narrow 25-degree beams work for heights up to 12 feet, while 40-degree wide beams handle 14-foot ceilings effectively. The International Association of Lighting Designers recommends increasing fixture wattage by 20% for every 2 feet above standard 8-foot height to maintain proper foot-candle levels. Most contractors ignore this completely and wonder why their high-ceiling installations look dim and poorly distributed.
Electrical Requirements and Circuit Planning
Standard 15-amp circuits handle maximum 12 LED recessed fixtures safely, but most electricians pack 18 to 20 fixtures on single circuits creating dangerous overloads. Calculate total fixture wattage first – typical 6-inch LED recessed lights draw 12 watts each, meaning 12 fixtures consume 144 watts total with comfortable safety margin. Dedicated 20-amp circuits support up to 16 fixtures maximum.
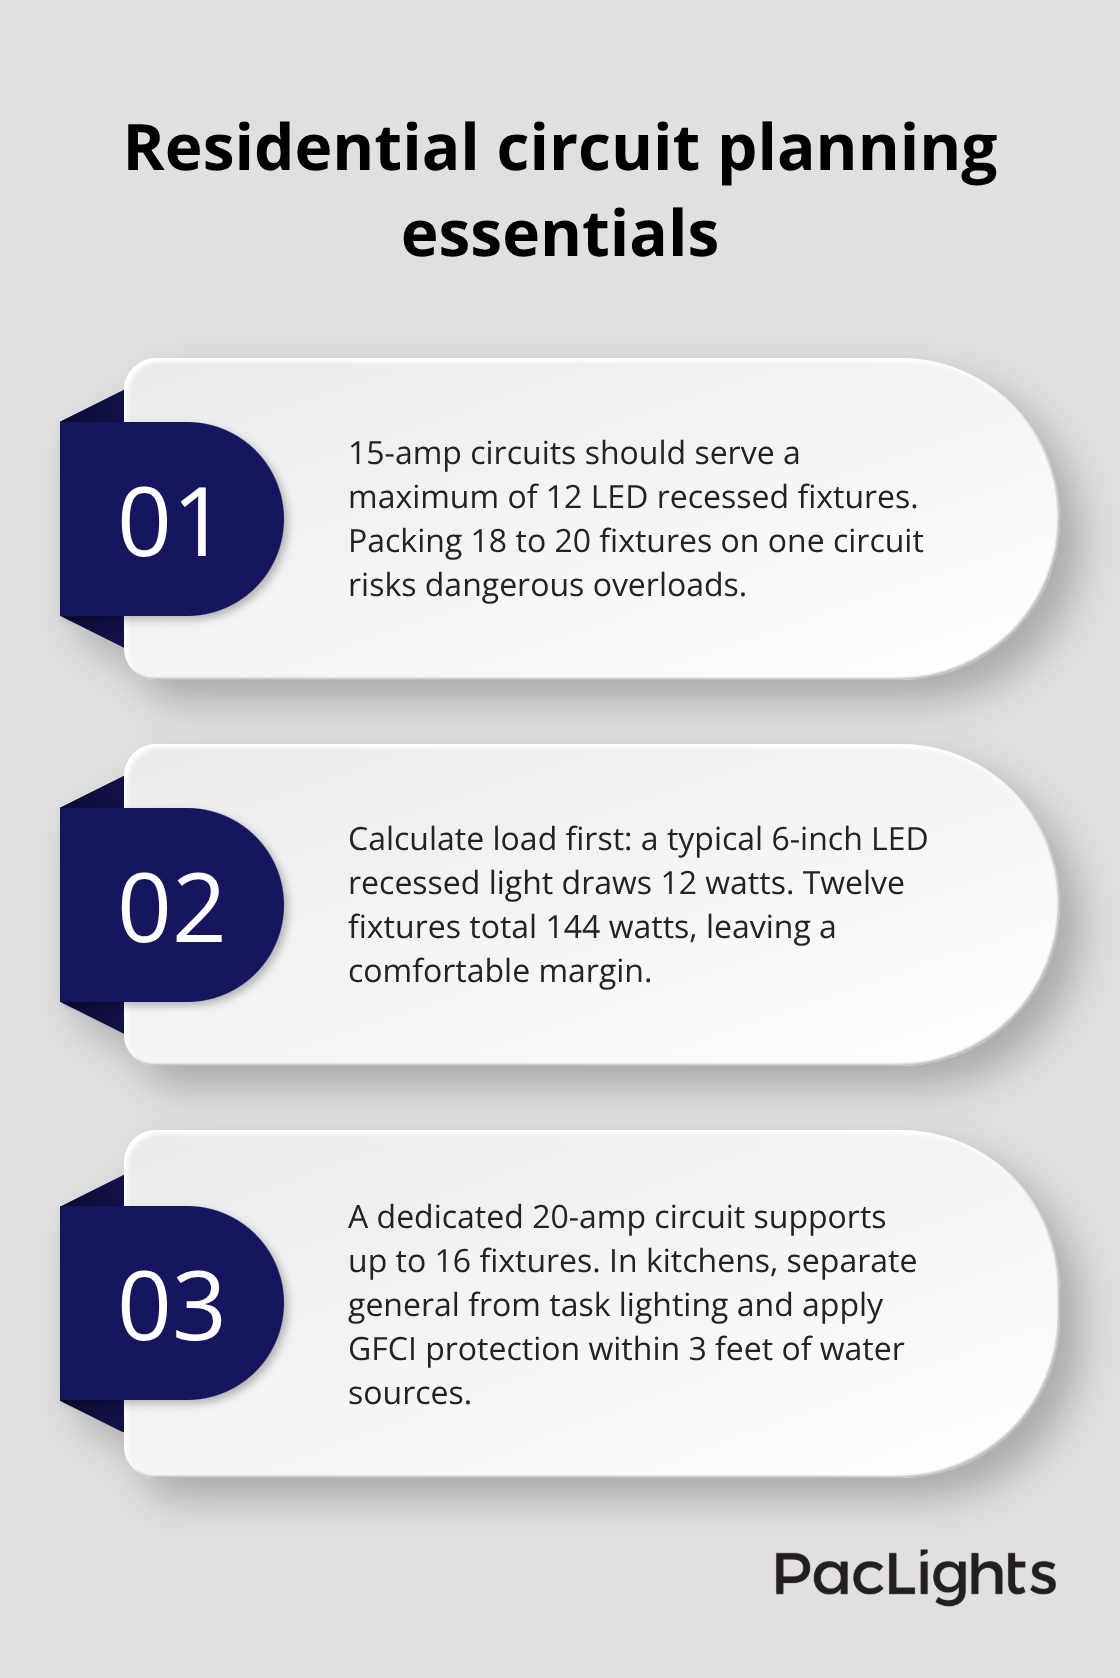
Kitchen installations require separate circuits for general lighting versus task lighting to prevent dimming when appliances activate. The National Electrical Code mandates GFCI protection for bathroom recessed lights within 3 feet of water sources (which most DIY installations completely ignore).
Working Around HVAC and Structural Elements
Ceiling joists run 16 inches on center in most homes, but HVAC ducts create irregular obstacles that destroy symmetrical lighting layouts. Map ductwork locations before you finalize fixture positions using thermal imaging cameras or stud finders with deep-scan capability. IC-rated fixtures handle direct insulation contact, while non-IC fixtures require 3-inch clearance minimum – this difference affects fixture placement significantly in insulated ceilings. Structural beams force fixture repositioning that breaks ideal spacing rules, but maintaining visual balance matters more than perfect mathematical spacing.
Professional Installation Techniques
Professional installers use adjustable housings to work around obstacles while they maintain proper light distribution patterns. Template guides help mark exact positions before cutting holes (preventing costly mistakes that require drywall repair). Retrofit kits work in existing ceilings without major construction, but new construction housings provide better thermal performance and longer fixture life. Wire management becomes critical with multiple fixtures – use junction boxes to consolidate connections and prevent voltage drop across long circuit runs.
Final Thoughts
Most homeowners create recessed lighting layout disasters when they ignore the technical fundamentals we’ve covered. The biggest mistake involves centering fixtures in rooms instead of positioning them for functional illumination. Lights spaced too close create harsh glare, while lights spaced too far apart leave dark zones that ruin room functionality.
Professional results require precise measurements, proper beam angles, and electrical plans that account for actual usage patterns. Skip the generic online calculators that ignore ceiling height variations and room-specific requirements. Calculate lumens per square foot based on actual activities (not theoretical room types).
When your project involves complex electrical work, structural modifications, or commercial applications, consult qualified professionals who understand code requirements and safety protocols. We at PacLights work with contractors and facility managers who need reliable lighting solutions that meet industrial standards and energy efficiency goals. The difference between amateur and professional recessed lighting layout comes down to understanding these technical details and applying them systematically across every room in your project.
Disclaimer: PacLights is not responsible for any actions taken based on the suggestions and information provided in this article, and readers should consult local building and electrical codes for proper guidance.