

Flush mount downlights are one of the most practical lighting solutions available today, yet many people overlook the details that make them work so well. At PacLights, we’ve seen how the right downlight can transform a space-improving both function and appearance.
This flush mount downlight guide walks you through everything from basic specifications to design choices, so you can make an informed decision for your project.
What Flush Mount Downlights Actually Do
How They Work and Why They Look So Clean
Flush mount downlights sit flat against your ceiling with no protrusion, and they deliver light straight down into your room. The fixture housing contains electrical connections and mounting brackets that stay hidden above the drywall, while only a trim ring remains visible at ceiling level. Light travels downward from the LED module, creating a seamless appearance that works especially well in spaces with 8-foot ceilings or lower where headroom matters. This design eliminates the visual bulk of pendant fixtures or protruding recessed cans, and it gives your ceiling a clean, uncluttered look. The housing stays out of sight, which is why flush mount downlights have become the standard choice in modern homes and commercial offices where both function and aesthetics demand attention.
Energy Savings That Add Up Fast
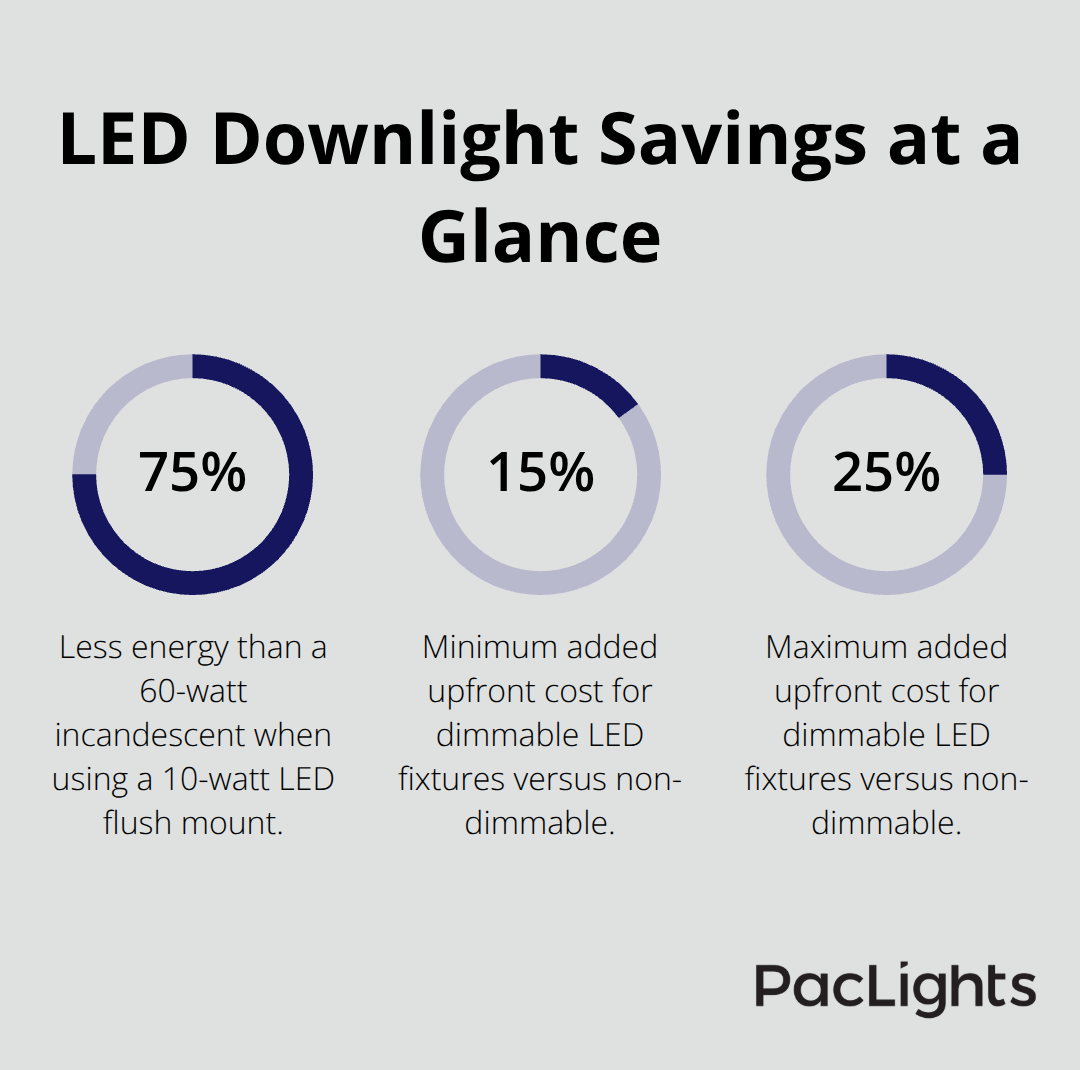
A 10-watt LED flush mount typically outputs around 800 lumens, matching the brightness of a 60-watt incandescent bulb while cutting energy consumption by approximately 75 percent. Over a 25,000-hour lifespan-roughly 10 to 15 years of typical use-a single LED downlight saves about $2,700 in electricity costs compared to incandescent equivalents. Monthly savings reach roughly $9 per fixture when you compare a 60-watt incandescent at $11 per month against a 10-watt LED running under $2 per month.
Superior Performance Across Different Room Types
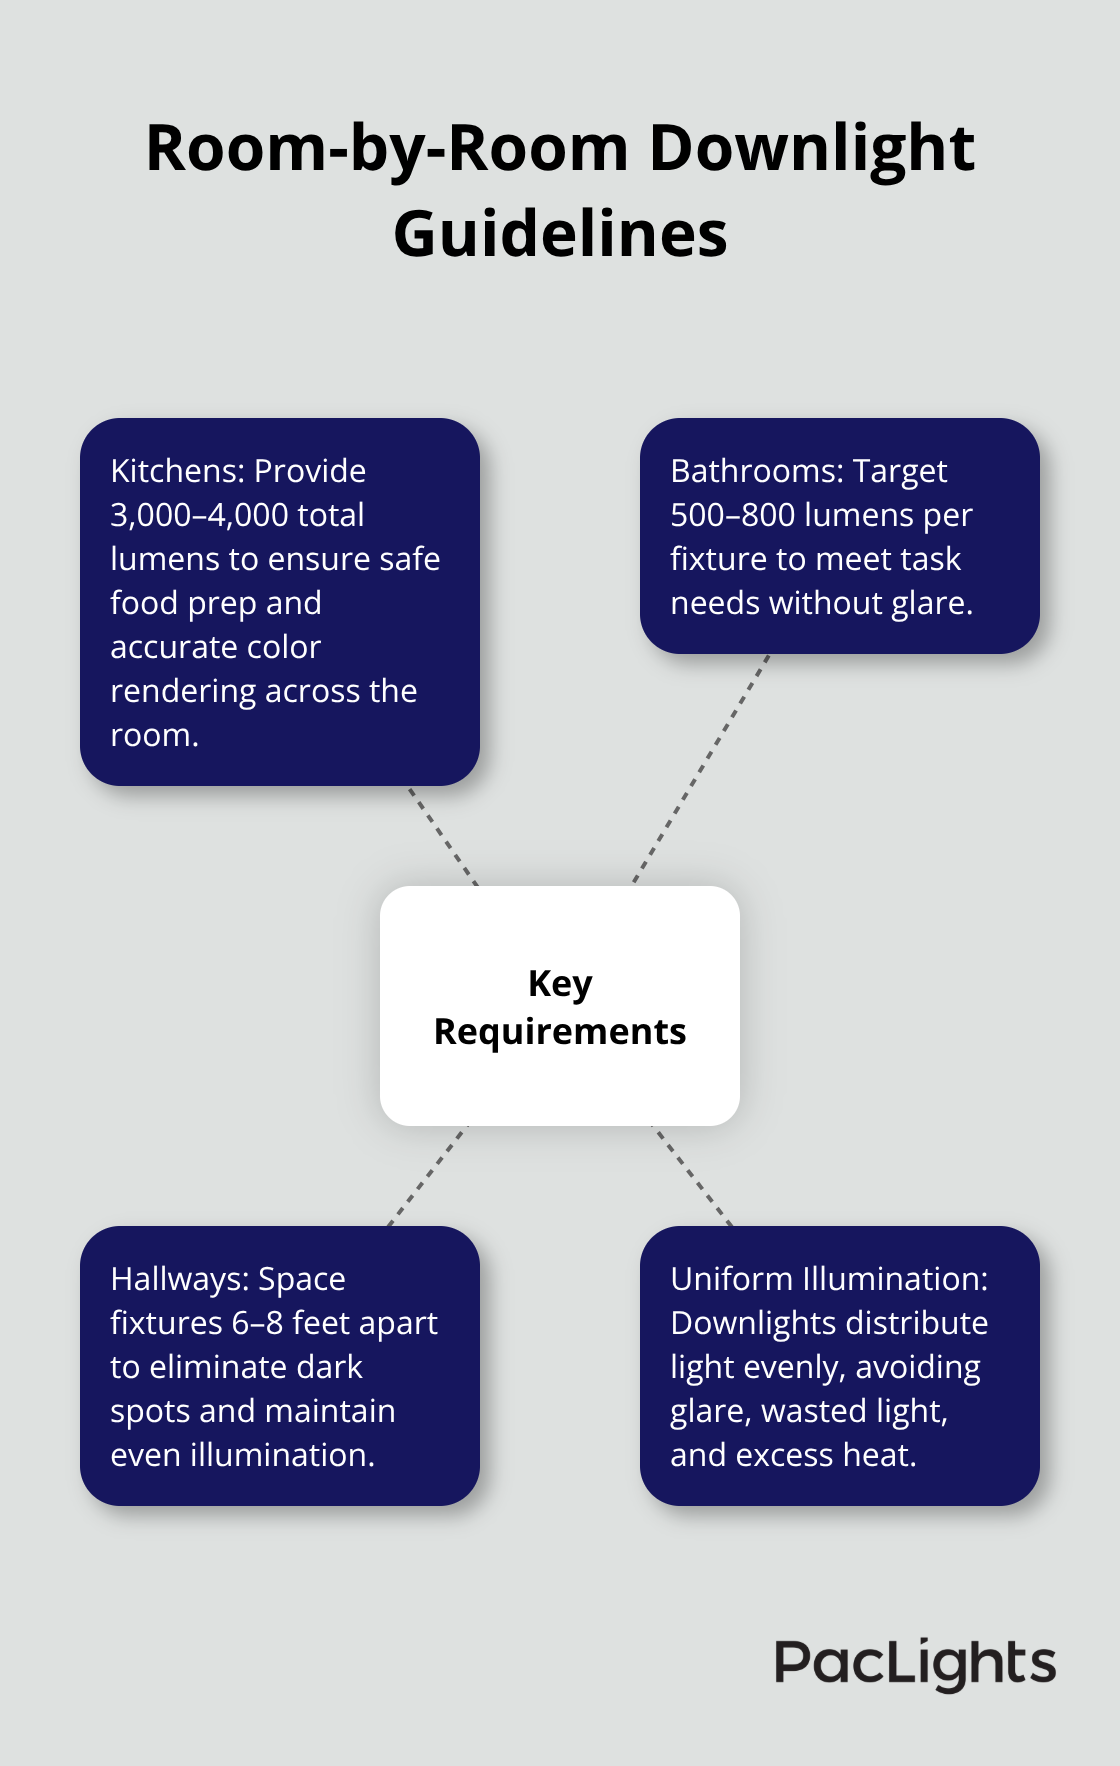
Flush mount downlights outperform other ceiling lighting options because they deliver uniform illumination without glare, wasted light, or excessive heat. Unlike track lighting, which concentrates light on specific areas, downlights provide general illumination across entire rooms-essential for kitchens requiring 3,000 to 4,000 total lumens for safe food preparation and accurate color rendering, bathrooms needing 500 to 800 lumens per fixture, and hallways benefiting from fixtures spaced 6 to 8 feet apart to eliminate dark spots.
Surface-mounted fixtures and pendants create visual clutter and lower perceived ceiling height, whereas flush mounts preserve space and work with any décor style.
Installation Speed and Electrical Considerations
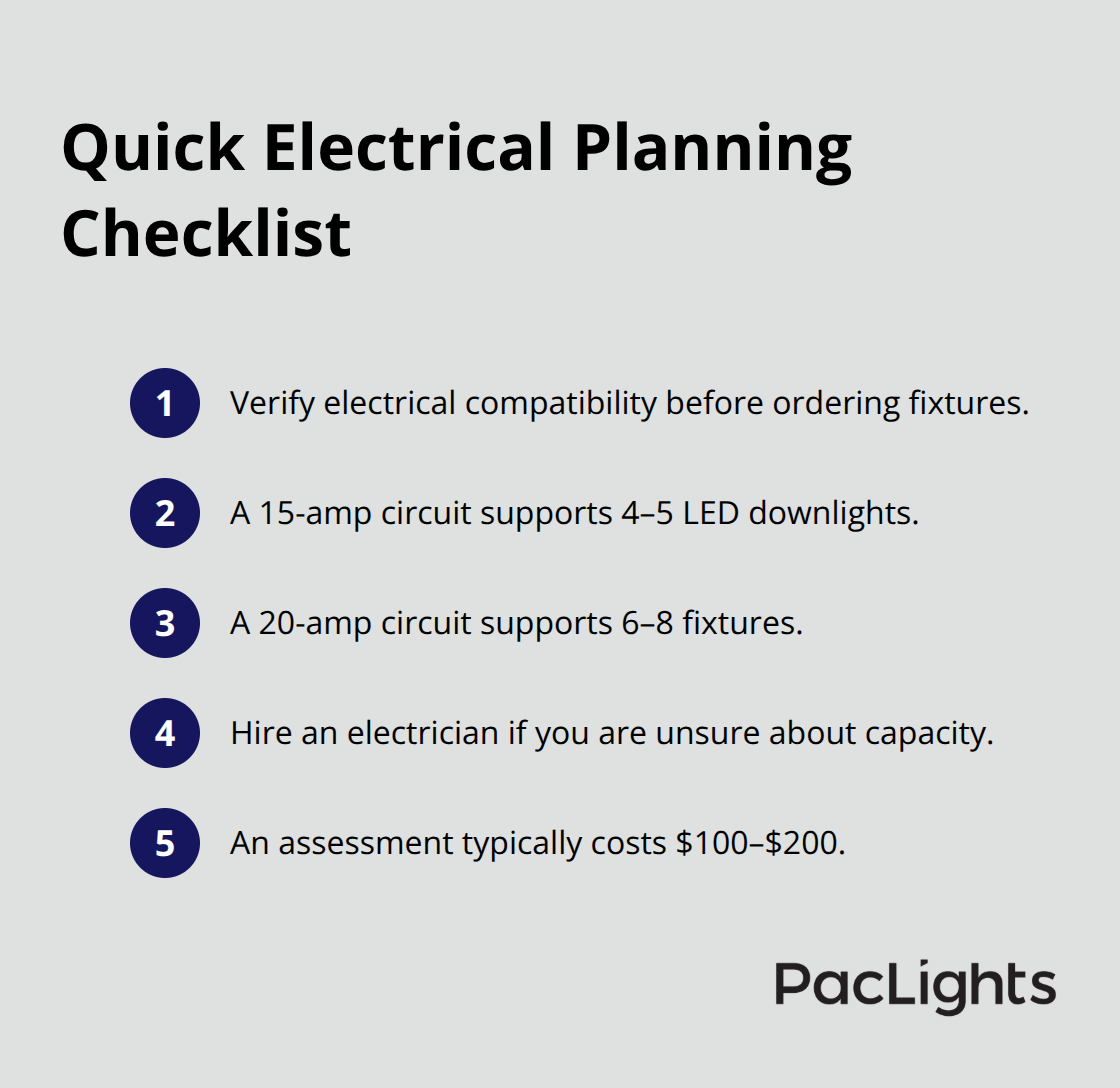
Installation flexibility matters because retrofit models use spring-loaded clips that lock into existing ceilings in 20 to 30 minutes per fixture, while new construction options install before drywall for completely hidden wiring and a flawless finish. Electricians typically charge $75 to $150 per hour, making retrofit installations faster and cheaper than alternatives requiring extensive ceiling demolition. A 15-amp circuit generally supports 4 to 5 LED downlights, while a 20-amp circuit handles 6 to 8-important details before you commit to any installation plan. Understanding your electrical capacity now prevents costly rewiring later and helps you plan the right number of fixtures for your space.
Choosing the Right Specifications for Your Space
Wattage, Lumens, and Color Temperature-The Three Decisions That Matter
The biggest mistake people make when selecting flush mount downlights is focusing on price instead of the three specifications that actually matter: wattage, lumens, and color temperature. Wattage tells you energy consumption, but lumens tell you brightness-and they don’t always align. A 10-watt LED produces roughly 800 lumens, while a 15-watt LED reaches about 1,200 lumens according to standard LED specifications.
Color temperature, measured in Kelvin, shapes how a space feels and functions. Warm white at 2700K to 3000K relaxes people and suits living spaces, while cool white at 4000K to 5000K sharpens focus and works best in kitchens and offices where task clarity matters. Cool temperatures actually suppress melatonin, making them poor choices for bedrooms or evening spaces.
Calculating Lumens for Different Room Types
For kitchens, you need at least 3,000 total lumens across all fixtures to safely prepare food and render colors accurately. A 12-by-14-foot kitchen with six fixtures should deliver around 500 lumens per fixture to hit that target. Bathrooms require far less-roughly 500 to 800 lumens per fixture-because the space is smaller and tasks are less demanding. Hallways need fixtures spaced 6 to 8 feet apart with moderate output to eliminate dark gaps without wasting energy.
Electrical Capacity and Circuit Planning
Verify electrical compatibility before you order anything. A 15-amp circuit handles 4 to 5 LED downlights safely, while a 20-amp circuit supports 6 to 8 fixtures. If you’re unsure about your home’s capacity, hire an electrician to assess the panel and existing loads-this costs roughly $100 to $200 and prevents expensive rewiring later.
Retrofit Versus New Construction Specifications
Retrofit and new construction installations demand different specifications because retrofit fixtures must fit into existing ceiling cavities while new construction allows complete design control. Retrofit downlights use spring-loaded clips that lock into standard 4-inch or 6-inch holes cut into drywall, and they install in 20 to 30 minutes per fixture with minimal ceiling damage. New construction fixtures mount directly to framing before drywall installation, which enables hidden wiring that looks flawless and costs less in labor since electricians work before the ceiling closes.
Dimmable fixtures cost 15 to 25 percent more upfront-expect $35 to $50 per retrofit fixture instead of $20 to $40 for non-dimmable models-but they deliver measurable energy savings by reducing brightness during low-usage periods and may extend fixture life. Always use LED-compatible dimmers to avoid flicker and premature failure.
Installation Details That Prevent Costly Mistakes
Mounting hardware matters because clips must lock with an audible click, wires require about half an inch of insulation stripped from each end, and proper connectors prevent overheating. Connect hot to hot, neutral to neutral, and ground to ground using the correct wire connectors. The housing must sit level because even a quarter-inch tilt creates uneven light distribution. Test each fixture before trimming to catch wiring mistakes early.
An electrician can assess your specific setup and help you avoid ordering the wrong hole size, selecting incompatible dimmers, or overloading circuits. With the right specifications locked in, you’re ready to explore how design choices-trim styles, finishes, and aesthetic integration-transform these technical decisions into a lighting system that looks as good as it performs.
Design and Aesthetic Considerations
Color Temperature Shapes How Spaces Function
Color temperature affects how people experience your space far more than most homeowners realize. Warm white at 2700K to 3000K creates a relaxed atmosphere perfect for living rooms and bedrooms, but it performs poorly in kitchens where you need sharp color differentiation between ingredients and surfaces. Cool white at 4000K to 5000K does the opposite-it suppresses melatonin production and enhances task clarity, making it essential for kitchens, bathrooms, and offices where accuracy matters. The Illuminating Engineering Society recommends 4000K to 5000K specifically for food preparation spaces because cool temperatures help you distinguish between similar-colored items and catch spoilage faster.
Don’t compromise on this decision. If you install 2700K fixtures in your kitchen, you’ll either struggle with visibility or feel compelled to add additional task lighting later, doubling your costs. Wall color dramatically affects how much light you actually need-medium-dark walls roughly double lumen requirements, while very dark surfaces can quadruple them. This means a kitchen with dark cabinets and dark tile flooring needs roughly twice the output compared to the same space with light-colored finishes. Calculate your actual lumen needs based on wall color before finalizing your fixture count, or you’ll end up with either insufficient lighting or wasted energy.
Trim Styles and Fixture Sizing Create Visual Impact
Trim and finish styles determine whether your downlights disappear into the ceiling or become design focal points. Flangeless trims create the seamless look most people want-they sit completely flush with no visible ring, which works best in contemporary and minimalist spaces where visual simplicity matters. Flanged trims add a visible metal ring that emphasizes the fixture and suits traditional or architectural-forward designs where you want lighting to be intentional rather than invisible. Open trims maximize downward light output, while baffled trims reduce glare in bright spaces or when fixtures are positioned near eye level. Adjustable or gimbal trims allow roughly 30-degree aiming, which lets you direct light toward artwork or architectural features without harsh shadows.
Fixture diameter should be approximately one-third of your room width-a 12-foot-wide kitchen benefits from 14 to 16-inch fixtures, while a 20-foot space needs 18 to 20-inch fixtures. Undersized fixtures create visual fragmentation, while oversized ones dominate the ceiling unnecessarily.
Dimmer Compatibility and Flexibility
Integration with existing systems requires checking dimmer compatibility before installation. Standard incandescent dimmers cause LED downlights to flicker or fail prematurely because LEDs draw minimal current. You must use LED-compatible dimmers, which cost roughly the same but manage the lower power draw correctly. Dimmable LED fixtures themselves cost 15 to 25 percent more upfront than fixed-output models, but the flexibility justifies the expense-you can reduce brightness during low-usage periods and extend fixture life while creating different moods for different times of day.
Coordinating Color Temperature Across Your Space
If your space has existing pendant lights or track lighting, choose downlight color temperature to complement rather than conflict with those fixtures. Mixing 2700K and 4000K in the same room creates visual tension and makes spaces feel disjointed, so commit to one temperature across all ceiling fixtures even if you use different fixtures elsewhere.
Final Thoughts
Selecting the right flush mount downlight comes down to three core decisions: matching lumens to your room’s function, choosing color temperature that supports your tasks, and verifying electrical compatibility before installation. A kitchen demands 3,000 to 4,000 total lumens with cool white at 4000K to 5000K for accurate color rendering, while a bathroom needs only 500 to 800 lumens per fixture with the same cool temperature for clarity. Wall color matters enormously-dark surfaces can double or quadruple your lumen needs, so calculate actual requirements based on your specific space rather than guessing.
The financial case for upgrading to modern LED flush mount downlights is straightforward. A 10-watt LED saves roughly $9 per month compared to a 60-watt incandescent, totaling about $2,700 in energy savings over the fixture’s 25,000-hour lifespan. Retrofit installations take 20 to 30 minutes per fixture with minimal ceiling damage, while new construction options deliver completely hidden wiring and flawless aesthetics.
Before you move forward, verify your circuit capacity-a 15-amp circuit handles 4 to 5 LED downlights safely, while a 20-amp circuit supports 6 to 8 fixtures. Confirm hole sizing for retrofit work, select LED-compatible dimmers to prevent flicker, and ensure all connections are secure with proper wire connectors. We at PacLights provide free lighting layout designs and ROI assessments to help you plan your flush mount downlight guide and confirm electrical readiness for your project.
Disclaimer: PacLights is not responsible for any actions taken based on the suggestions and information provided in this article, and readers should consult local building and electrical codes for proper guidance.