

Picking the right surface mount downlight for your ceiling isn’t a guessing game. The wrong choice wastes energy, creates poor lighting, and costs you money over time.
At PacLights, we’ve helped facilities make smart lighting decisions for years. This guide walks you through the real factors that matter when selecting surface mount downlights for your space.
What Surface Mount Downlights Actually Are
Surface mount downlights sit directly on your ceiling surface instead of recessing into it, which fundamentally changes how you approach installation and retrofit projects. The fixture consists of four core parts: a canopy that fastens to the ceiling, the fixture body housing the LED, a fitter that determines light spread, and a shade that diffuses or directs that light. Fitter sizes range from 2.25 inches for tight spaces like bathrooms and closets, to 4 inches for standard rooms, and 6 inches for large areas needing broader coverage. This modular design lets you control exactly how light behaves in your space by selecting the right fitter and shade combination.
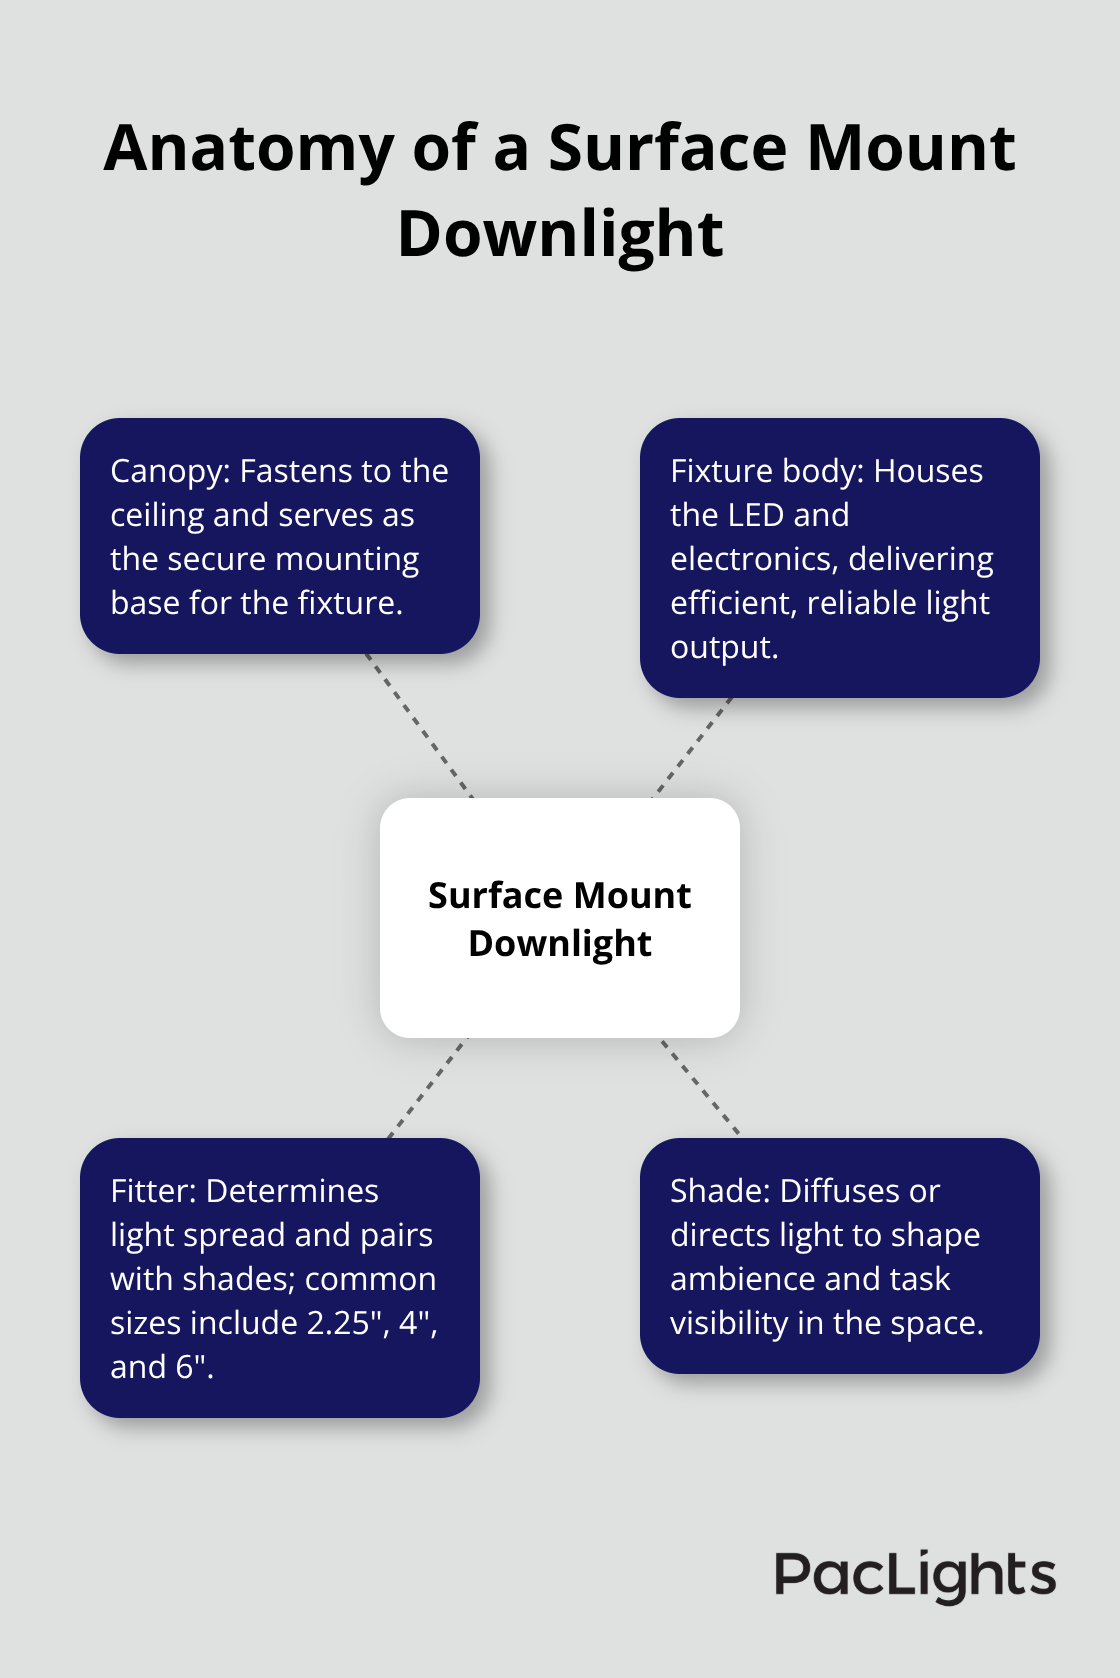
Modern surface mount downlights deliver 820 to 1,500 lumens from 10 to 18 watts of LED power, achieving roughly 120 lumens per watt of efficiency. Installation happens in minutes because there’s no ceiling cavity to cut or housing to mount between joists. This speed matters in commercial facilities where downtime costs money. Opal or milk glass shades diffuse light broadly across a space, while clear shades direct light more precisely to task zones, so your shade choice directly impacts how your space feels and functions.
Why Surface Mount Outperforms Recessed Options
Recessed downlights require cutting ceiling cavities, installing housings between joists, and often demand extensive structural work during renovations. Surface mount fixtures eliminate that complexity entirely. In retrofit scenarios, this difference translates to faster project completion, lower labor costs, and minimal ceiling disruption. The low-profile design of modern surface mount systems integrates seamlessly into contemporary ceiling planes without visual clutter. Surface mount designs also work in spaces where recessed installation simply isn’t feasible, such as low ceilings around 8 feet where cavity depth becomes a real constraint. Commercial and industrial facilities increasingly prefer surface mount downlights because installation speed reduces operational disruption. You avoid the cost and hassle of ceiling reconstruction. Energy savings remain identical to quality recessed fixtures, with LED downlights cutting lighting costs by 60 to 75 percent compared to incandescent or HID systems, typically paying back within 18 to 24 months through utility bill reductions.
What Makes Shade Selection Matter
Your shade choice directly controls how light spreads throughout your space. Opal or milk glass shades diffuse light broadly, creating even illumination across large areas and reducing harsh shadows. Clear shades direct light more precisely to specific task zones, making them ideal for focused work areas. Many facilities purchase shades separately from fixtures, allowing you to customize light distribution after installation without replacing the entire unit. This flexibility means you can test different configurations and adjust based on actual performance in your space.
Installation Speed and Cost Advantages
Surface mount fixtures mount to the ceiling surface in minutes, eliminating the need for cavity cutting or joist-mounted housings. This speed translates directly to lower labor costs and faster project completion. In commercial settings where operational downtime carries real financial consequences, the installation advantage becomes substantial. Retrofit projects benefit most from this approach since you avoid costly ceiling reconstruction that recessed downlights demand. The straightforward mounting process also reduces the technical skill required, allowing faster turnaround on larger facility upgrades.
Matching Fitter Size to Your Space
Fitter size determines how broadly light spreads and which shade options work with your fixture. A 2.25-inch fitter works best in tight spaces like bathrooms and closets where you need concentrated light. Standard rooms typically use 4-inch fitters, which balance light spread with fixture visibility. Large areas requiring broader coverage benefit from 6-inch fitters that distribute light across wider zones. Selecting the correct fitter size upfront prevents the need for fixture replacements later and ensures your lighting layout matches your space’s actual dimensions and function.
Understanding these core characteristics positions you to evaluate specific brightness and color temperature needs that your facility actually requires.
Factors to Consider When Choosing Surface Mount Downlights
Your ceiling material and structure dictate which surface mount downlight will actually work in your space, and this choice cascades into cost and performance implications you can’t ignore. Drywall ceilings present the easiest installation scenario because fasteners grip securely and you can mount fixtures anywhere without structural constraints. Concrete ceilings demand different fastening methods, typically toggle bolts or concrete anchors that cost more and take longer to install, adding 15 to 25 percent to labor time. Drop ceiling grids work well for surface mount fixtures because you can position lights anywhere within the grid structure, but you need to verify the grid can support fixture weight, typically 3 to 8 pounds depending on fitter size. Metal deck ceilings in industrial spaces require welded or bolted mounting plates, substantially increasing installation complexity and cost. Low ceilings around 8 feet create a hard constraint that eliminates recessed downlights entirely, making surface mount your only practical option. Moisture-prone environments like parking garages, canopies, and laundry areas require IP44 or IP65 rated fixtures that cost 20 to 40 percent more than standard models, but skipping this specification leads to premature failure and safety hazards. Measure your ceiling height, material, and any structural limitations before selecting fixtures to avoid costly mistakes during installation.
Brightness and Color Temperature Shape How Your Space Functions
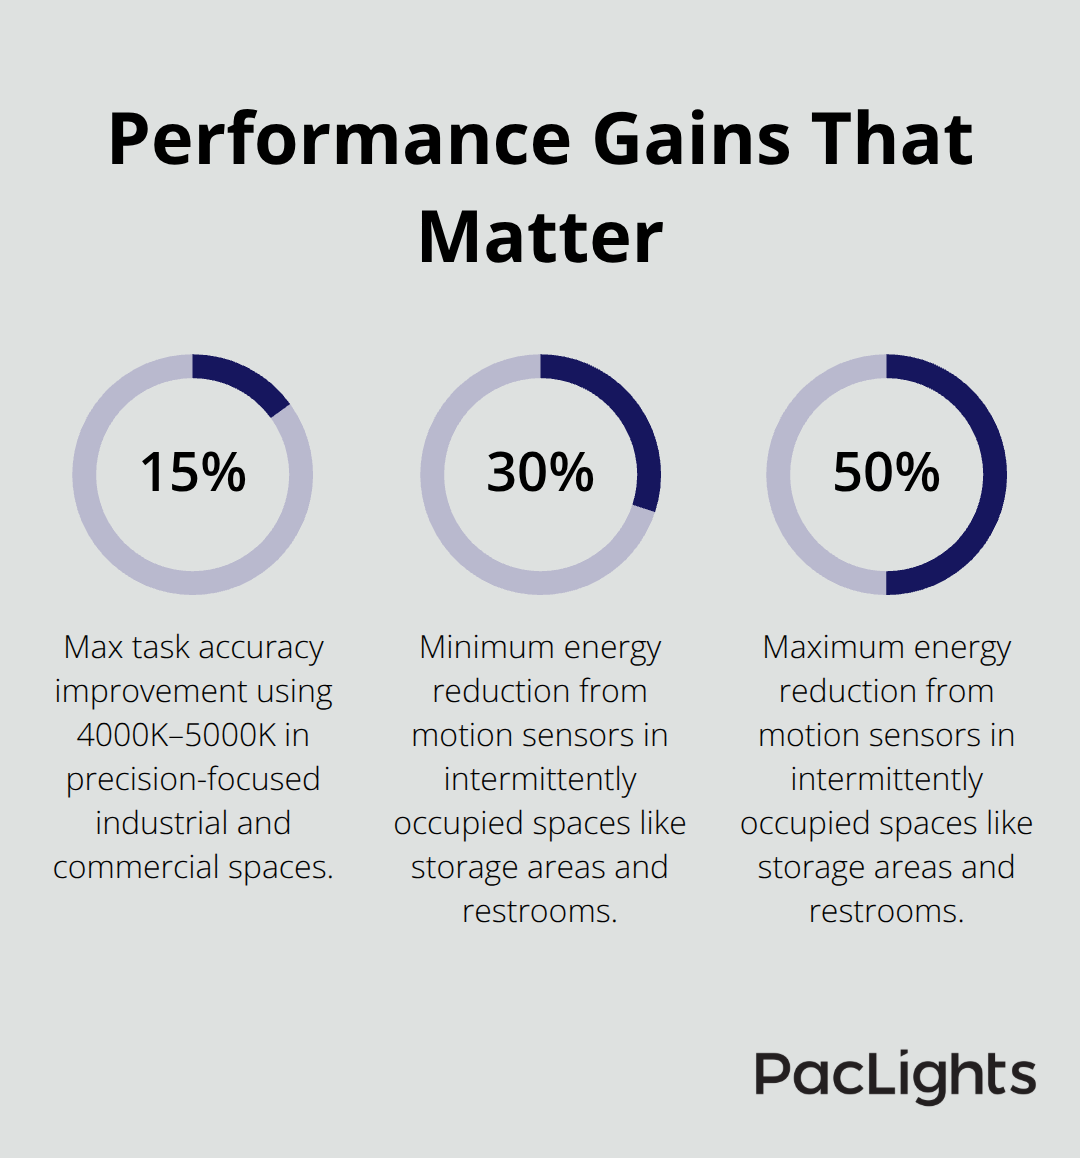
Lumen output and color temperature directly impact productivity, safety, and energy consumption in measurable ways. Most commercial and industrial spaces need between 30 to 50 foot-candles of light depending on task type, which translates to roughly one downlight per 25 square feet when you use standard 4-inch fixtures with 60-degree beam angles spaced 4 to 6 feet apart. Spacing fixtures closer than 4 feet wastes energy and creates glare; spacing them farther than 6 feet produces dark spots that compromise visibility and safety. Color temperature selection matters more than most facility managers realize: 4000K to 5000K improves task accuracy by 5 to 15 percent in industrial and commercial spaces where precision work occurs, while 3500K serves as a balanced choice for offices that combine administrative and focused work. Kitchens and bathrooms demand 90-plus CRI (Color Rendering Index) to render colors accurately, while living spaces and general commercial areas function well with 80 to 89 CRI. A 15-watt LED downlight delivers approximately 1800 lumens, sufficient for most standard rooms, but larger spaces or task-intensive areas need 1500 lumens or higher from individual fixtures. Motion sensors reduce energy consumption by 30 to 50 percent in intermittently occupied spaces like storage areas and restrooms, making them a practical investment that typically pays back within 12 to 18 months through reduced utility bills.
Energy Efficiency Calculations Show Real Financial Impact
LED downlights cut lighting costs by 60 to 75 percent compared to incandescent or HID systems, and the payback timeline matters more than the upfront cost. A typical retrofit converting 20 fixtures from 50-watt halogen downlights to 15-watt LEDs saves approximately 700 kilowatt-hours annually, translating to $80 to $120 per year in electricity savings depending on your regional rate. Over a fixture’s 25,000 to 50,000-hour lifespan, that’s $2,000 to $6,000 in direct energy savings plus reduced maintenance labor because LED fixtures rarely need replacement. Dimming capabilities add 15 to 25 percent to upfront costs but enable flexible control that compounds energy savings when you pair them with occupancy sensors or daylight harvesting. Networked lighting controls let you schedule different brightness levels for different times of day, reducing waste during off-peak hours. These financial realities set the stage for evaluating which specific fixture options actually deliver the performance your facility needs.
Matching Beam Angles, Trim Styles, and Smart Controls to Your Facility
Beam Angles Control Coverage and Fixture Density
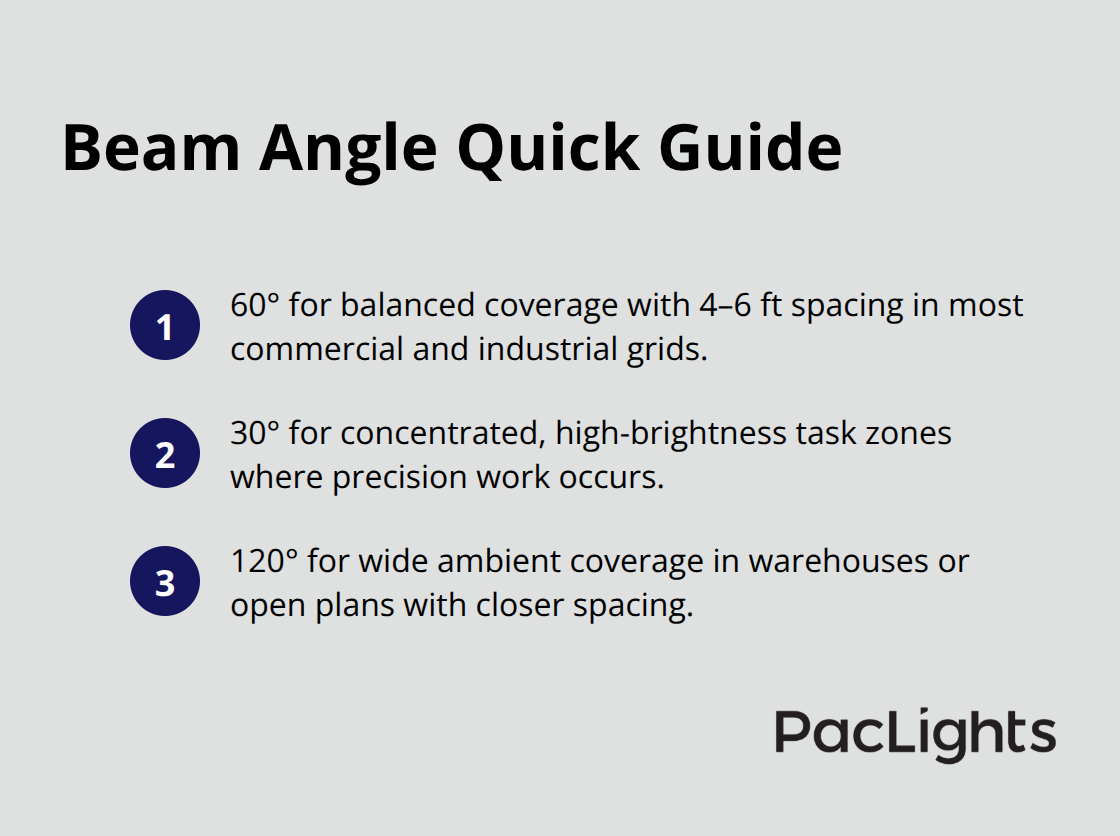
Beam angle selection determines whether your fixtures deliver uniform brightness or create dark spots that compromise safety and productivity. A 60-degree beam angle works as the standard for most commercial and industrial spaces because it balances coverage area with lumen efficiency, spacing fixtures 4 to 6 feet apart in a grid pattern. Narrow 30-degree beams concentrate light into focused zones, ideal for task-intensive areas like assembly lines or inspection stations where precision work demands bright, concentrated illumination. Wide 120-degree beams spread light across larger areas with closer fixture spacing, making them practical for warehouses or open floor plans where you need ambient coverage without excessive fixture density.
The math matters here: a warehouse measuring 20 feet by 30 feet with 8-foot ceilings needs approximately 12 to 16 fixtures using 60-degree beams, but switching to 30-degree beams would require 20 to 24 fixtures to maintain equivalent brightness levels, directly increasing material and installation costs. This calculation prevents costly fixture replacements after installation reveals performance gaps.
Trim Styles and Finishes Shape Your Facility’s Appearance
Trim styles range from baffle designs that reduce glare and work well in offices, to gimbal and reflector options that direct light precisely, to smooth finishes for clean contemporary aesthetics. Finishes include black, brushed nickel, chrome, rose gold, satin nickel, and white, allowing you to match your facility’s architectural style without visual clutter. The trim ring directly impacts how light distributes and how your ceiling appears, so selecting the right combination prevents costly fixture replacements after installation reveals performance gaps.
Dimming Capabilities Reduce Energy Waste
Wall dimmers and remote dimming add 15 to 25 percent to upfront costs but enable occupants to adjust brightness for comfort and task requirements, reducing energy waste during periods when full brightness isn’t needed. Motion sensors cut energy consumption by 30 to 50 percent in intermittently occupied spaces like storage areas, restrooms, and conference rooms, typically paying back within 12 to 18 months through reduced utility bills. Networked lighting controls with scheduling capabilities let you program different brightness levels throughout the day, dimming fixtures during off-peak hours or when natural daylight supplements artificial lighting.
Selectable Color Temperature Matches Specific Activities
Selectable color temperature options spanning 3000K, 4000K, and 5700K enable you to match lighting to specific activities without installing multiple fixture types. The 4000K to 5000K range improves task accuracy by 5 to 15 percent in precision-focused environments where workers need sharp visual clarity. This flexibility means you adapt your lighting strategy to operational changes without replacing fixtures.
Smart Controls Integrate Into Facility Management Systems
Smart-connected fixtures with Matter or similar standards integrate into facility management systems, providing real-time data on energy consumption and fixture performance that informs maintenance schedules and identifies underutilized lighting zones. Advanced lighting controls (including networked systems and optional motion sensors) layer onto surface mount downlight options, helping facilities quantify actual energy savings before implementation. Free lighting layout designs and ROI assessments account for your specific ceiling type, brightness requirements, and control strategy.
Final Thoughts
Surface mount downlight choices depend on three core factors: your ceiling’s physical constraints, your facility’s brightness and color temperature needs, and the control capabilities that reduce energy waste over time. Ceiling material determines installation speed and cost, brightness requirements drive fixture density and lumen output, and color temperature selection impacts productivity in task-intensive environments. Beam angles prevent dark spots that compromise safety, trim styles integrate with your facility’s aesthetic, and dimming or motion sensing capabilities compound energy savings month after month.
The right fixture for your space isn’t the cheapest option upfront-it’s the one that delivers measurable performance while cutting your lighting costs by 60 to 75 percent compared to older systems. A 15-watt LED downlight producing 1,800 lumens costs more initially than halogen alternatives, but saves $80 to $120 annually in electricity alone, reaching full payback within 18 to 24 months. Add motion sensors to intermittently occupied spaces and you accelerate that timeline by cutting energy consumption another 30 to 50 percent.
Start by measuring your ceiling height, material, and any structural limitations, then calculate the lumen output and fixture density your space actually needs based on task type and foot-candle requirements. We at PacLights provide free lighting layout designs and ROI assessments that quantify energy savings specific to your facility before you commit to implementation. This data-driven approach removes guesswork and positions your facility for measurable financial returns alongside improved lighting performance.
Disclaimer: PacLights is not responsible for any actions taken based on the suggestions and information provided in this article, and readers should consult local building and electrical codes for proper guidance.