

Surface mount downlights ceilings offer a straightforward way to brighten any space without the complexity of recessed installation. At PacLights, we’ve seen businesses switch to this approach and immediately notice cleaner aesthetics alongside better light distribution.
The real advantage? You get professional results faster, with lower installation costs and easier maintenance. This guide walks you through everything you need to know to make the right choice for your project.
What Surface Mount Downlights Actually Do
How Surface Mount Downlights Work
Surface mount downlights attach directly to your ceiling surface, delivering focused illumination without requiring cuts, recesses, or extensive ceiling modifications. Unlike recessed fixtures that demand hollow cavities behind drywall, surface mounts connect to your existing ceiling structure-whether concrete, suspended tile, or standard drywall-and wire straight to your electrical box. This direct mounting approach means the fixture itself becomes visible as part of your ceiling design, which is exactly why surface mounts work best for spaces where you want clean, bright results without installation complexity. The light output typically ranges from 800 to 1,500 lumens depending on fixture size and LED wattage, with modern surface-mount designs producing even, diffused illumination across the room rather than harsh directional hotspots.
Installation Speed and Cost Advantages
The installation advantage over recessed lighting stands out immediately. Recessed downlights require 3 to 5 days of labor involving drywall cutting, framing work, and professional electrician involvement, while surface mounts go live in a single day with minimal disruption. Your labor costs drop significantly because there’s no ceiling demolition, no hidden cavity work, and no need for extensive rewiring behind walls. Maintenance becomes genuinely easier-bulb replacement and cleaning happen from below without accessing crawl spaces or removing ceiling panels. For commercial spaces like retail showrooms, offices, and warehouse facilities, this translates to faster project completion and lower total cost of ownership.
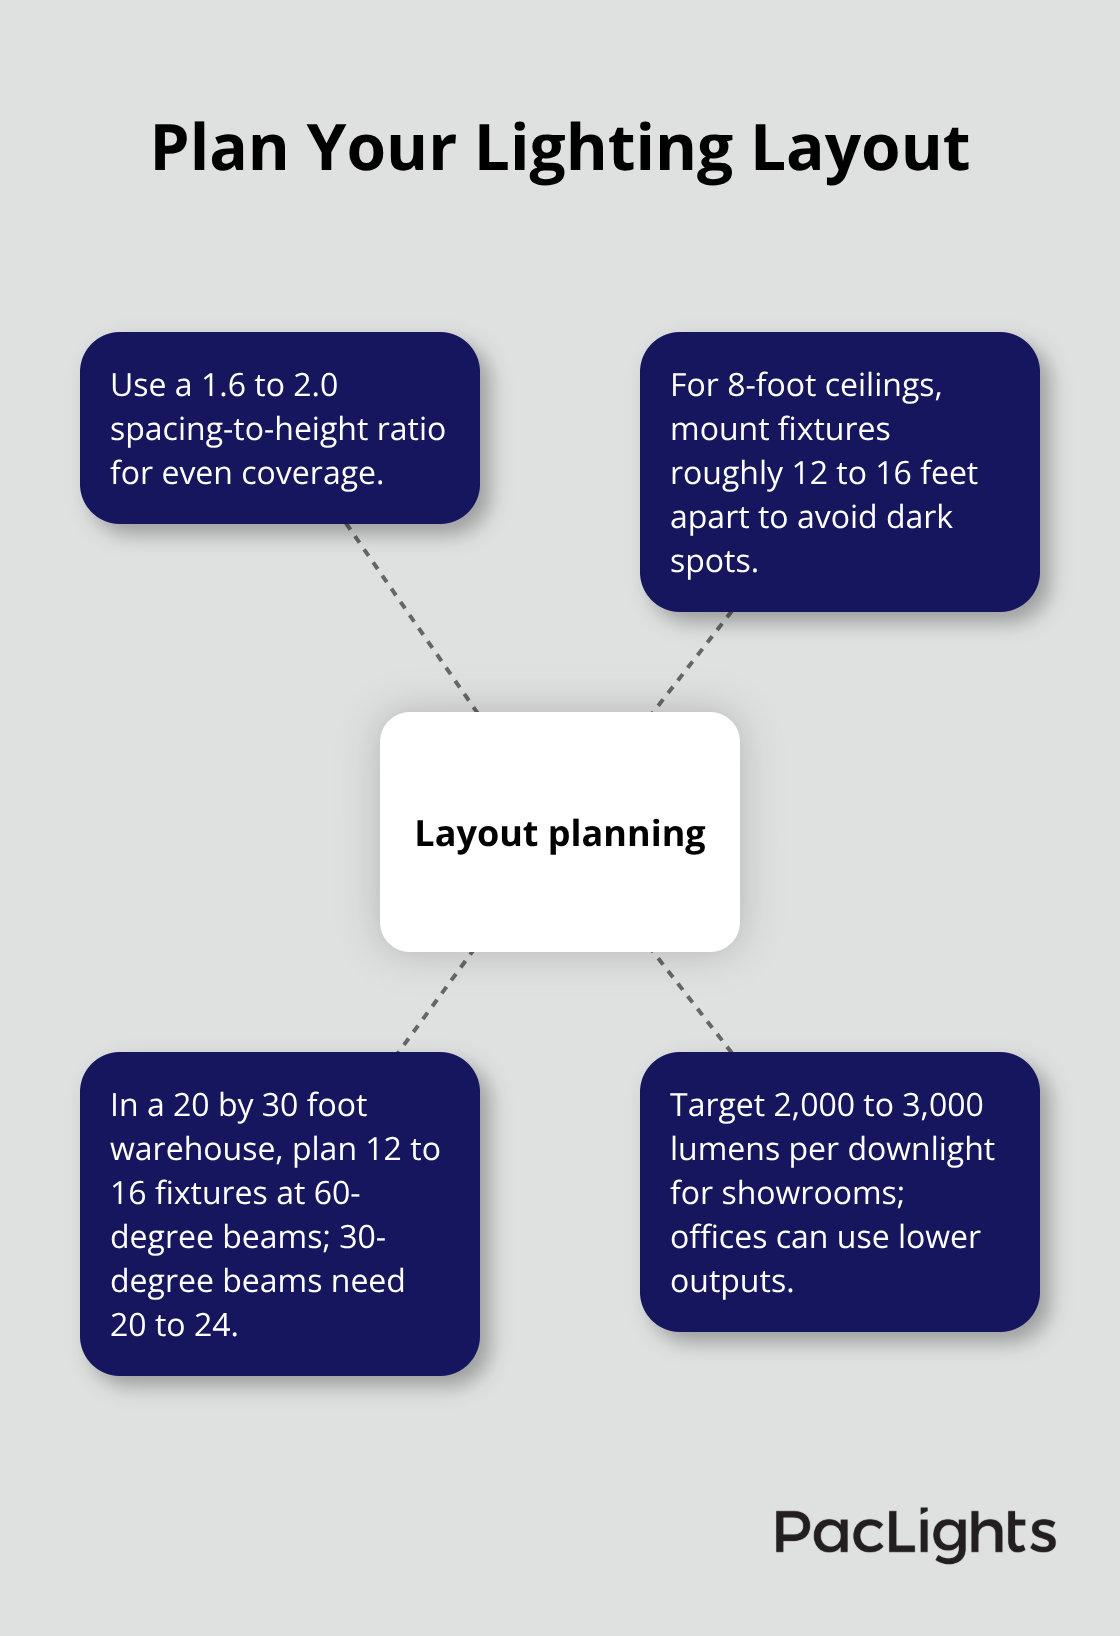
Spacing, Layout, and Light Output Planning
Spacing calculations matter significantly for even coverage. Use a 1.6 to 2.0 spacing-to-height ratio, meaning for an 8-foot ceiling, mount fixtures roughly 12 to 16 feet apart to prevent dark spots while maintaining even coverage. For a typical 20 by 30 foot warehouse with an 8-foot ceiling, plan 12 to 16 fixtures with 60-degree beam angles; if you need tighter control, 30-degree beams require 20 to 24 fixtures instead. Task-intensive areas like showrooms perform best around 2,000 to 3,000 lumens per downlight, while general ambient lighting in offices works well at lower outputs.
Color Temperature for Function and Comfort
Color temperature selection depends on function and task requirements. The 4,000 to 5,000 Kelvin range improves task accuracy by 5 to 15 percent compared to warmer tones, making this range ideal for detail-oriented work. The 3,500 Kelvin option offers a balanced middle ground for general office environments. This distinction matters because cooler light enhances focus and visibility in spaces where precision counts, while balanced tones support comfort in areas where workers spend extended hours. Your choice directly affects both performance and employee satisfaction, which makes the selection process worth careful consideration before installation begins.
Installing Surface Mount Downlights on Different Ceiling Types
Matching Installation Methods to Your Ceiling Material
Your ceiling material determines both your installation method and timeline. Concrete ceilings require an impact drill with masonry bits and wall plugs, adding roughly 15 to 20 minutes per fixture but delivering permanent, rock-solid mounting. Suspended tile ceilings offer the fastest installation since many surface-mount fixtures clip directly onto the grid or use magnetic bases, eliminating drilling entirely and allowing you to reposition fixtures later without damage.
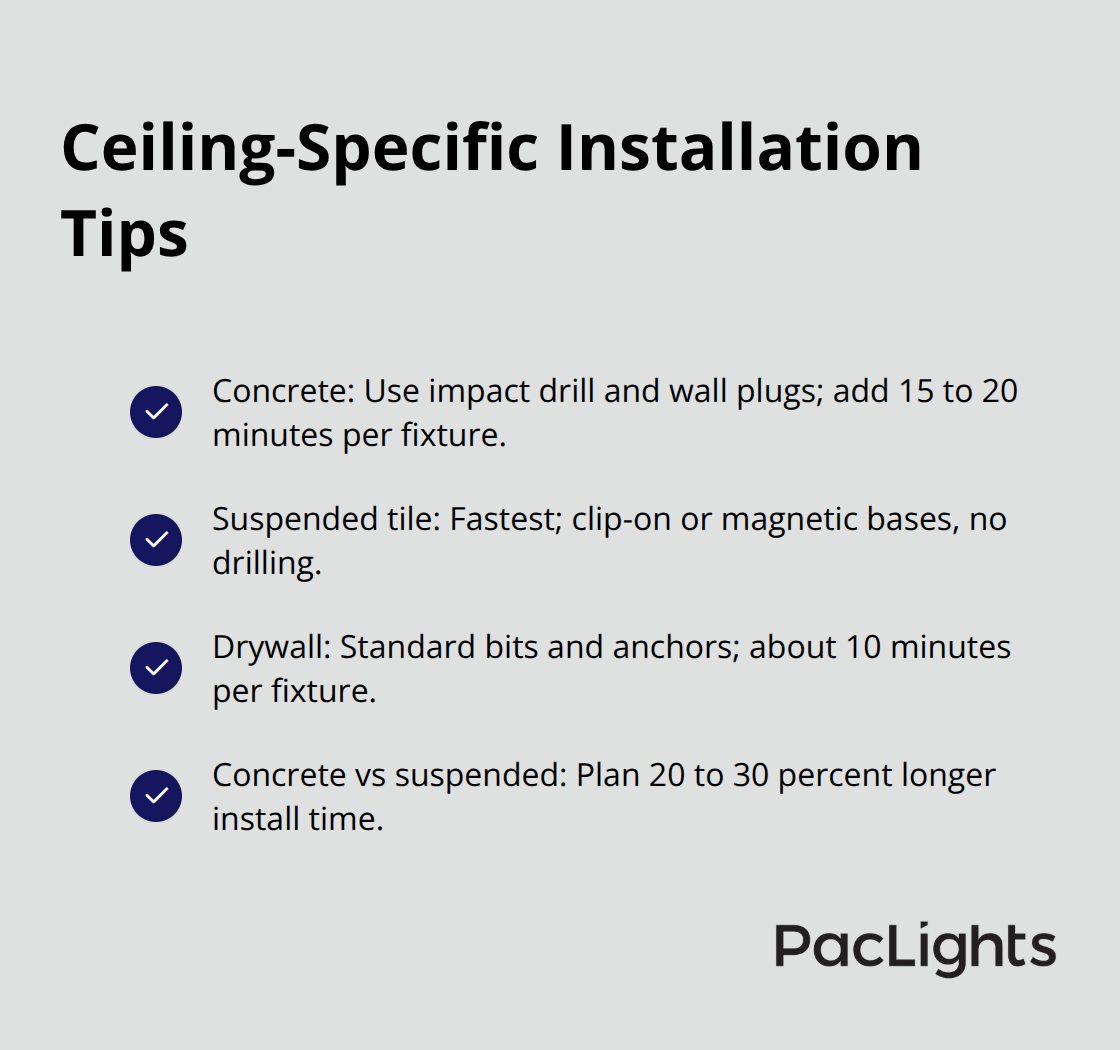
Standard drywall requires standard drill bits and anchors, taking about 10 minutes per fixture. Measure your ceiling height and material first before you order fixtures, because this decision shapes everything from fixture selection to labor costs. For concrete spaces like warehouses and parking structures, plan for impact drilling and account for 20 to 30 percent longer installation compared to suspended ceilings. Confirm your ceiling type with a physical inspection rather than relying on building plans, since renovations often change original materials.
Planning Your Layout for Even Coverage
Proper spacing prevents the dark spots and uneven coverage that make spaces feel uncomfortable and wasteful. The 1.6 to 2.0 spacing-to-height ratio remains your most reliable guide, translating to roughly 12 to 16 feet apart for an 8-foot ceiling. Map your layout on paper before you drill anything, positioning fixtures to avoid light pools directly under each one and instead create overlapping coverage zones. For concrete ceilings, use the fixture base plate as a template to mark mounting points, ensuring the plate sits perfectly level before you secure it to the wall plugs.
Wiring and Electrical Connections
Wiring requires complete power isolation at the main panel before you touch anything, then connect hot to hot using black or brown wires, neutral to neutral using blue or white wires, and ground to ground using yellow-green wires. Secure these connections with wire nuts and tuck wiring neatly into conduits or channels where visible, especially in high-traffic areas where exposed wires create safety hazards and look unprofessional. After you wire each fixture, restore power only after you verify all connections, then test with the wall switch to confirm proper operation before you move to the next fixture.
Adding Dimming Control for Flexibility
If dimming is part of your plan, use dimmable drivers with 0 to 10 volt or DALI control rather than Triac dimming, which adds 15 to 25 percent upfront cost but delivers smoother dimming performance and typically pays back in 12 to 18 months through extended bulb life and energy savings. This control flexibility sets the stage for the energy optimization strategies that transform your lighting system from a fixed installation into a responsive, cost-reducing asset.
How LED Surface Mounts Cut Energy Costs and Deliver Real Returns
The Math Behind LED Efficiency and Cost Savings
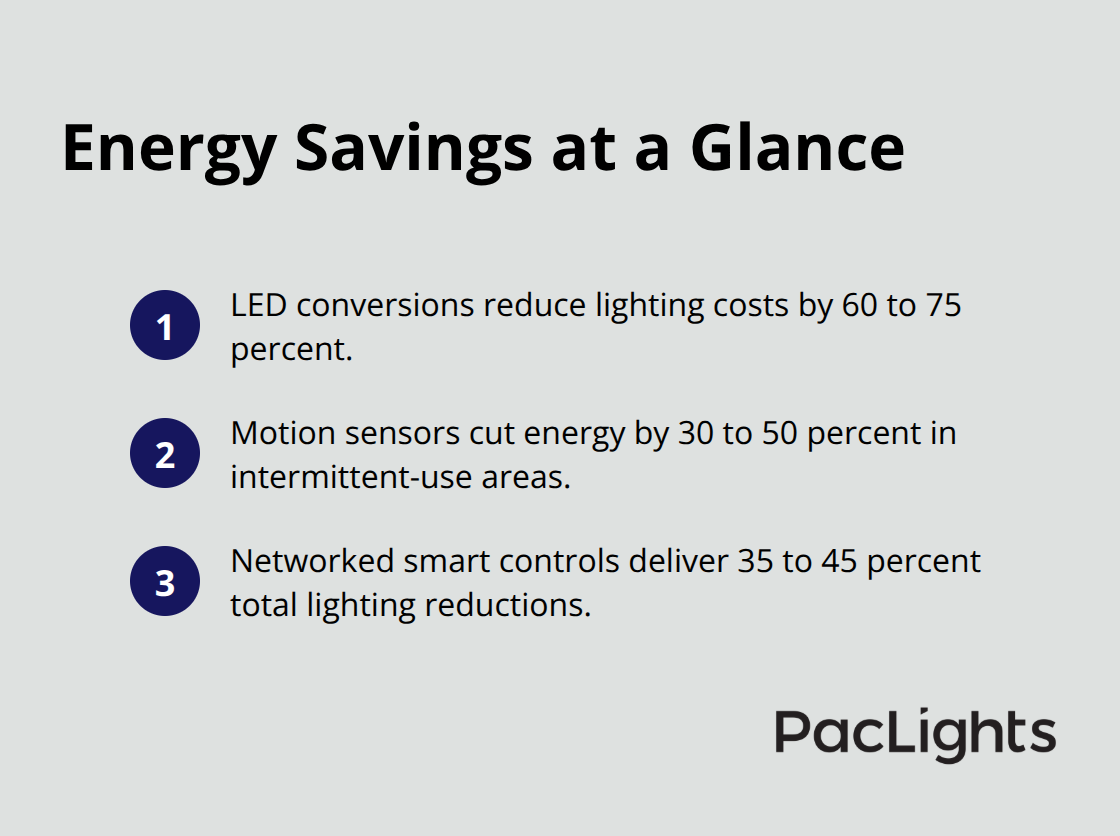
LED surface-mount downlights consume 10 to 18 watts while delivering 820 to 1,500 lumens, which translates to efficiency around 120 lumens per watt. This matters because your lighting system typically accounts for 20 to 30 percent of commercial facility electricity use, making fixture selection one of the highest-impact decisions you can make. LED conversions reduce lighting costs by 60 to 75 percent, meaning most projects pay back their investment in 18 to 24 months from utility savings alone. If you upgrade an existing warehouse or office space, you’ll see measurable monthly reductions starting immediately after installation. The efficiency advantage holds regardless of mounting style, so surface mounts deliver the same LED performance as recessed options without the installation labor premium. What matters most is selecting high-quality LED fixtures with proper drivers and heat management, because cheap LEDs fade faster and waste your savings advantage within a few years.
Motion Sensors and Occupancy-Based Control
Motion sensors in intermittent-use areas like corridors, storage rooms, and bathrooms cut energy consumption by 30 to 50 percent by turning lights off after 5 to 15 minutes of inactivity. These sensors work best in spaces where occupancy patterns vary throughout the day, preventing wasted energy in empty rooms. Pairing motion detection with daylight harvesting prevents over-dimming while maintaining comfort across zones, and the Department of Energy notes that dimming to roughly 70 percent during peak daylight hours reduces energy use by 25 to 40 percent. This combination approach adapts your lighting to real conditions rather than running fixtures at full brightness constantly.
Smart Controls and Networked Systems
Networked smart controls using platforms like Casambi or Tuya IoT enable centralized scheduling and remote monitoring, delivering total lighting energy reductions of 35 to 45 percent when combined with LED efficiency. These systems allow you to adjust brightness, set schedules, and track performance from a single interface across your entire facility. The combined strategies of LED fixtures, motion sensors, and smart controls typically pay back in 18 to 24 months while extending LED lifespan from the standard 25,000 to 50,000 hours.
Document your baseline energy use before adding controls, then measure monthly to verify savings and identify further optimization opportunities.
Getting a Tailored Assessment for Your Facility
Arrange a free lighting layout and ROI assessment to guide fixture selection, control options, and long-term performance expectations specific to your space. This assessment accounts for your ceiling type, room dimensions, task requirements, and existing electrical infrastructure to recommend the right combination of fixtures and controls. A professional evaluation prevents costly mistakes like over-specifying fixtures or under-sizing control systems, ensuring your investment delivers maximum returns from day one.
Final Thoughts
Surface mount downlights ceilings transform your facility without the installation headaches that plague recessed lighting projects. You gain faster completion, lower labor costs, easier maintenance, and measurable energy savings that compound month after month. The three factors that matter most are matching fixtures to your ceiling type using proper spacing ratios, selecting high-quality LED fixtures with reliable drivers, and layering in motion sensors and smart controls from the start.
Start by measuring your ceiling height and material, then map your layout on paper before you drill anything. Document your baseline energy use so you can track monthly savings after installation, and plan for professional installation if your space involves concrete ceilings or complex electrical requirements. This preparation prevents costly mistakes and ensures your investment delivers maximum returns from day one.
We at PacLights offer customizable surface-mount fixtures tailored to your specific requirements, along with optional motion and daylight controls to optimize energy use. Contact our team for a free lighting layout and ROI assessment to guide your fixture selection and control strategy, and we’ll show you exactly how surface-mount downlights can transform your facility into a brighter, more efficient operation.
Disclaimer: PacLights is not responsible for any actions taken based on the suggestions and information provided in this article, and readers should consult local building and electrical codes for proper guidance.