

Modern offices demand lighting that combines functionality with clean aesthetics. Recessed office fixtures deliver both by disappearing into the ceiling while providing powerful illumination.
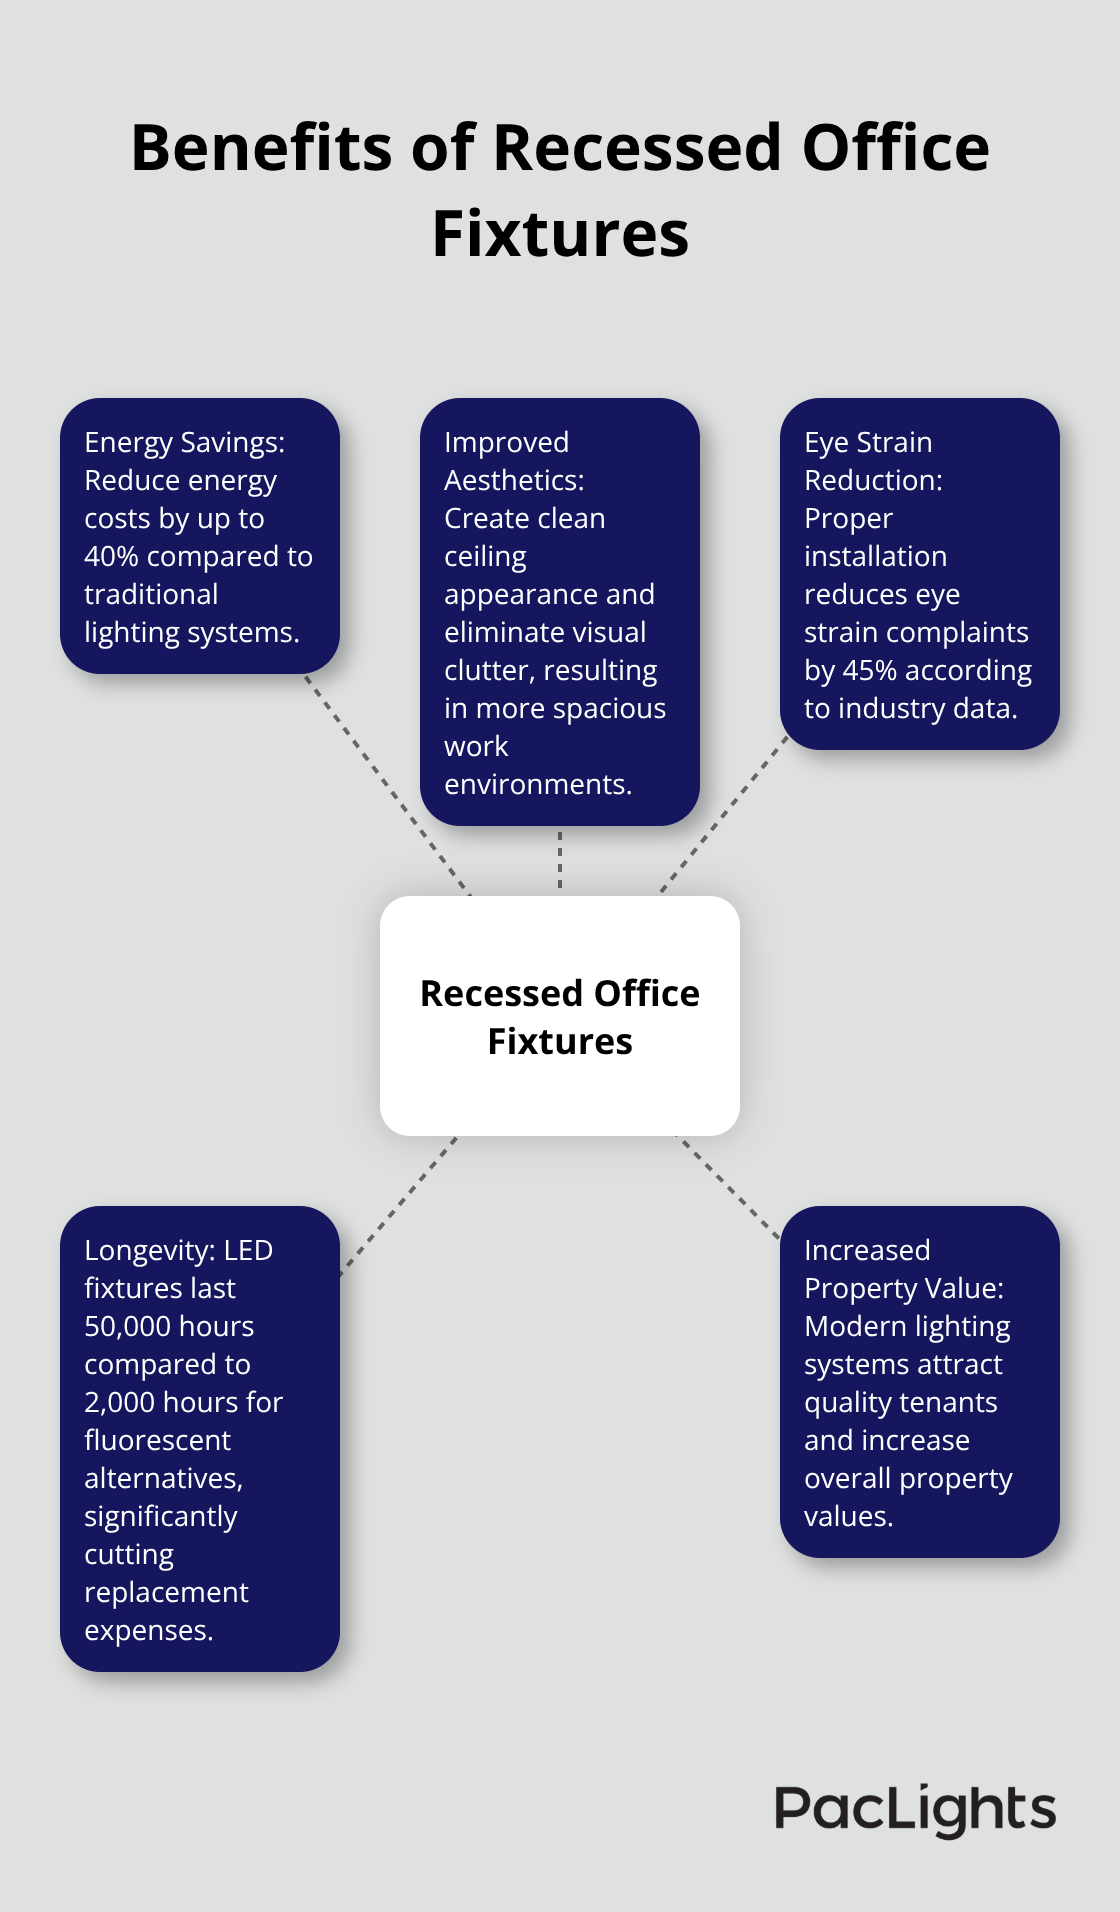
We at PacLights see businesses transform their workspaces with strategic recessed lighting installations. The right approach reduces energy costs by up to 40% while creating professional environments that boost productivity.
Which Recessed Fixture Type Works Best
Office success starts with the right recessed fixture for each specific function. LED downlights handle general illumination with 100-130 lumens per watt efficiency, which makes them the backbone of any office system. These fixtures provide uniform ambient light across workspaces, with 4000K color temperature that delivers optimal balance for productivity. Install them on 8-foot centers in standard 9-foot ceiling offices to achieve even coverage without shadows or hot spots.
Task-Focused Adjustable Spotlights
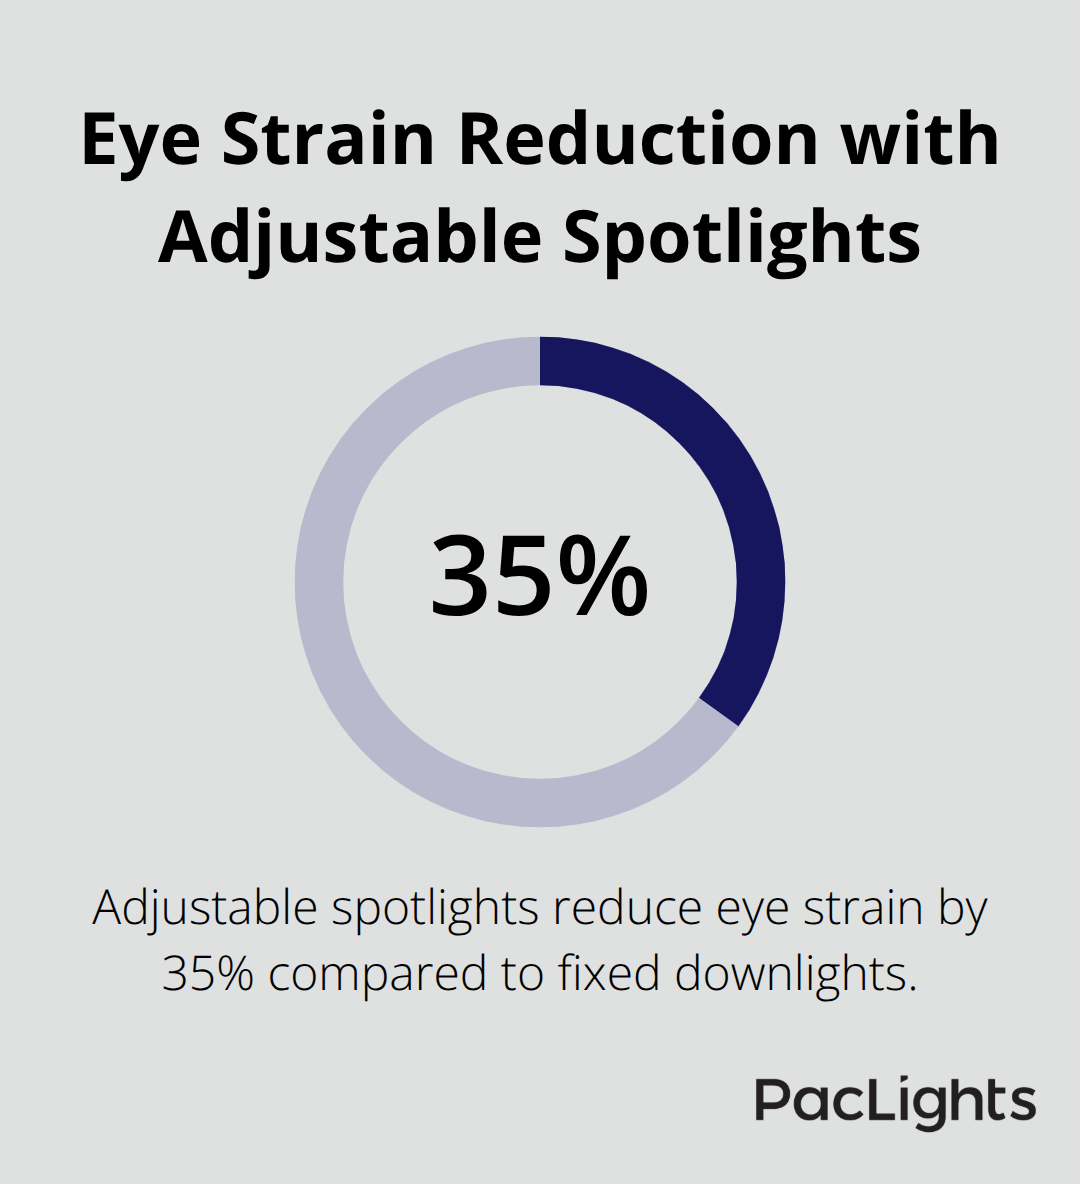
Adjustable recessed spotlights solve focused work areas where traditional downlights fail to perform. These fixtures rotate 30-40 degrees and tilt up to 25 degrees, which directs concentrated light exactly where employees need it most. Position them 24-30 inches from wall surfaces to illuminate desk areas without glare problems. The gimbal design allows precise beam control and reduces eye strain by 35% compared to fixed downlights (according to the Illuminating Engineering Society). Install these fixtures with separate switches to give workers direct control over task intensity throughout their workday.
Large Space Solutions with Troffers
Recessed troffer lights dominate large open offices and conference rooms where single downlights cannot provide adequate coverage. Modern LED troffers deliver 4000-5000 lumens per fixture while they consume only 35-45 watts of power. The 2×4 foot format covers more ceiling area with fewer fixtures, which reduces installation costs by 25% compared to multiple downlights. Choose troffers with prismatic lenses to minimize glare and create comfortable conditions for computer work. Space them 12-16 feet apart in open floor plans to maintain consistent levels across expansive work areas.
Color Temperature Considerations
Color temperature affects worker performance and comfort throughout the day. Cool white light at 4000K-5000K promotes alertness and focus during peak work hours. Warmer temperatures around 3000K work better in break rooms and casual meeting spaces where relaxation matters more than intense concentration. Tunable white fixtures allow you to adjust color temperature automatically (matching natural daylight patterns for optimal circadian rhythm support).
Once you select the right fixture types for your space, proper layout becomes the next critical step in your project success.
How Do You Calculate the Perfect Layout
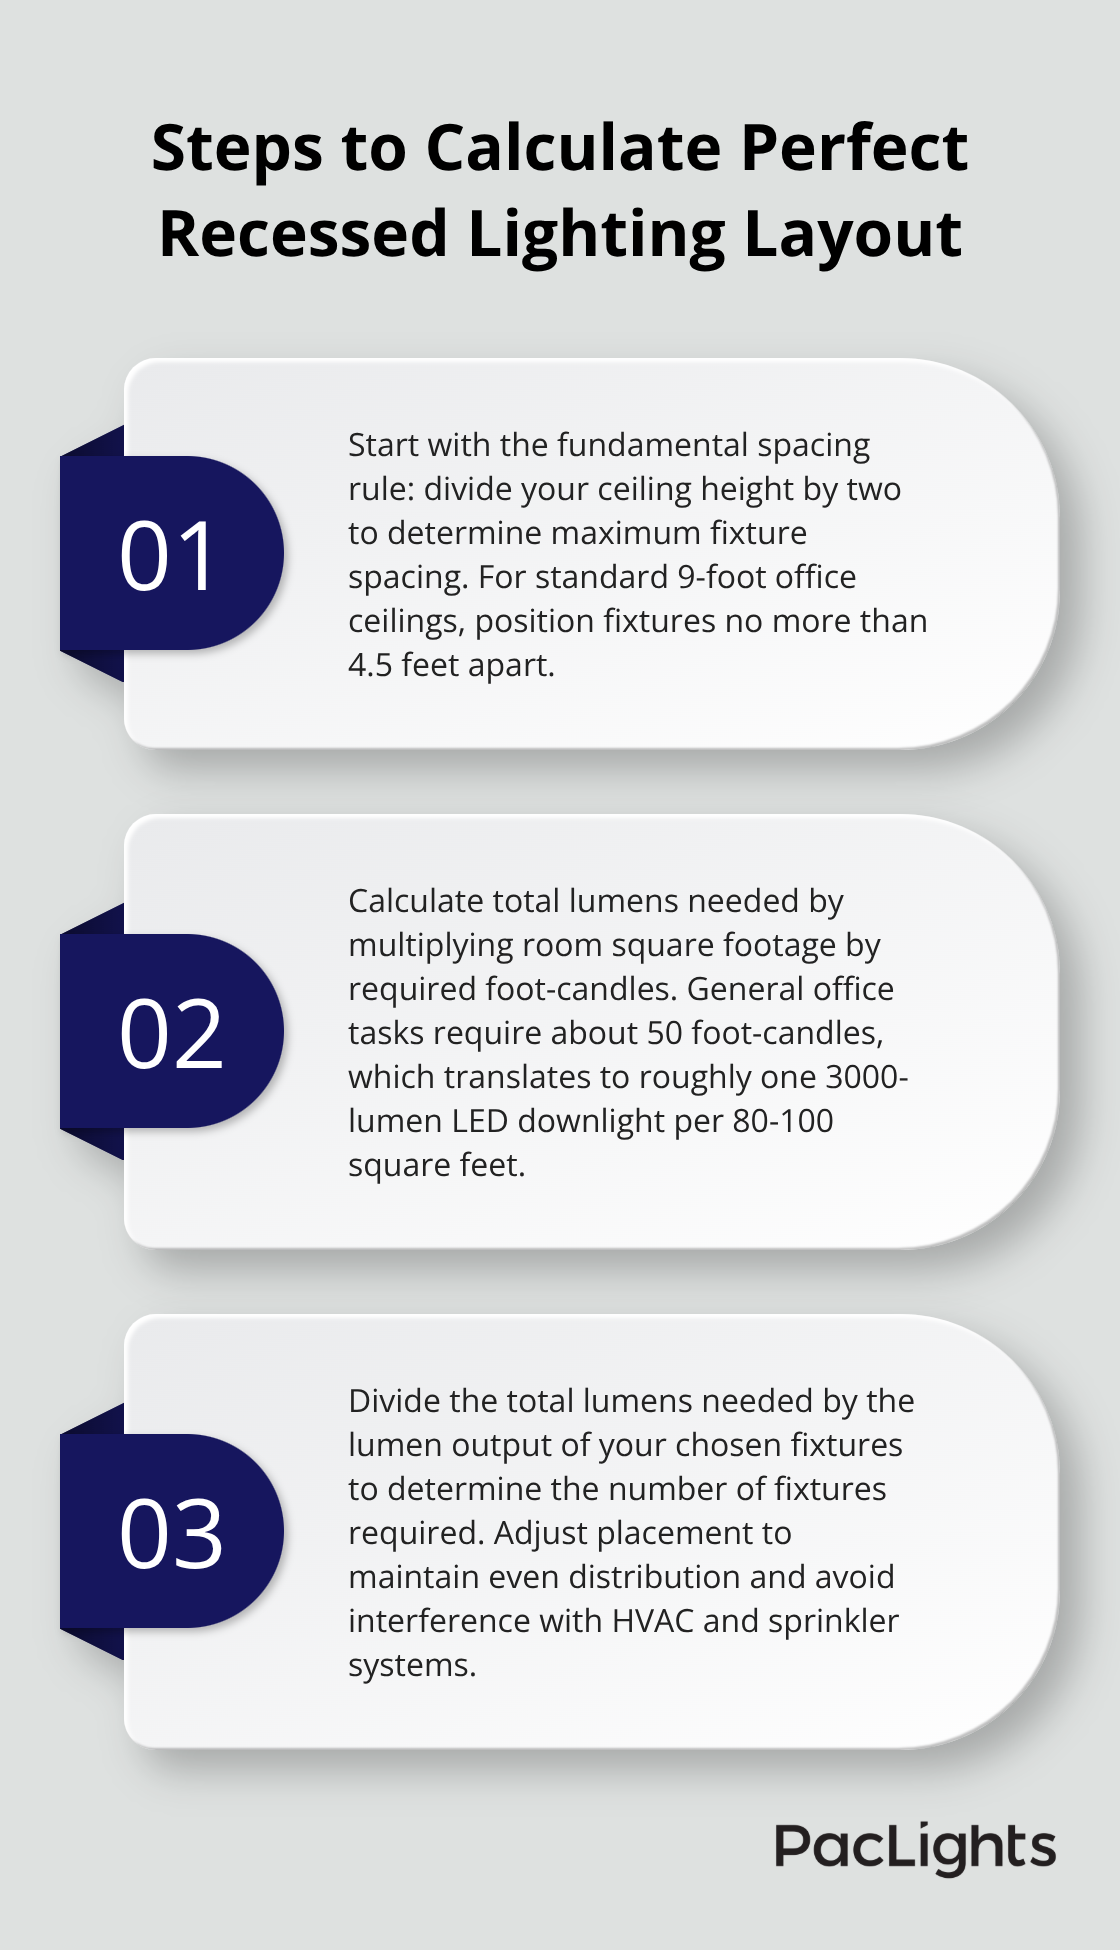
Proper recessed light layout requires precise calculations based on your ceiling height and workspace requirements. Start with the fundamental spacing rule: divide your ceiling height by two to determine maximum fixture spacing. For standard 9-foot office ceilings, position fixtures no more than 4.5 feet apart. This formula prevents dark spots and maintains uniform illumination levels across work surfaces. The Illuminating Engineering Society recommends 50 foot-candles for general office tasks, which translates to roughly one 3000-lumen LED downlight per 80-100 square feet of floor space.
Light Output Requirements for Different Areas
Office zones demand different illumination levels based on specific tasks performed in each area. General workstations need 30-50 foot-candles, while detailed work areas require 75-100 foot-candles for optimal performance. Conference rooms function well with 20-30 foot-candles for presentations, but increase to 50 foot-candles when participants need to read documents. Calculate total lumens needed by multiplying room square footage by required foot-candles, then divide by fixture lumen output to determine how many fixtures you need.
Integration with Building Systems
Coordinate recessed fixture placement with HVAC vents and sprinkler heads before you finalize your layout. Maintain 3-foot minimum clearance from air vents to prevent air currents from affecting light distribution and creating uncomfortable drafts at workstations (this also protects fixture performance). Position fixtures at least 18 inches from sprinkler heads to meet fire code requirements and avoid interference with water spray patterns. Plan electrical circuits to handle fixture loads efficiently – typically 15-amp circuits support 12-15 LED downlights, while 20-amp circuits accommodate up to 20 fixtures safely.
Ceiling Grid Considerations
Standard office ceilings use 2×2 or 2×4 foot grid systems that dictate fixture placement options. Align recessed fixtures with grid lines to maintain clean visual appearance and simplify installation work. Drop ceiling installations allow easier access to electrical connections but require fixtures rated for plenum spaces (where HVAC systems circulate air). Hard ceiling installations provide more permanent solutions but demand careful planning since modifications become difficult after completion.
Successful layout calculations set the foundation for professional installation that maximizes both performance and visual appeal.
What Installation Mistakes Kill Your Lighting Project
Professional recessed fixture installation starts with understanding your ceiling type and structural limitations. Drop ceiling installations allow quick access but require fixtures rated for plenum spaces where HVAC air circulates above tiles. Hard drywall ceilings demand precise cuts and careful planning since modifications become expensive after completion. Use IC-rated housings for insulated ceilings to prevent fire hazards and maintain thermal performance. Non-IC fixtures need 3-inch clearance from insulation materials according to National Electrical Code requirements. Concrete ceilings present the biggest challenge – plan all fixture locations before you pour concrete because retrofits cost 300% more than new construction installation.
Circuit Planning Prevents Costly Problems
Load calculations determine how many fixtures each circuit can safely handle before installation starts. Standard 15-amp circuits support 12-15 LED downlights at 10-12 watts each, while 20-amp circuits accommodate up to 20 fixtures safely. Install dedicated circuits for adjustable spotlights with separate switches to give workers control over task intensity. Use 12-gauge wire for runs longer than 80 feet to prevent voltage drop that reduces fixture performance by up to 15%. Ground fault circuit interrupters become mandatory within 6 feet of water sources in break rooms and bathrooms. Professional electricians complete installations 40% faster than DIY attempts while they meet all safety codes that protect your investment and insurance coverage.
Spacing Precision Creates Even Light
Measure fixture spacing with laser levels to achieve uniform light distribution across work surfaces. Position fixtures 18 inches from walls to prevent scalloping effects that create distracting light patterns on vertical surfaces. Stagger fixture rows in large open areas to eliminate shadows between workstations – offset each row by half the spacing distance for optimal coverage. Test light levels with a digital meter at desk height before you finalize fixture positions. The International Association of Lighting Designers reports that proper spacing reduces eye strain complaints by 45% compared to randomly placed fixtures. Mark all ceiling penetrations with temporary templates before you cut to avoid measurement errors that waste time and materials.
Electrical Safety Standards
Wire connections must meet local electrical codes to prevent fire hazards and system failures. Turn off power at the circuit breaker before you start any electrical work (this protects both workers and equipment from dangerous electrical shock). Use wire nuts rated for LED fixtures and wrap all connections with electrical tape for additional protection. Install junction boxes that support fixture weight – standard ceiling boxes handle up to 50 pounds while heavy-duty boxes support fixtures up to 70 pounds. Check all connections with a voltage tester before you energize circuits to verify proper installation.
Final Thoughts
Recessed office fixtures transform workspaces with professional aesthetics and measurable performance benefits. Energy savings reach 40% compared to traditional systems, while proper installation reduces eye strain complaints by 45% according to industry data. The clean ceiling appearance eliminates visual clutter and creates more spacious work environments.
Commercial spaces achieve strong returns through reduced electricity bills and lower maintenance costs. LED fixtures last 50,000 hours compared to 2,000 hours for fluorescent alternatives (which cuts replacement expenses significantly). Property values increase when buildings feature modern systems that attract quality tenants.
Professional planning and quality fixtures determine your project success. We at PacLights provide comprehensive lighting solutions that help you make informed decisions about your workspace transformation. Start with a detailed space analysis to identify your specific requirements, then select fixtures that match your performance goals and budget constraints.
Disclaimer: PacLights is not responsible for any actions taken based on the suggestions and information provided in this article, and readers should consult local building and electrical codes for proper guidance.